Command Line Boot Camp For Cybersecurity
Introduction
In this post we will be covering the basics of command-line to stream-line those interested in getting into cybersecurity. To do this we will start with covering some basics on what makes up a computer and how they function. After this we will then jump into some basic commands for the command line interface (CLI) for Linux, where to go for more information, how to use CLI efficiently and then close with some next steps and further resources. By the end of this post you will be able to explain the basics of Linux CLI and be able to use it efficiently as you learn to hack. This post does not condone hacking for malicious purposes but rather is intended for those interested in becoming what is known as an ethical hacker.
For any skill learned, we attach meaning to words to describe reality that we can then use to communicate with one another. Throughout this post we will cover common terms that we will build off of by defining important terms once and either using them without explanation or its acronym from then on. You can go HERE to look up unfamiliar words, or for more computer security related terms, you can go here. You can go to this Reddit post to understand the different branches of hacking that can then be used to find vulnerabilities and increase security.
Some Basic Building Blocks
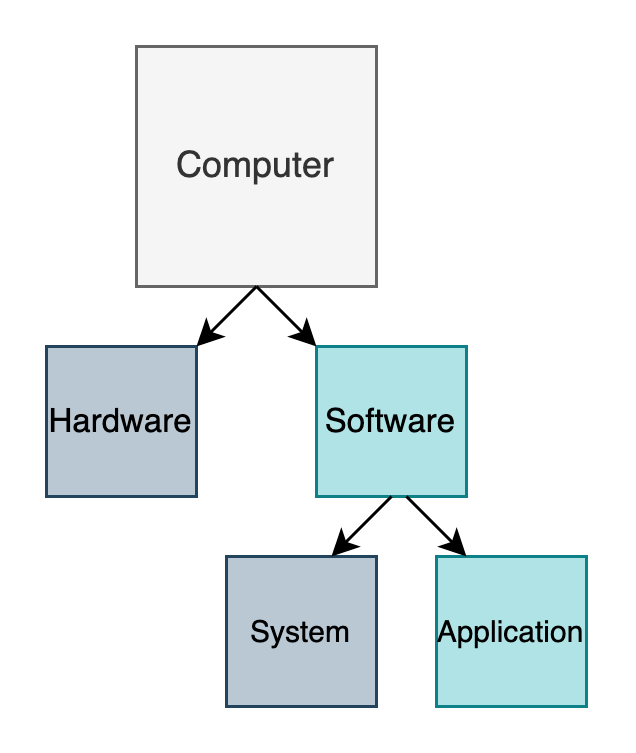
At the most basic level, computers are made up of hardware and software. The hardware are the physical parts of the computer made by the manufacturer and the software are the systems that are stored on and operate using the resources of the hardware. Of these systems there are two types: System software, the programs that maintain and enable the use and function of the hardware and application software, the programs that the end-user interacts with to use the computer. If the system software fails, the whole computer crashes; if an application system fails, that program crashes but not the computer. There are different types of system software such as Windows, Mac, and Linux.
uses the following diagram to show the layers between the user and the most basic part of a computer, the hardware.
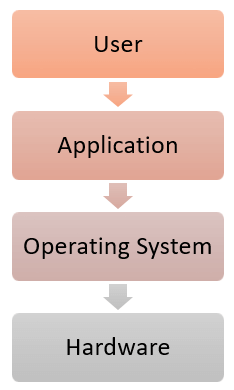
There are two parts that make up an operating system, the shell and the kernel. The shell is the outermost part of an operating system (OS) whereas the kernel is the innermost part of the OS that communicates with the hardware. In order for the end-user to use the computer, they use a terminal (an interface) which then gives commands to the shell which then turns this into commands which the computer (the kernel) can understand and then use (using the hardware). Williams also provides a helpful diagram for this as well.

There are different types of interfaces such as a graphical user interface (GUI) and command line interfaces. The most commonly used interface is the GUI which are the icons, mouse, and visual content on a computer that the user uses to operate the computer. CLI also can be used to operate the computer by using typed commands instead of a GUI. The CLI is powerful because at a minimum it can do everything the common GUI does and in its prime it gives you greater capability to manage and manipulate computers for your use while also saving you time and effort. One example of this is the ability to automate tasks that would otherwise take hours using a GUI (such as making a thousand files one by one using a GUI versus the seconds it takes using CLI). Essentially, CLI is a much more efficient and powerful means of harnessing the capabilities of computers. As it concerns hacking, using CLI is essential not only because of the amount of tasks that need to be done but also because it allows you, the hacker, to remotely use another computer (the target machine) without giving indication of your presence on the target machine's GUI. See here for more pros and cons of GUI and CLI.
CLI First Steps
We will focus our attention here on using Linux's CLI because a majority of tools used for hacking are made with and for Linux because Linux is open source whereas Windows is not. You can go here for an introduction to CLI in Windows. If an OS is not open source, that means that you will see and/or being able to change the underlying parts of the system that the developers want you to see and be able to change. Basically, it's like trying to do a heist with the limitations of a bumper car versus an actual car, not to mention one that you built uniquely for that (Knight rider anyone???)
It is important to know that Linux is case-sensitive where as Windows is not. This means that Password and password are two different words in Linux OPs but not in Windows. Below are some common commands you will use though the emphasis in this section is to introduce you to using commands and give you an idea of what to expect for commands you know or will learn in the future. You can go HERE to set up Kali Linux, a common OP that hackers use and the one we will be using in the examples.
To get started, open a new terminal and you will be greeted by a fresh command prompt as seen below.
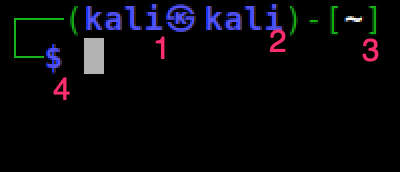
Here we see that
- We are signed in as the user "kali"
- The name of the computer is "kali" as well
- We are in the home directory represented with
~ - And we see that the command prompt is ready to receive a command
There are seemingly endless commands that can be used in CLI so it is important to be familiar with steps you can take when you are unsure or forget what to do. Using CLI can do at least what the GUI can do and often more. Such as...
We can use ls to show the contents of the current directory (the equivalent of a folder in Windows). And the -l switch (explained below) to show more information of the contents and or hidden files.

Here we see that we are in "TheDirectoryWithin" directory and see that there is another directory and a text file.
We can use cat to show the contents of a document.

We can use cd <directory> to enter a specified directory or cd .. to move back up a directory.

Here we first listed the contents of the directory Testing and then used cd to move into folder TheDirectoryWithin. We can see that we did indeed move into this folder by the addition of the directory to our path.
There are two distinctions that are helpful to know when navigating directories, absolute path and relative path. Path refers to the location of where a directory or file is in relation to root. Absolute path is the complete path of a directory whereas relative path is the location of a directory in relation to the currently directory you're in (also known as cwd, current working directory). In the above example, the absolute path would be /home/kali/Desktop/Testing/TheDirectoryWithin The relative path of this directory from /home/kali would be Desktop/Testing/TheDirectoryWithin. Besides representing root, the forward slashes also separate the directories from one another.
| ~ | represents your home folder | ~/Desktop The cwd is Desktop which is in the home directory. |
| . | represents the cwd | cd . If the cwd is Desktop, using this command will not move you out of the Desktop directory because Desktop is the cwd. |
| .. | represents the parent directory of the cwd | cd ../../../Downloads Using the above image, using this command will move us from TheDirectoryWithin up a level to Testing up a level to the Desktop up a level to home and into the directory Downloads which also is in the home directory alongside Desktop. |
For more information about absolute path and relative path, Abhishek Prakash has a helpful article here.
Due to the vast range of what CLI can do and the different tools you'll use, knowing where to get more information is essential. We can do this with the man command plus the relevant command. Let's do this using ls.

Here we see that we get a fuller name of the command, the synopsis (or syntax, where to put which parts where when using the command to achieve your desired result), a description of it, and different ways you can modify it with switches. Switches (also known as flags) are ways you can customize each command to get it to do more, less, or something specific. You can go here for a post on the differences between what switches, options, and arguments are.
Sometimes you may already know what you're looking for in a man page but can't find it, you can use / <key word> to search for the instances of that key word and use n to scroll to the next instance of that word or phrase.

Here we searched for instances of "author" and it highlighted the first to instances of the word. Hit n to go through each instance.
Another way you can search through the contents of a man page or another document is using the grep command in conjunction with the | pipe operator located usually above the enter key. Using the grep command will run a search through the specified document and return the search results of lines where the key word or phrase appeared. The pipe command will take results from one command and "pipe" them into another command.

In the image above, we used ls to show the contents of the /bin directory and piped the results into the grep command to look for the word more. Note that if you want to search for a phrase that has spaces, use quotation marks otherwise the command prompt will consider each of the following words as a different argument.

Here we tried to used the grep command to search for any exact matches of the phrase "more of" but initially didn't get any results because we didn't enclose our phrase in quotation marks. Whereas our results after doing so reflect that there are no instances of the phrase "more of" in the /bin folder.
Overall, the man pages and or Google will be your friends as you learn new commands and hone your CLI abilities. Including the key words "linux" and "syntax" are helpful additions when searching Google depending on what you're looking for. It is worth noting that some tools will also include ways you can find more information and or help.
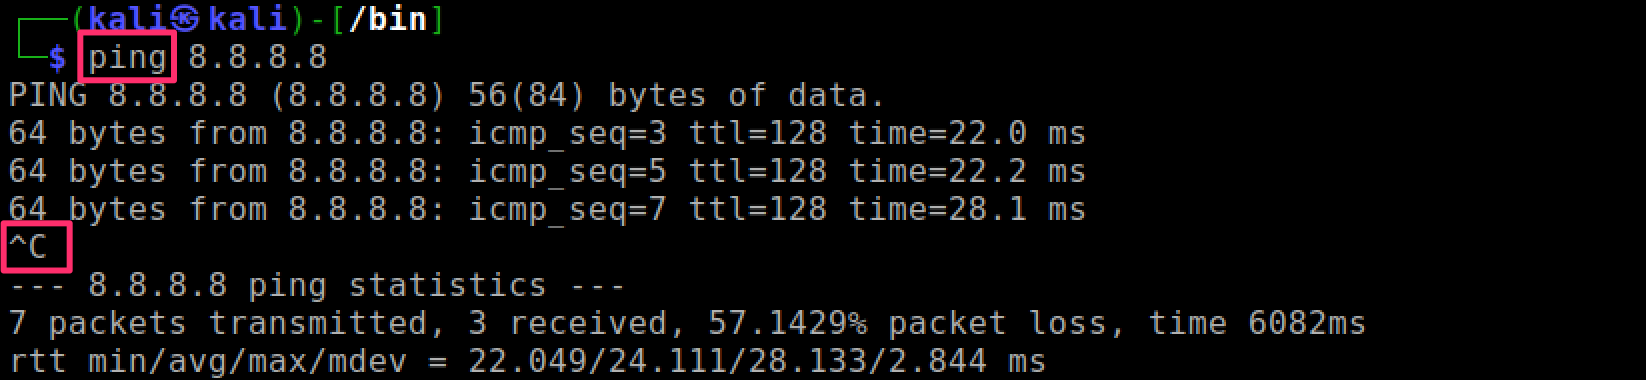
Sometimes you might want to stop a running command. You can do this with Ctrl + C on Windows and Cmd + C on Mac respectively. Also, you can use Cmd + C if you wanted a fresh command prompt after typing a command instead of backspacing everything. Below we started pinging Google's server and decided to cancel it using Cmd + C represented by ^C.
Overall, Cmd + C will be the most common way to cancel a command and or get a new command prompt although sometimes you may have to use other means such as using q while in a man page or exit while in Metasploit. The reasons for this includes either developer choice and or starting a program from which you need to exit if to get back to a fresh command prompt. If there is another command needed to get back to a fresh command prompt, it is usually indicated in the tool.
Now that we have laid down some foundations for using the command line, we will lay out some additional basic commands that will be commonly used. Going along with the intentions stated above, the goal in this section is not to give a comprehensive list of commands and their use but to introduce readers to common commands that they can use as a launching pad into other commands and infer what is possible with CLI.
As in the GUI you can make a folder (directory) with the mkdir command.

Create a file in that or a directory using the touch command.

Move a file to a different location using the mv command.

Rename it using the same command.

Copy it with the cp command.

And remove it with the rm command.

Although for the most part the commands do what they sound like, note that some commands have oddities such as the mv command that can be used to rename a file and or overwrite a file if the destination has a file of the same name. Also, if there are more than one file you want to move, copy, or remove include spaces in between the file names and include the destination at the end.
Sometimes you may need to find something, you can use the find command to do this. Without using any arguments, the find command will return all the directories and files within the current directory and subdirectories (recursively).

We can specify if we are looking for a file or a directory using the -type argument with the corresponding character. Remember that the single dot represents the cwd.

Furthermore, you can expand the flexibility of the search using operators such as asterisks as a placeholder for any number of characters/lengths and question marks to represent only one character. Let's search for all files that with a two digit extension (represented with .??).

The search result show us that there are two files with a two character extension, one written in JavaScript and another written in Python. Note that the names of these files are different lengths, this is because we used an asterisk wildcard to signify the file could be any number of characters. To find more information about the find command and/or how to use the various search commands in Linux you can go here.
Other special characters you can use not only with the find command but any command include those in the following helpful chart from TryHackMe in the Linux Fundamentals Part 1 room.
Symbol / Operator | Description |
& | This operator allows you to run commands in the background of your terminal. |
&& | This operator allows you to combine multiple commands together in one line of your terminal. |
> | This operator is a redirector - meaning that we can take the output from a command (such as using cat to output a file) and direct it elsewhere. |
>> | This operator does the same function of the > operator but appends the output rather than replacing (meaning nothing is overwritten). |
Efficient CLI Use
One of the keys of getting into Cybersecurity is not merely being able to use Linux but being able to use it efficiently. The following will help you toward this. Besides the numbering of lines, this content was from tutorialLinux's helpful walkthrough found here.
| nl | You can use this command to number the lines of a document. | nl file1.txt This will function similarly to cat by displaying the contents of a file but now with numbers for each line |
| Ctrl + d | Exits the current session | This means that if you are on your local computer's CLI, it will exit the CLI session. If you are logged into a remote computer's CLI, it will log you out of that CLI session and return you to your local computer's CLI. |
| Tab | Hitting tab while beginning to type will autocomplete it for you if there it is unambiguous or will list the possible options if you hit it twice. | If you were in the home directory and there was a unique Directory named "unique_directory" typing the following and hitting tab would auto complete the name for you. cd uni |
| clear, Ctrl + l | If you want a clear screen you can hit either of these for that. | Ctrl + l will scroll you down the CLI to achieve a clear screen whereas the clear command will clear the CLI for this (meaning, you can't scroll up to see what you've done). |
| Ctrl + a | Navigates to the beginning of the line | If you started typing a command and forgot to add something to the beginning, using Ctrl + a will bring you to the beginning. |
| Ctrl + e | Navigates to the end of the line | This command is the inverse of Ctrl + a |
| Alt + f | Moves you through the line forward by spaces/symbols. | Sometimes there is a spot in the middle of the command you are typing that you want to modify, this command allows you to navigate by spaces/symbols throughout the line (going forward). |
| Alt + b | Moves you through the line backwards by spaces/symbols. | This command is the inverse of Alt + f |
| history | Shows you a history of the commands you've used in the current session. | Sometimes you might want to look back at what commands you used to get where you currently are. You can use the history command to do this. |
| Ctrl + r | Allows you to search through your history. | Other times you may know what command you want to repeat, you can use Ctrl + r to search through your history quickly. Start typing the command and progressively hit Ctrl + r to recall previous commands that fit your search. To get a new command prompt hit Cmd + c or Ctrl + g to return to what you were typing. Alternatively, you can also use the up arrow to scroll through your command history as well. |
Using CLI Like a Pro
Sometimes being efficient at CLI is just not enough and you need to be just plain cool. The following commands may help you with that endeavor but not guarantee it. These also were from a helpful tutorialLinux video that can be found here.
| sudo !! | Runs the previous command with sudo. | Sometimes if you forgot to add sudo to a command you can use sudo !! to rerun it but now with sudo. |
| Ctrl + k | Deletes to the end of the current line | If you are in the middle of the line and you want to delete the remainder of the line you can use Ctrl + k |
| Ctrl + y | "yanks" the text you just deleted back | If you did the previous command (Ctrl + k), you can use Ctrl + y to get the text back. |
| Ctrl + u | Deletes text to the beginning of the line. | This command is similar to Ctrl + k but does the inverse. It deletes to the beginning of the line. |
| Ctrl + w | Deletes backward by word. | If you want to delete backwards to a certain point you can use Ctrl + w to do this by word. If you want to include symbols you can use Ctrl + space will include do the same but include symbols. Alternatively you can also use Alt + Backspace which stops also at special characters. |
| less + f | Similar command to tail that shows you the end of a document but with more flexibility. | Using less + f will allow you to not only see the end of the document but also scroll backwards through it by using Ctrl + c and when you want to "reattach" you can use Shift + y. |
| Ctrl + x + e | Takes the current command prompt into the set text editor. | This is usually used for longer commands. When you quit the text editor it will take you back to the command prompt and run the command. Not recommended with Nano. |
| Ctrl + . | Adds the last used argument to the current command line | If you want to use the same argument for a new command you can use Ctrl + .. |
| reset | Resets the current session without losing your session history. | Sometimes your session can get a little messed up. If this happens the reset command usually fixes it. |
CLI for Hacking
By this point you should be able to comfortably navigate CLI and where you're not you should know at least where to go or what to do. In order to to take the next step in your journey to learn CLI for ethical hacking you need to first have a solid understanding of a variety of topics related to cybersecurity and from that vantage point discern and detect vulnerabilities in systems, networks, etc. Since the concept of cybersecurity is to prevent unwanted visitors on your systems and networks, you need to know the common steps organizations will take to prevent being hacked in order to circumnavigate them and bypass them undetected. You can go here for some ideas of what some next steps are or HERE for a helpful getting started online resource that covers many essential skills for getting into ethical hacking.
Further Resources
- For learning CLI and practice, go to Overthewire.
- For various courses related to Cybersecurity and pen-testing practice, visit TryHackMe.
- For additional practice you can go to HackTheBox.
- The HackersArise blog provides a host of content to get you primed for hacking.
- You can go HERE for a list of Linux CLI commands.
- You can go to this Reddit forum for another place to start for how to get into hacking.
- Here is a Python Primer for beginners.